How to Configure Distributed Fail2Ban: Actionable Threat Feed Intelligence
Kent Ickler //
ADVISORY: The techniques and tools referenced within this blog post may be outdated and do not apply to current situations. However, there is still potential for this blog entry to be used as an opportunity to learn and to possibly update or integrate into modern tools and techniques.
How to Configure Distributed Fail2Ban: Actionable Threat Feed Intelligence
Fail2Ban is a system that monitors logs and triggers actions based on those logs. While actions can be very customized, the typical use case is monitoring an auth-log for authentication errors and configuring a system to block the offending source IP.
Fail2Ban works great deployed in this fashion. However, I wanted to take it a step further. With the below method, you can use Fail2Ban to block the offending source as usual, but then notify other Fail2Ban nodes that they should also block the offending source from future connections. This is a base set of code you can build on to distribute your Fail2Ban bans across multiple Fail2Ban nodes.
Proof of Concept & Method
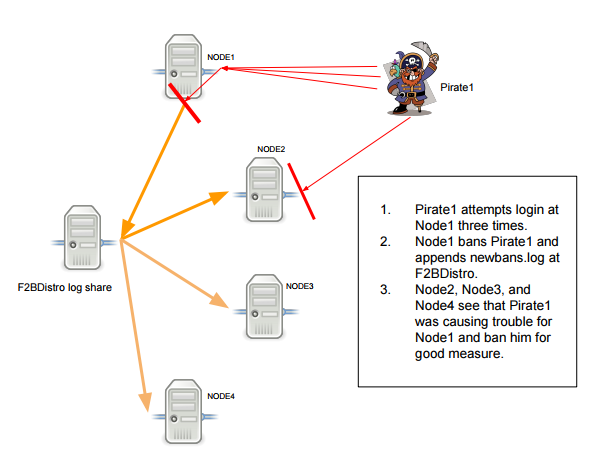
This is a proof-of-concept that you can build to scale laterally or vertically. This method uses SSHFS to remotely mount a file-share that can be read and appended by multiple systems concurrently. The configuration adds an action to write to a “global” ban log, where other Fail2Ban nodes monitor and process the bans. The newbans.log global log file is appended by a Fail2Ban action that calls a system component called “logger” which is used to generate a consistent-format entry in a system-log; and in our case the standard output. The logger standard-output is redirected to append to the global newbans.log (on the file-server)
logger -s -i "HOST <ip> PORT <port>" 2>> /opt/logdistro/logs/newbans.log
In our configuration, we are using Fail2Ban to monitor SSH as its primary trip-wire source. While Fail2Ban will wait for three invalid SSHd attempts logged in the /var/log/auth.log file, it will only wait for the single entry in the newbans.log file. This is because the newbans.log log file only includes log entries that have already been banned by a cooperating Fail2Ban node and therefore it isn’t necessary to wait for more entries. Increasing the “maxretry” for newbans.log could potentially allow rules like “Only global-ban if a source had three invalid SSH attempts on two different servers within 30 minutes”.
Fail2Ban includes options to automatically un-ban sources after a given time. Each Fail2Ban node independently manages its own ban and unbanning processes. The Fail2Ban “server” node, in this case, is just a storage location for the global newbans.log file. With this method, we use SSHFS to mount the log file across the network using SSH. Other methods exist, but this was quick, and secure method to “share” the logfile. I cannot comment on the scalability of hundreds of nodes in this practice. Presumably, there is a limitation to the number of collaborating Fail2Ban nodes with SSHFS mounted files that this system could support before becoming inefficient.
Headaches and Tweaks
Some tweaking may be necessary. Some distro’s will process log polling differently and you may need to adjust the “backend” variable accordingly. The “Polling” method worked for most of our nodes. On a few other Linux distros however, changes to the global newbans.log log went unnoticed. This was due to to the “backend” method not acknowledging that the SSHFS mounted file had changed. More information on the “backend” methods can be found on Fail2Bans website.
We are calling the same iptables-multiport action when banning a source found in newbans.log therefore the collaborating Fail2Ban nodes will also enter their own entry in newbans.log. If a node creates a ban in response to another node’s newbans.log entry the ban will use multiport to ban all ports, not just the initial connection port. This will cause the log to be bit noisy but allows each node to report back that it propagated the ban. This can be configured in a multitude of ways. Additionally, the action to add the entry in newbans.log can be applied to other Fail2Ban actions.
Get on with it!
The configuration here is relatively simple. We first setup an SSH server where we will host a “global” newbans log file. We will create a user and a private/public keypair that will allow other Fail2Ban nodes to securely access and append the new log file. Then, moving to the Fail2Ban node we will take the private-key and setup the remote file-share mount using SSHFS and fstab. Lastly, we will need to setup the Fail2Ban configuration files to look at the new files and trigger things accordingly– for that I’ve provided a GitHub clone to get you moving quickly.
Setup new server:
In this case, I chose a DigitalOcean droplet to be the storage location of the global log file. It doesn’t have to be in the cloud however. Hosting the file on your local network could reduce delay if you do not configure log rotations for the newbans.log file.
sudo -s

mkdir /opt/logdistro

touch /opt/logdistro/newbans.log

useradd f2bcourrier

chown -R /opt/logdistro


su f2bcourrier ##(operate as new f2bcourrier user)

cd ~/

ssh-keygen -t rsa -b 4096 ### (you could use RSA too!)

cat ~/.ssh/id_rsa.pub > ~/.ssh/authorized_keys


cat ~/.ssh/id_rsa

#Copy this output (Private-key), we’ll need it soon

exit
Setup the Fail2Ban Node:
Pre-Req’s
sudo -s

apt-get install sshfs

apt-get install fail2ban

mkdir /opt/logdistro

mkdir /opt/logdistro/logs

mkdir /opt/logdistro/keys

nano /opt/logdistro/keys/f2bcourier.key
#Paste the contents of your “id_rsa” from the server.
Next, update /etc/fstab to mount the new log data:
nano /etc/fstab

 ##--- Add line below; be sure to change SERVER IP, ect:

f2bcourrier@[SERVER IP]:/opt/logdistro /opt/logdistro/logs fuse.sshfs auto,reconnect,allow_other,StrictHostKeyChecking=no,cache=no,IdentityFile=/opt/logdistro/keys/f2bcourier.rsa,defaults,_netdev 0 0'
Next, let fstab mount the remote file location:
mount -a
If you get any failures here, you’ll need to umount /opt/logdistro/logs before trying again.
Test it out!
touch /opt/logdistro/logs/test
Back on the server, you now should see a file in /opt/logsdistro/!
Fail2Ban Configuration
The remainder of the node configuration will involve building and/or rebuild some configuration files. I have added these files and an ansible playbook template in a GitHub repo. A list of the files in the GitHub repo is below. Lastly, we need to either comment out the lines of the defaults-debian.conf file in /etc/fail2ban/jail.d or mv the file out of the Fail2Ban folders. Below we will move the file to the “old” folder in the GitHub clone.
iptables-multiport.conf
Fail2Ban Action file that includes information to write to the new “global” log file.
Replaces /etc/fail2ban/actions.d/iptables-multiport.conf
newbans.conf
Fail2Ban Filter for the new “global” log file.
Move to /etc/fail2ban/filter.d/newbans.conf
Sshd.conf (OPTIONAL)
Fail2Ban Updated filter for SSHD, includes some additional SSH failures for key-based-auth.
Replaces /etc/fail2ban/filter.d/sshd.conf
Jail.local
Fail2Ban Jail configuration to create the new global-log monitor instance.
Move to /etc/fail2ban/jail.local
Fail2ban-with-distro.yml (OPTIONAL)
Ansible Playbook to remotely deploy a Fail2Ban Node with the global ban configured. If you use this playbook, be sure to update the [SERVER IP] on the /etc/fstab configuration and have your private-key available for transfer by ansible. This playbook includes all necessary processing to take a node without Fail2Ban installed to a Fail2Ban protected node cooperating with the newbans.log log file.
Download the files and move them into their respective locations:
cd /opt

git clone https://github.com/Relkci/F2BDistro.git

cp /opt/F2BDistro/f2bfiles/iptables-multiport.conf /etc/fail2ban/action.d/

cp /opt/F2BDistro/f2bfiles/newbans.conf /etc/fail2ban/filter.d/newbans.conf

cp /opt/F2BDistro/f2bfiles/sshd.conf /etc/fail2ban/filter.d/sshd.conf

cp /opt/F2BDistro/f2bfiles/jail.local /etc/fail2ban/jail.local

mkdir /opt/F2BDistro/old

mv /etc/fail2ban/jail.d/defaults-debian.conf /opt/F2BDistro/old
Restart Fail2Ban and check Logs
service Fail2Ban restart
Check the Fail2Ban log to ensure everything loaded properly:
tail /var/log/fail2ban.log
Test
Test and watch. When three invalid authentication attempts are now made on SSH, the Fail2Ban node will locally block the source IP for 30 minutes. It will also add an entry in the newbans.log file for other Fail2Ban nodes to read. When they see the new entry in newbans.log, they will immediately block the source IP for the 30 minutes.
You can tail the Fail2Ban log file at /var/log/fail2ban.log and watch this happen real-time. There is a delay. In my test deployment of 10 servers, all nodes had blocked an offending IP within 3 seconds of the third authentication attempt on the initial node.
To manually trigger a distributed ban you can use the below line.
logger -s -i "HOST <ip> PORT <port>" 2>> /opt/logdistro/logs/newbans.log
Build Wide
I’m not sure how busy your primary server will get, but you can expect it will retain one SSH connection per Fail2Ban node for the SSHFS remote log file. If the file begins to grow significantly large, it may require log rotation to reduce the traffic involved in monitoring the file.
Build Tall
Because the newbans.log log format is pretty simple, you can program any application to write to this log and have an IP blocked by all nodes. The initial block doesn’t have to come from a Fail2Ban node. Utilizing the logger syntax below, you can add newbans.log entries as needed.
logger -s -i "HOST <ip> PORT <port>" 2>> /opt/logdistro/logs/newbans.log
SSHFS: https://github.com/libfuse/sshfs
Fail2Ban: https://www.fail2ban.org/
Want to learn more mad skills from the person who wrote this blog?
Check out this class from Kent and Jordan:
