Defusing a Bomb Through Trigger Bypasses and Sensors
Mike Felch //
Meet ‘The Box’ Bomb
For the last few years at the security conference DEF CON in Las Vegas, the Tamper Resistant Village has hosted a challenging contest called ‘The Box’ where contestants mimic an EOD technician in an attempt to defuse a bomb. The fake bomb consists of trigger sensors, traps, electronic components, and locks, that together need to be reverse engineered in order to disable a simulated explosion. Each team of two members has ten minutes to work together to solve each component of the challenge using their own tools and are not allowed to remove tape or cut wires. If the bomb explodes, they must go to the end of the line. Any new teams get to immediately jump to the front. For the last few years, there were no winners and only hundreds of failed attempts. Beau Bullock and I came ready, equipped and motivated to break the losing streak. We were the only team in three years to defuse the bomb and wanted to share our experience. This post should help provide some tips and encourage attendees to give it a shot next year!
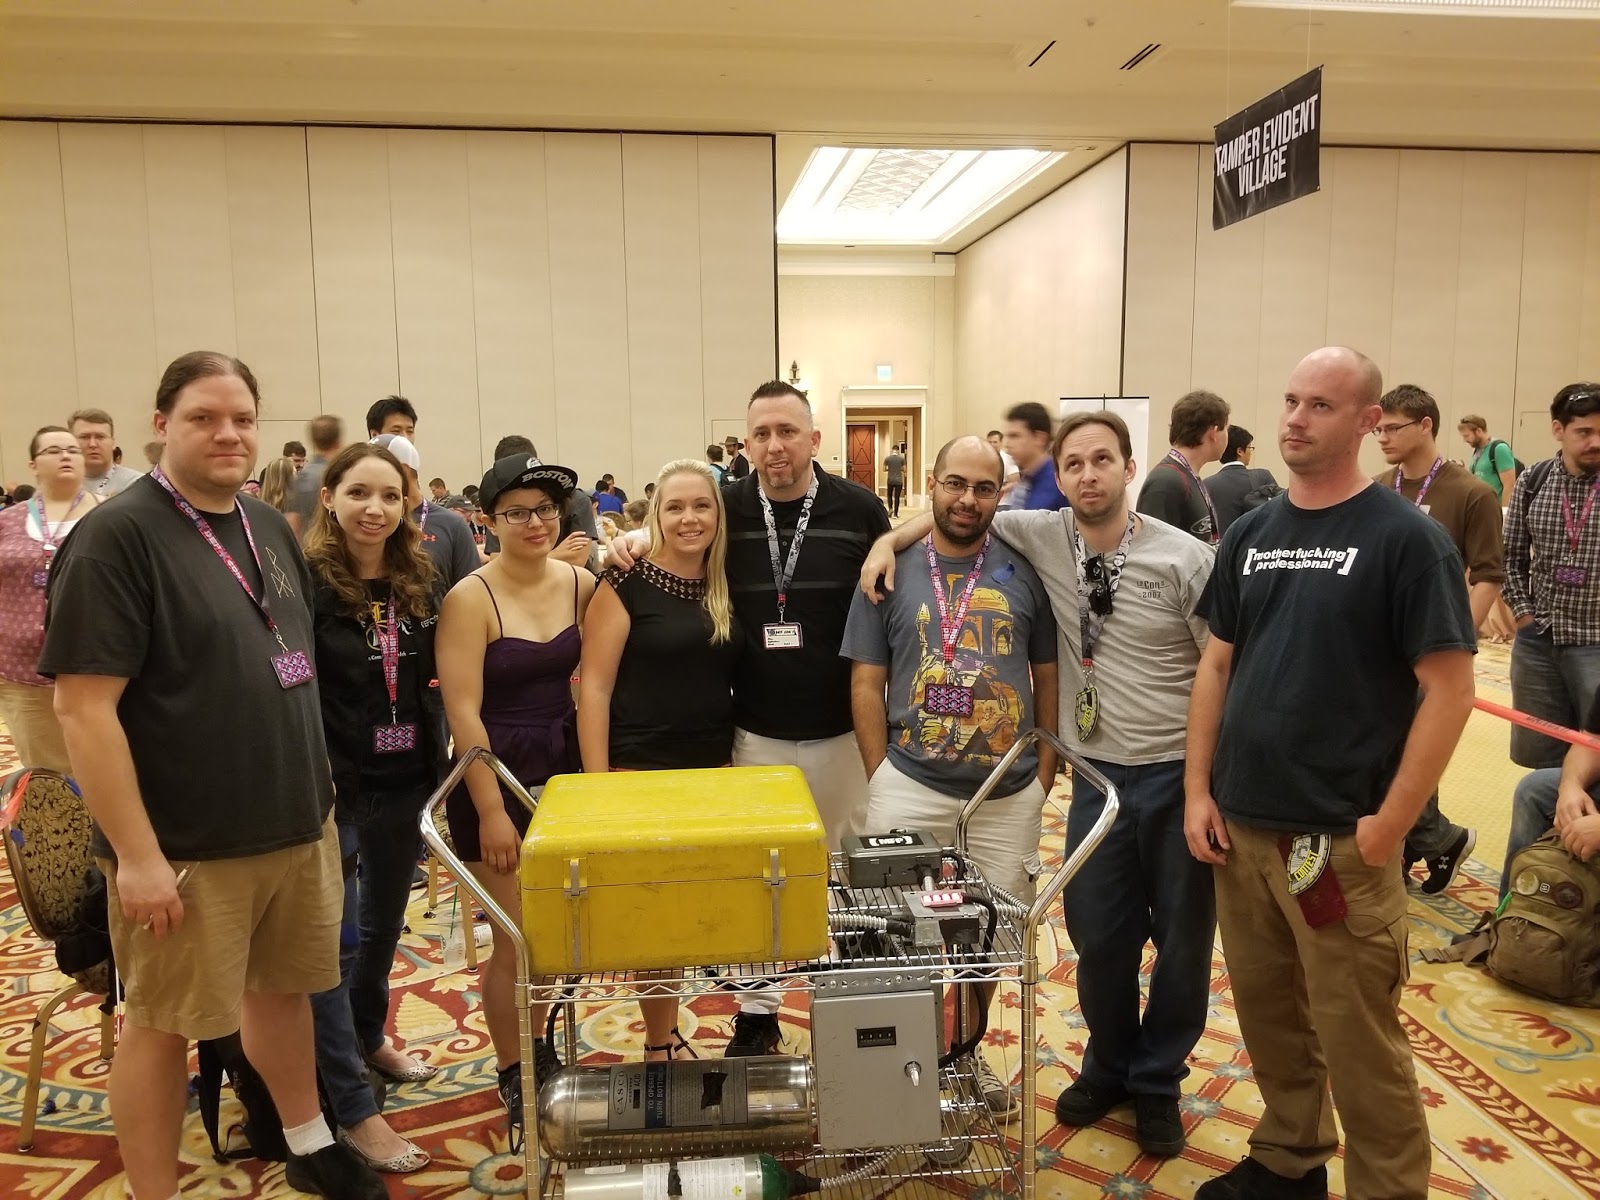
Mike Felch, center with his wife, Angela.
Our Strategy
We came in with a game plan! These strategic moves were the basis for the decisions we executed during our game play. Without them, we may have had a much different outcome.
1) Start Early
The contest kicked off Friday morning at 10am and we wanted to get started early. It turns out this was a great opportunity to get familiar with the different components of the challenge because of the limited number of new teams.
2) Fail Fast
In order to progress through and eliminate the endless possible combinations of what could be a portion of the challenge and what wasn’t, we decided to take the approach of failing fast. We learned what not to do very quickly and could focus our efforts on unlocking new key areas.
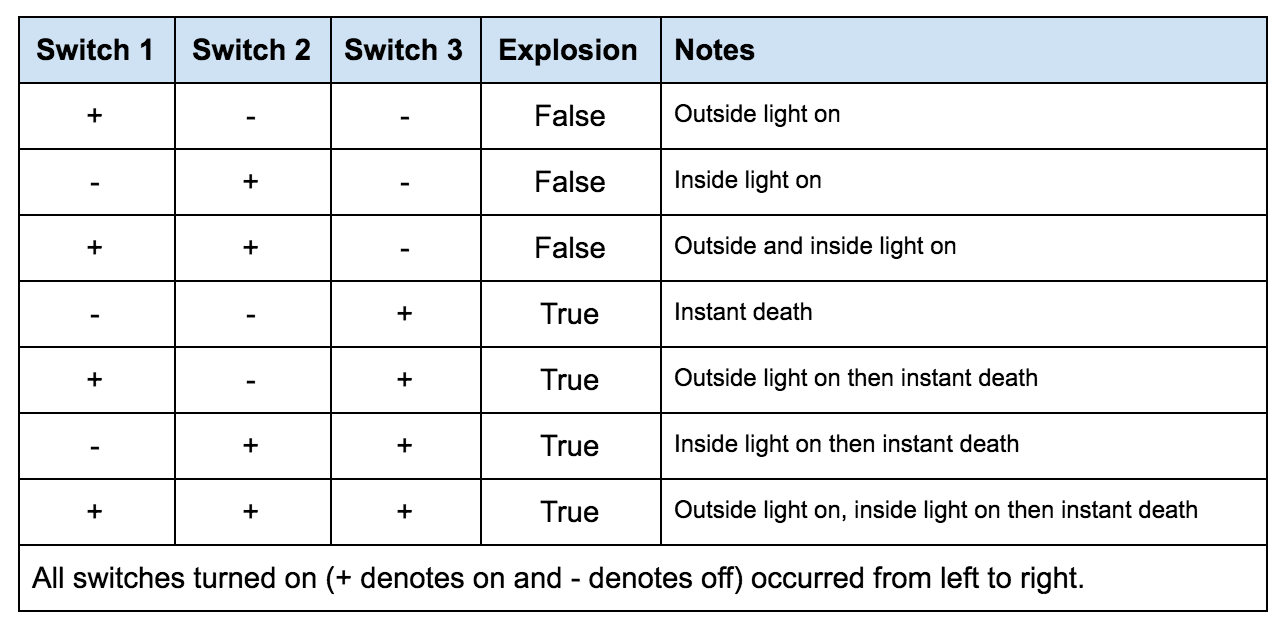
3) Truth Tables
When we had a range of possible configurations, we leveraged truth tables to eliminate the possibility of overlooking even the finest details. For instance, the following truth table reflects the 3-switch configuration on the front of the bomb:

4) Sharing Knowledge and Tools
In the beginning, all the teams were very resistant on talking, sharing and strategizing together. I feel a part of the hesitation was the competitive nature a contest like this creates but I also think for the well-equipped teams, we had a sense of security being that we came prepared. I strongly believe we helped create a sharing environment early on by lending tools which set the atmosphere for the entire conference. The camaraderie led to everyone depending on each other, contributing to each others’ gains and strategizing together. We even swapped teammates with The Giner Diner for a round of cross-training on a portion of the challenge that we had already solved consistently.
Preparation
Because this contest is relatively new in comparison to most of the historic contests at DEF CON, there wasn’t a lot we could do to prepare for what we were about to encounter. Last year, I spent about 20 minutes watching contestants try to defuse the bomb but I avoided competing because I don’t like participating in competitions unless I am all in.
There are also two videos on YouTube from DEF CON 22 that were helpful in making sure we brought some essential tools:
https://www.youtube.com/watch?v=sEcVAcTfuVI
https://www.youtube.com/watch?v=jEabTPOXh04
Overall preparation really just consisted of thinking through the type of sensors that could have been leveraged and try to find random tools to aid in bypasses.
Tools of the Trade
When determining the tools we should bring, we tried focusing on ways in which we could measure the environment to learn new information or influence a change in the environment to control an outcome. In other words, tape and magnets would help us control moving components whereas a USB endoscope would give us leverage in hard to see areas. By thinking through made-up scenarios and incorporating fictional sensors, we were able to consider tools or resources that would not have been previously considered. This proved to be a double-edged sword since upon arriving at the contest they mentioned the bomb could be defeated with less than five dollars worth of tools and all of which could be obtained at the conference. In the image below, you can see the tools we ended up using to defeat the challenge. The only tools not present in the image is a pick-up tool and a neodymium magnet.
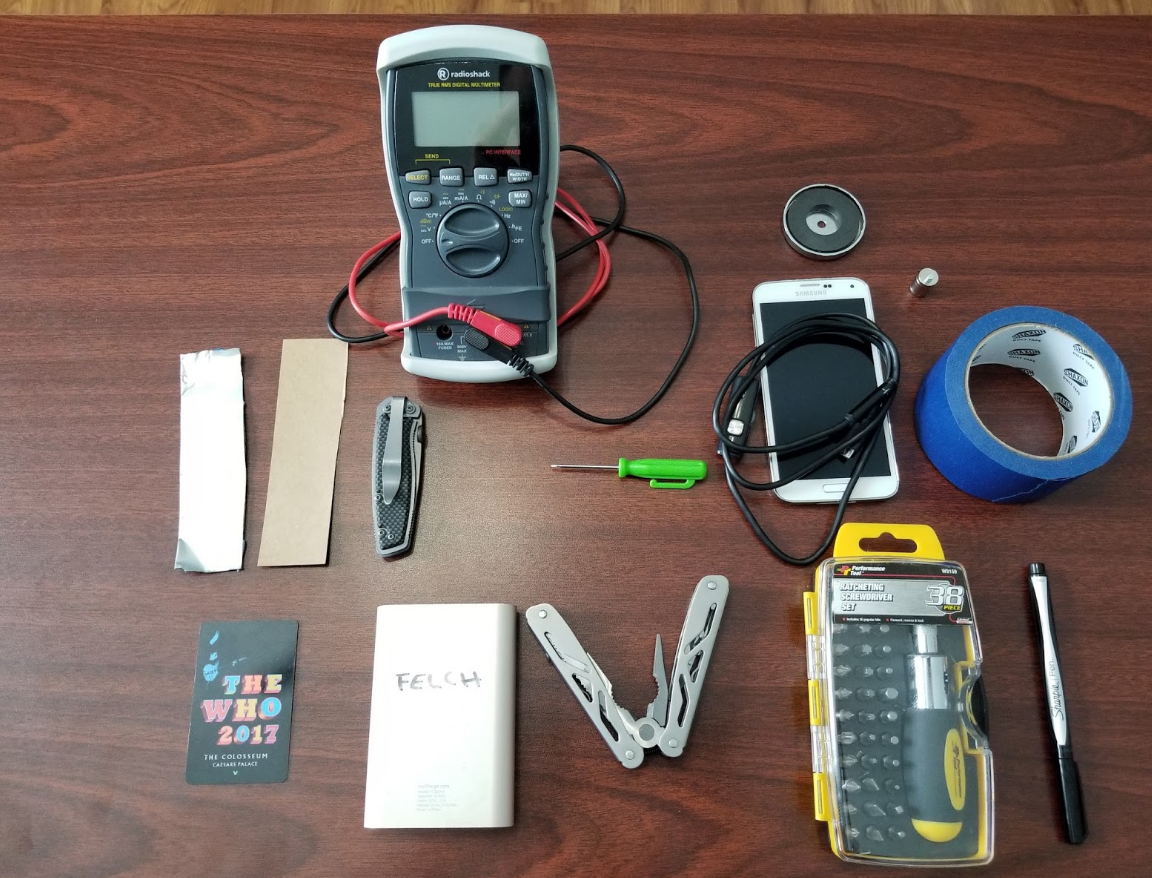
Looking back, we really only needed a magnet, piece of cardboard, a room key card, tape and something to pick a lock with like a small screwdriver. Obviously, hindsight is 20/20.
The Bomb
Upon arriving at the contest and being the first team to go, we inspected the external environment of the bomb and it quickly became obvious there were numerous directions we could go. This escalated once we actually opened the ‘Bomb Cover’ of the yellow case and found lots of lights, knobs, fuses, gauges, a wire with many different plugs, a sensor and an ‘Internal Panel’. My personal biggest regret is not taking more pictures. Attached to the front of the cart on the right was a gray metal ‘Switch Panel’ with three switches in the off position and what at first glance looked to be a light of some sort that was off. On the bottom left corner attached to the cart was a ‘Circuit Breaker’ in the ‘On’ position. At the very bottom shelf of the cart were two canisters, one ‘Large Canister’ with a round metal turn-lid that could be opened and a small canister that seemed to be closed and taped off. On the back-side of the cart was a small gray ‘Lock-box’ with a 4-digit combination lock and a key lock below it. Finally, on the very top of the cart to the left of the yellow case was a timer box and a metal locked box — both of which were said to be off limits and not a part of the challenge. You probably noticed there were a few items above in bold. We will look at each of those a little more in-depth because they contained challenges that would lead to the pressure sensors requiring activation in order to solve the overall challenge.
Challenge: The Bomb Cover
The yellow case was super interesting once opened but before we were inside, we had to bypass a magnetic sensor on the inside corner of the case. Each side of the case was held by a locking hinge that when unlocked provided the ability for someone to pry off the lid through wedging a flathead screwdriver at the seam. Luckily, another team brought some magnetic film that revealed a darkened field right where the sensor was. With some painters tape, we attached a magnet over the outside of the case directly over the sensor in order to keep the trigger in the armed position. Success!


Aside from not being too rough when unlatching the hinges and taking off the lid, the first challenge was defeated! Looking inside at all the moving components and not understanding the context or purpose opened up lots of potential directions.

Most of the inside was a trap and would lead to instant explosion. The main parts we needed to focus on were the five different colored lights in the center (starter, relay, ignition, fuel, load), the sensor in the bottom middle and the ‘Internal Panel’ at the top. Obviously, we spent a lot of time trying to make sense of everything we were looking at and even started reverse engineering the continuity between the different plugs and the red wire.

One thing we did learn from opening the lid was that by constantly touching the sensor one of the lights would remain illuminated, the moment we quit touching the sensor the light would go out. It only seemed to work when we touched it with our fingers which led everyone to believe they were capacitive touch. This created a theory that we would be looking for five similar sensors that could be activated to illuminate all five lights. After wasting time removing and swapping fuses and brute forcing plug configurations with the red wire, I had a feeling we were trying to complete a circuit. With the new found knowledge of sensor activated lights and confusion with how we were going to activate five capacitive touch sensors with only four hands, we started researching. Beau found awesome documentation on the actual panel and I focused on how capacitive touch worked.

After reading white-papers, stackoverflow and blogs — It turns out, you can create a simulated capacitive signal by using aluminum foil, copper wire, and a ground. I cut an aluminum can and using wired alligator clips to connect the foil to a ground from a battery. I tested the device on two cell-phones simultaneously and it worked flawlessly! Unfortunately, we learned Saturday afternoon that they were actually pressure sensors and not capacitive touch sensors when the capacitive generator wouldn’t keep the light illuminated leading to another team trying pressure instead (Thanks Tom!).

Challenge: The Internal Panel
At the top of the yellow box resided a latched panel covering a compartment that was guarded by a spring-loaded trigger. This one was a little tricky and required a thin sturdy piece of 4×1 inch cardboard that could be used as a shim to slide in the opening of the panel while maintaining the trigger in the armed position. Once fully opened we taped the cardboard in place so we could move on. Within the compartment was another pressure sensor that activated a different light. Wedging the cardboard was a little tricky at first because one of the orange fuses had some sort of touch sensor that had to be avoided. Nonetheless, we had another success!


Challenge: The Switch Panel
As seen in the bottom right corner of the picture below, a gray metal panel containing three switches can be seen as soon as the contestants walk up to the bomb. Obviously, instinct says to throw each switch to see what happens. We quickly learned that the third switch would trigger the bomb every time and no matter what state the other two switches were in. To make matters worse, inside the box was some sort of light sensor that trigger the moment you shined a flashlight into it. This panel and the electrical switches were a trap! No interaction was needed to defuse the bomb, it only created a quick death for most new teams who decided to learn for themselves. Overall, I am glad it was a part of the contest because it made the line shorter fairly quickly.

Challenge: The Circuit Breaker
Also in the above image, you will notice a circuit breaker in the bottom left of the picture. You would be surprised how many teams threw the breaker. I believe we were the first team to throw it into the off position in an attempt to accept or reject it as a necessary move. It was predicted to blow the bomb but we just wanted to verify our theory. You will notice a small hole directly below the red lever. Using a small screwdriver, you could lift the inside locking mechanism to open the door to the actual breaker. Inside there were three large fuses which evidently didn’t need to be removed. We didn’t have to burn any rounds figuring that one out because other teams spent a lot of time testing each one of the internal fuses. After opening the door and looking around, we found another pressure sensor attached to the back wall behind the fuses. Upon putting pressure on it, we were able to identify another light being illuminated. Three down, two to go!

Challenge: The Large Canister
Saturday morning we decided to immediately focus on the large canister since we learned on Friday it could actually be opened. We knew the cart was very sensitive and that even a small bump would trigger an explosion. We watched another team Friday hold the canister very still while slowly turning the lid and so we followed suit successfully. After opening the lid and seeing a 20oz bottle sitting sideways in some sort of fixture, we used a USB endoscope and cell phone to view the inside. Beau watched the recording in slow-motion and found another sensor! We decided to try and pull out the 20oz bottle all the way which revealed the sensor on the bottom right. It turns out the bottle had wires on the back attached to some sort of liquid-level trigger sensor that when tilted would trigger an explosion. Most of the other teams lifted the cart towards the canister and placed the wheels on small cardboard boxes but I wasn’t convinced it was needed. After all, we were already successful at removing the bottle without elevating the cart. Side note, Saturday just before the end of the day another team accidentally pulled the bottle out too far breaking the tilt sensor which indirectly created a misunderstanding of how the sensor actually worked. After the contest closed for the day, the hosts fixed the sensor and Sunday morning all the teams were exploding because they were trying to tilt the liquid forward in the same manner that proved to be successful the day before. With the sensor fixed, any tilting would create an explosion.
I couldn’t get my hand inside the rim of the canister without getting cut but luckily I was able to borrow the pickup-tool from another competitor named ‘Tom’ which happened to apply just enough pressure sideways to activate the light hands free! Four down with one left!


Challenge: The Lock-Box
This challenge create problems for everyone in the beginning. Luckily Beau and I were able to solve this one consistently, and fairly quickly. Using a quarter, we opened the bottom key lock and didn’t waste any time with the combination lock which proved to be a good move because it was a useless tarpit. With a room key, we shimmed through the corner and up to the top where we identified the spring-loaded sensor was armed. Once taping the room key in place, we slowly opened the door but too much immediately triggered a light sensor. Looking inside the box we found the fifth sensor on the back panel and by holding (taping) the door partially opened, we had just enough space to fit a hand in to touch the sensor and illuminate the final fifth light. We ended up using a black shirt to cover the box just in case light entered while holding the door.


The Final Run
Saturday afternoon quickly came and Beau had to leave for his flight. By this time we had already identified all five sensors, practically mastered each challenge and were working to simultaneously activate all of them at the same time in hopes of defusing the bomb. With Beau gone and requiring teams of two, I convinced my wife, Angela, to join me. She is super competitive, very organized and had already successfully completed an escape room with me previously. I knew she was the right person for the job! We had the opportunity for about three runs on Saturday after Beau left and before the contest closed for the day so I leveraged them to quickly train her on all of the challenges. Sunday morning we arrived late and the crowd was pretty big. About the third attempt Sunday morning we activated all five sensors at the same time and defused the bomb to a roaring crowd, some of which spent most the entire conference watching. Overall, it was an absolute great experience and worth the investment! Below is what the bomb looked like seconds after our victory, I’m glad I captured this picture.

Final Thoughts
1) Sharing tools with new teams greatly hurts game play
There were times we waited over an hour to play because so many new teams would see how we were solving the challenges, would decide to play and then would ask to borrow our tools. Keeping track of who has your equipment while keeping it in a usable form is tiring, especially having to wait so long to try again. Next time we will probably decide to only share tools with teams who are taking the challenge seriously.
2) Trust nothing and verify everything
I burned research time on capacitive touch because I didn’t verify my theory before testing with pressure only. While that is common sense, it can be difficult to remember when you are in the spur of the moment. We also witnessed other teams committed to a theory without proving why they decided to pursue the direction.
3) Pick a name before you get there
If you don’t, the hosts will pick one for you and you will regret it.
4) Can we get a formalized line next year? Please? 🙂
The only recommendation I have for increasing the quality of game play is to formalize the line. It’s hard to keep track of your tools, who goes next, who’s in front of you and whether the people standing around are players or spectators. I put together a quick image to reflect what might have made a huge impact for everyone involved. A one way in, one way out line for teams while still giving them the ability to watch progress during their wait. Since the chairs were used to hold up the barrier, it would be an excellent opportunity for each team to sit for a few minutes in between turns.

Special Thanks
The Giner Diner: It was a huge pleasure competing with you, strategizing and learning from each other. We wouldn’t have made it as far as we did if it weren’t for you two. If you read this, feel free to connect with us on Twitter. See you next year!
The Mysterious “Tom”: Thanks a bunch for letting us borrow the pickup-tool. It was great to meet you even though we were a little intimidated when you and your teammate walked in with all those crazy tools. For a second I thought you might be a real EOD technician!
Datagram and The MFP’s: We appreciate you taking the time to put together an awesome contest and fun challenge! While we were a little disappointed that The Dark Tangent didn’t select the contest for a black badge, the experience we had outweighed it. Keep up the great work! If you need help with the bomb for next year, we have some great ideas!

Ready to learn more?
Level up your skills with affordable classes from Antisyphon!
Available live/virtual and on-demand
