How to Hack WebSockets and Socket.io
Ethan Robish //

WebSockets Overview
WebSockets is a technology to allow browsers and servers to establish a single TCP connection and then asynchronously communicate in either direction. This is great for web apps as it allows real time updates without the browser needing to send hundreds of new HTTP polling requests in the background. It’s bad for pentesters as the tool support for WebSockets is not nearly as prevalent or sophisticated as for HTTP.
In addition to Burp Suite, a few other tools exist for dealing with WebSockets. I attempted to use each of these but none of them worked the way I wanted.
- Zed Attack Proxy (ZAP)
- Pappy Proxy
- Man-in-the-Middle Proxy (mitmproxy)
- WebSocket/Socket.io (WSSiP)
If you’re interested in using WebSockets on the offensive side to evade detection check out this post.
In this post I’m going to mainly focus on socket.io, a popular WebSockets library for JavaScript. However, some of the ideas here could be applied to other libraries or generically to the WebSockets protocol as well.
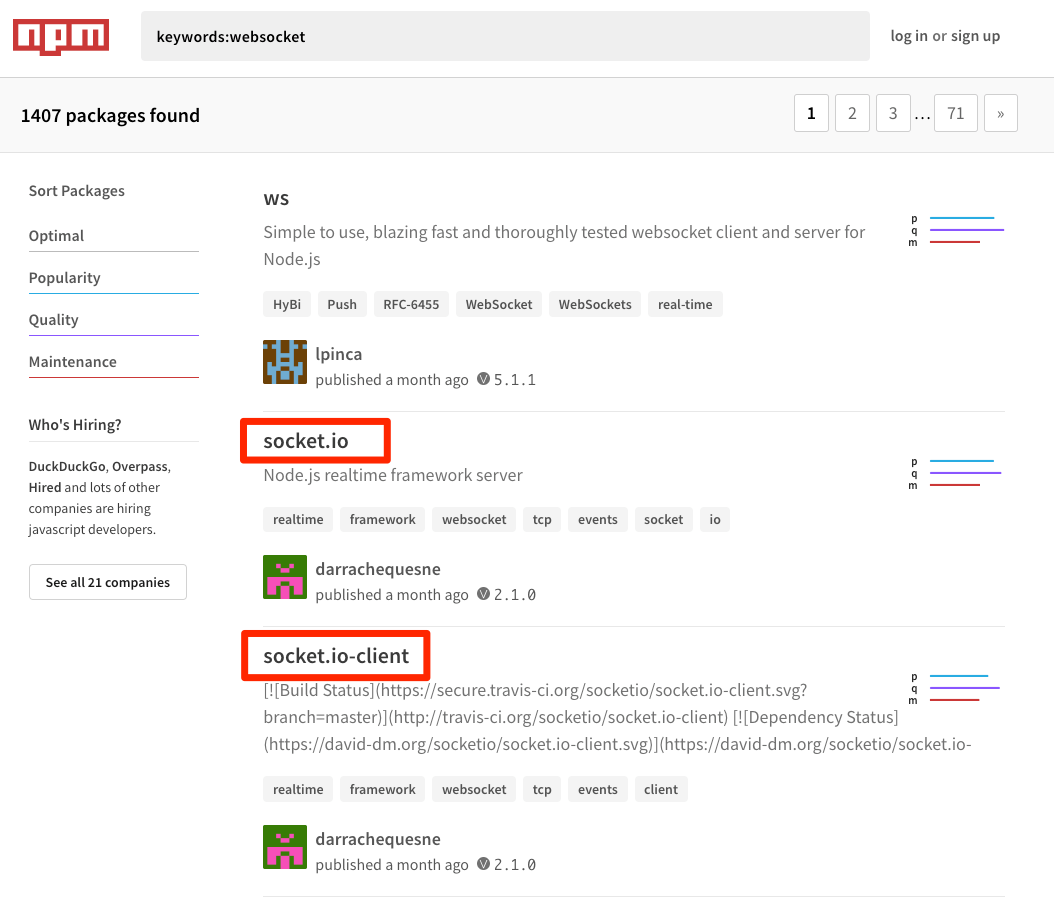
How popular is socket.io? It has over 41 thousand stars on Github.

It also occupies the slots for 2nd and 3rd most popular WebSockets package on NPM.
It turns out that the excellent OWASP Juice-Shop Project uses the socket.io library so I will be using it for demonstration.
https://github.com/bkimminich/juice-shop/search?utf8=%E2%9C%93&q=socket.io&type=
This post assumes you are already somewhat familiar with testing web applications using Burp Suite, and everything covered can be accomplished in the Community Edition. Without further ado, let’s jump in.
If we go to Juice-Shop in the browser, we can quickly see the WebSocket traffic in the background. You can find this in Burp by going to Proxy->WebSockets history.
Unlike HTTP where you always have request/response pairs due to the stateless nature of the protocol, WebSockets is a stateful protocol. This means that you can have any number of outgoing “requests” and any number of incoming “responses” from the server. Since the underlying connection is TCP that is held open both the client and the server can send messages at any time without waiting for the other. This explains the differences in the WebSockets history view from the HTTP history you may be used to looking at.

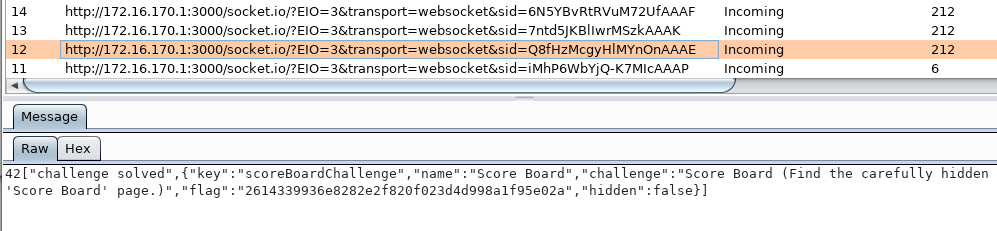
In this view, you’ll mostly see single-byte messages sent and received. But when the application does something interesting you’ll see messages with larger payloads.
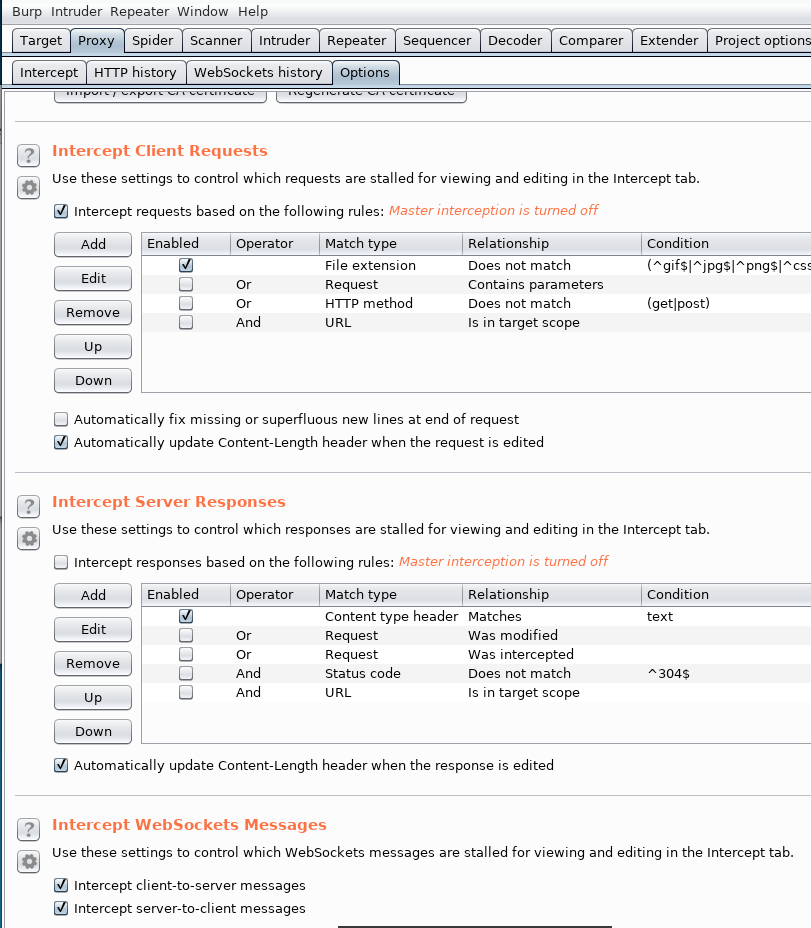
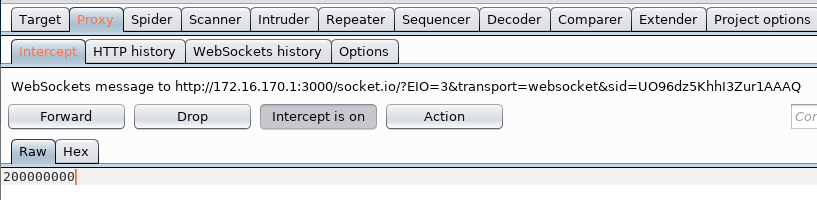
Burp has some capability for testing with WebSockets. You can intercept and modify them in real-time but there is no Repeater, Scanner, or Intruder functionality for WebSockets. WebSocket interception is enabled by default in Burp and all you need to do is turn on the master interception.
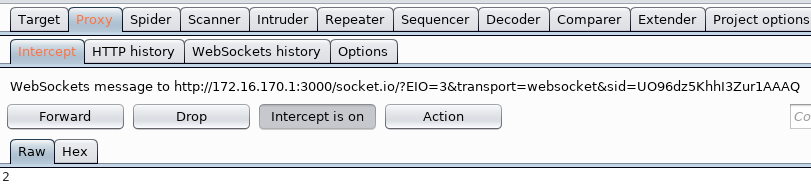
You’ll get intercepted WebSocket messages the same way you do for HTTP. You can also edit them in the interception window.
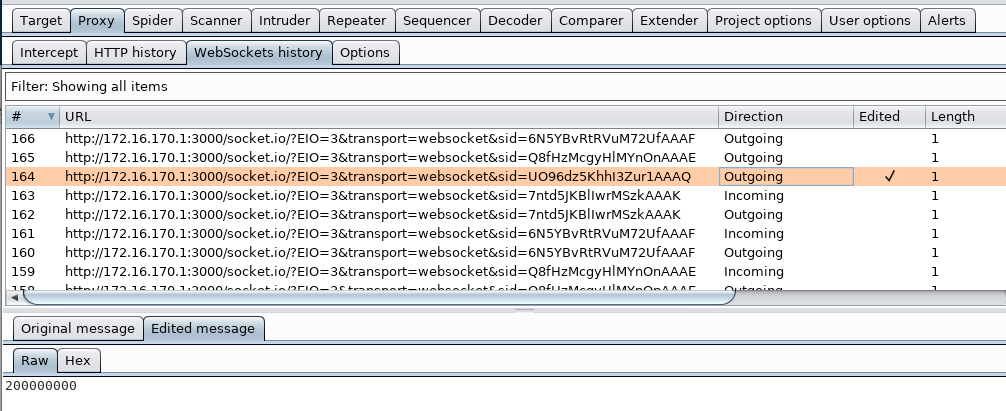
And view the edited messages in the WebSockets history tab.
Downgrading WebSockets to HTTP
Method 1: Abusing Socket.io’s HTTP Fallback Mechanism
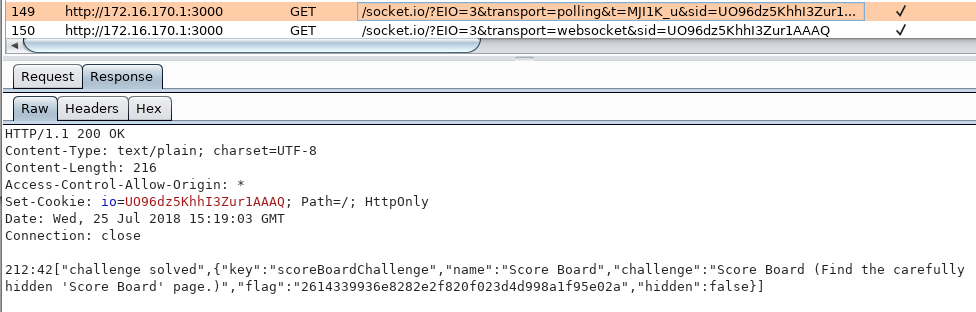
One oddity I quickly noticed was that sometimes I would see similar messages in the HTTP history as I had seen in the WebSockets history. If you recall from above, the interesting WebSockets message I pointed out had to do with solving the scoreboard challenge. Below shows the same response from the server except this time in HTTP history. So I knew that socket.io was capable of sending messages both over WebSockets or HTTP.
I guessed that HTTP was available in order to fall back on in case WebSockets was not supported or somehow blocked in the application. The transport parameter drew my attention with its values of “websockets” and “polling” in the requests I observed.
This section in socket.io’s documentation talks about how “polling” and “websockets” are the two default transport options. It also shows how you can disable polling by specifying WebSockets as the sole transport. I figured the reverse would be true as well and that I could specify polling as the sole transport mechanism.
https://socket.io/docs/client-api/#with-WebSocket-transport-only
By searching through socket.io.js source code I came across the following, which certainly looked promising.
this.transports=n.transports||["polling","WebSocket"]
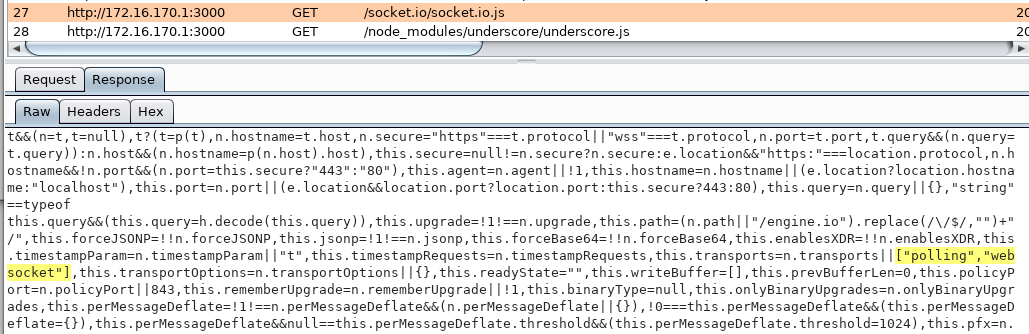
That line of code is setting an internal variable called “transports” to some value passed in OR defaulting to [“polling”,”websocket”] if the passed in value is false/empty. That would definitely fit our understanding so far of the default transports being polling and WebSockets. Let’s see what happens if we set up a match and replace rule under Proxy->Options in Burp to change these defaults.

Success! After the rule was added, refresh the page (I also had to enable Burp’s built-in rule to “Require non-cached response” or perform a forced refresh), and no more communication was sent via WebSockets.
That’s great, but what if the application you are using already provides transport options which would take precedence over our new defaults? In this case, we can just modify our match and replace the rule. The following rule should work for different versions of the socket.io library, and disregard any transports specified by the application developers.
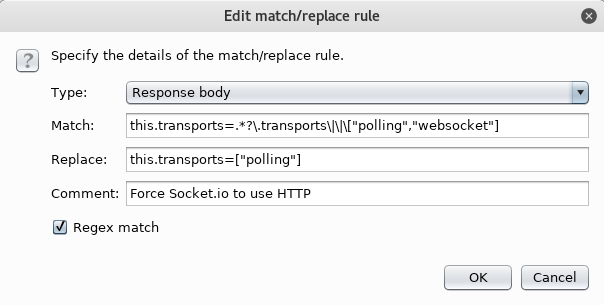
For ease of copy-paste here are the strings to use:
this\.transports=.*?\.transports\|\|\["polling","websocket"]

this.transports=["polling"]
Be sure to set this as a regex match.
Method 2: Interrupting the WebSockets Upgrade
Method 1 is specific to socket.io and could possibly be extended to other client libraries. But the following method should be a little more universal as it targets the WebSockets protocol itself.
After some investigation, I found that WebSockets first communicates over HTTP in order to negotiate with the server and “upgrade” a connection to a WebSocket. The important parts of this are:
1) The client sends requests an upgrade request with some WebSocket specific headers.
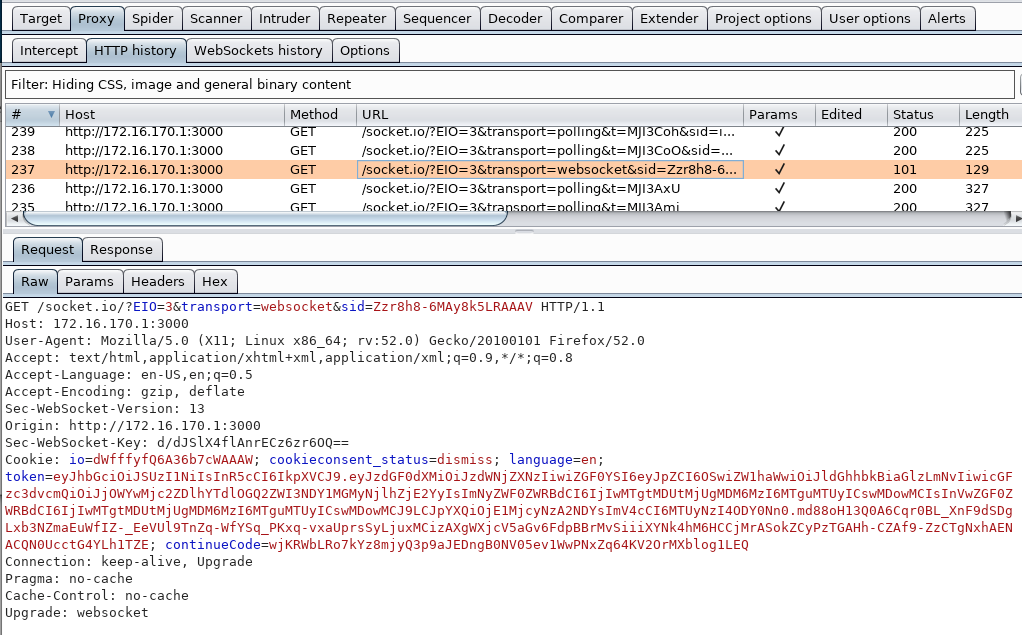
2) The server responds with a status code of 101 Switching Protocols, also with some WebSocket specific headers.

3) The communication transitions to WebSockets and we don’t see any more HTTP requests for this particular conversation.
The WebSockets RFC section 4.1 gives all sorts of clues on how we can interrupt this workflow.
Below is an excerpt from https://tools.ietf.org/html/rfc6455#section-4.1 with my own added emphasis.
- If the status code received from the server is not 101, the client handles the response per HTTP [RFC2616] procedures. In particular, the client might perform authentication if it receives a 401 status code; the server might redirect the client using a 3xx status code (but clients are not required to follow them), etc. Otherwise, proceed as follows.
- If the response lacks an |Upgrade| header field or the |Upgrade|header field contains a value that is not an ASCII case-insensitive match for the value “WebSocket”, the client MUST_Fail the WebSocket Connection_.
- If the response lacks a |Connection| header field or the |Connection| header field doesn’t contain a token that is an ASCII case-insensitive match for the value “Upgrade”, the client MUST _Fail the WebSocket Connection_.
- If the response lacks a |Sec-WebSocket-Accept| header field or the |Sec-WebSocket-Accept| contains a value other than the base64-encoded SHA-1 of the concatenation of the |Sec-WebSocket-Key| (as a string, not base64-decoded) with the string “258EAFA5-E914-47DA-95CA-C5AB0DC85B11” but ignoring any leading and trailing whitespace, the client MUST _Fail the WebSocket Connection_.
- If the response includes a |Sec-WebSocket-Extensions| header field and this header field indicates the use of an extension that was not present in the client’s handshake (the server has indicated an extension not requested by the client), the client MUST _Fail the WebSocket Connection_. (The parsing of this header field to determine which extensions are requested is discussed in Section 9.1.)
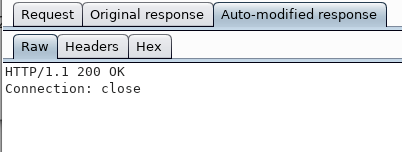
With those “MUST Fail” conditions in mind, I came up with the follow set of replacement rules which should fail on all five.

Once those rules were in, all WebSocket upgrade requests failed. Since socket.io will silently fail to HTTP by default this has the desired effect. Specific implementations or other libraries may behave differently and cause errors in the application you are testing. But our jobs are to make software do things it wasn’t meant to!
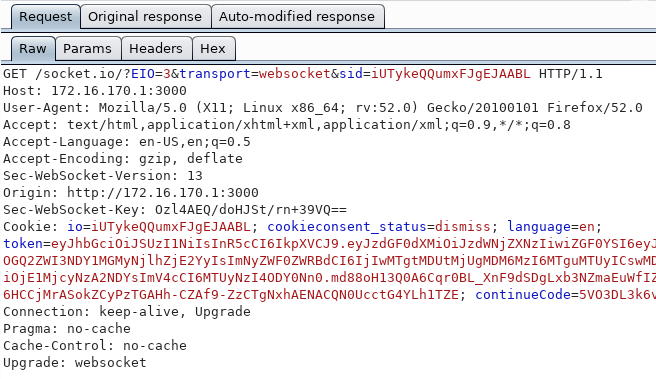
The original response looked like this and would have resulted in the client and server transitioning to WebSockets for communication.

Instead, the client received this modified response from the server and by the RFC should fail the WebSockets attempt.
One thing I encountered during a test was that after putting these match and replace rules in, the client was extraordinarily persistent in retrying WebSockets connections and caused a lot of unwanted traffic in my HTTP history. If you are dealing with the socket.io library, it is probably easiest to use Method 1 above. If you have a different library or situation you may have to add more rules to convince the client that the server does not support WebSockets or even cripple the WebSockets functionality in the client library.
Using Burp Repeater as a Socket.io Client
Since we’ve forced communication to go over HTTP instead of WebSockets you can now add in custom match and replace rules that will apply to the traffic that would have gone over WebSockets!
Next, we can go one step further and pave the way for using tools like Repeater, Intruder, and Scanner. These changes will be specific to the socket.io library.
There are a couple of problems that prevent us from repeating the HTTP requests that socket.io uses.
- Each request has a session number and any invalid requests will cause the server to terminate that session.
- The body of each request has a calculated field for the length of the message. If this is incorrect, the server treats it as an invalid request and terminates the session.
Here are a couple of example URLs used in the application.
/socket.io/?EIO=3&transport=polling&t=MJJR2dr
/socket.io/?EIO=3&transport=polling&t=MJJZbUa&sid=iUTykeQQumxFJgEJAABL
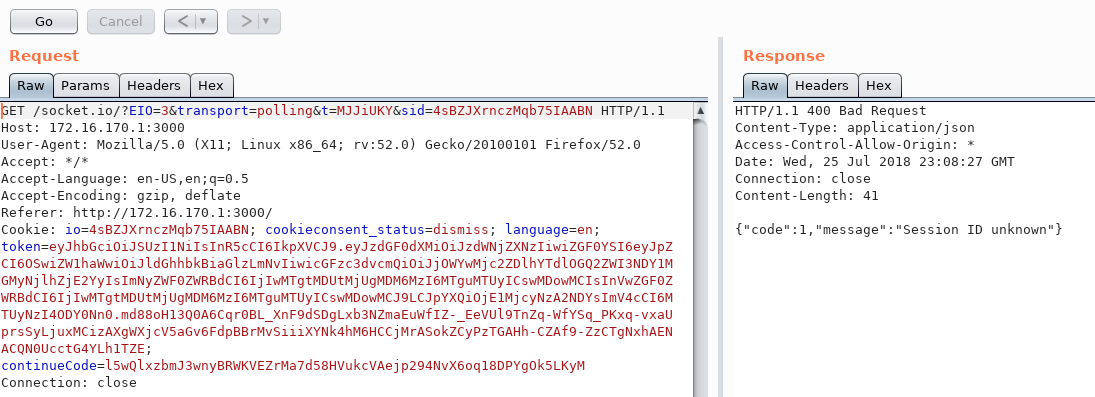
The “sid” parameter in the URL represented a single connection stream to the server. If an invalid message was sent (as is common when trying to break things) then the server would close the entire session and I had to start over with a new session.
The body of a given request contained a field with the byte count of the payload. This is similar to the “Content-Length” HTTP header except it was specific to the socket.io payload. For instance, if the payload you wanted to send was “hello” then the body would be “5:hello” and the Content-Length header would be 7. That’s 5 for the letters in “hello” and 7 accounts for both the letters in “hello” as well as the “5:” which socket.io adds to the body. As always, Burp will update the Content-Length header for us so we don’t need to worry about that. But I could not find a good way to automatically calculate and include the length of the payload. To complicate matters more, I witnessed socket.io sending multiple messages within the same HTTP request. Since each was an encapsulated WebSockets payload, each had its own length and ended up looking something like this: “5:hello,4:john,3:doe” (the actual syntax may have been different but you get the idea). Any error in calculating the length and the server would reject it as an invalid message and bring us back to problem #1.
This is an example of a message body. This is from a response in the Juice-Shop app but the requests were formatted the same. Note that “215” here represents the length of the payload following the “:”.
215:42[“challenge solved”,{“key”:”zeroStarsChallenge”,”name”:”Zero Stars”,”challenge”:”Zero Stars (Give a devastating zero-star feedback to the store.)”,”flag”:”e958569c4a12e3b97f38bd05cac3f0e5a1b17142″,”hidden”:false}]
Macro
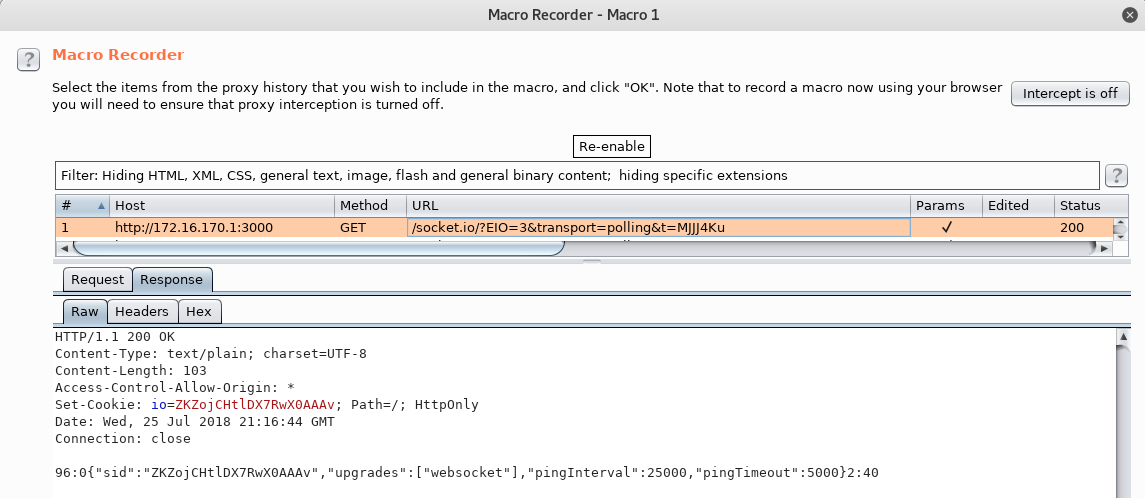
I was able to solve the first problem using a Burp Macro. Basically, each time Burp matched on a server rejection of a message, the macro would automatically establish a new session and update the original request with the valid “sid”. Create a new macro by going to Project options->Sessions->Macros->Add
The URL to establish a new session was simply crafted by leaving off the “sid” parameter. For instance:
/socket.io/?EIO=3&transport=polling&t=MJJJ4Ku
I found that the value of “t” didn’t really matter so I left it untouched.

The server response included a brand new “sid” value for us to use.
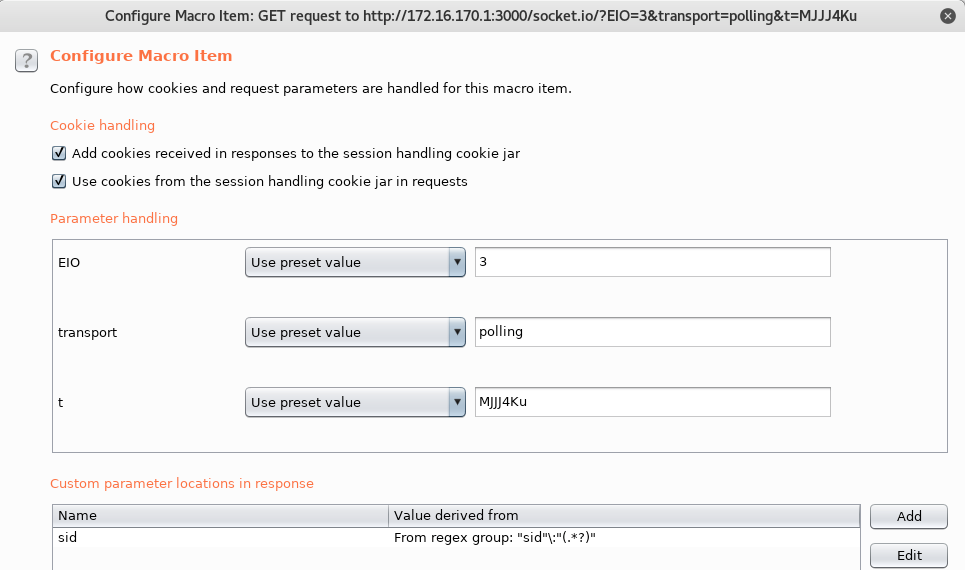
Next, click the “Configure item” button and fill in the parameter name as “sid”. Use the “Extract from regex group” option and the following regex.
"sid"\:"(.*?)"
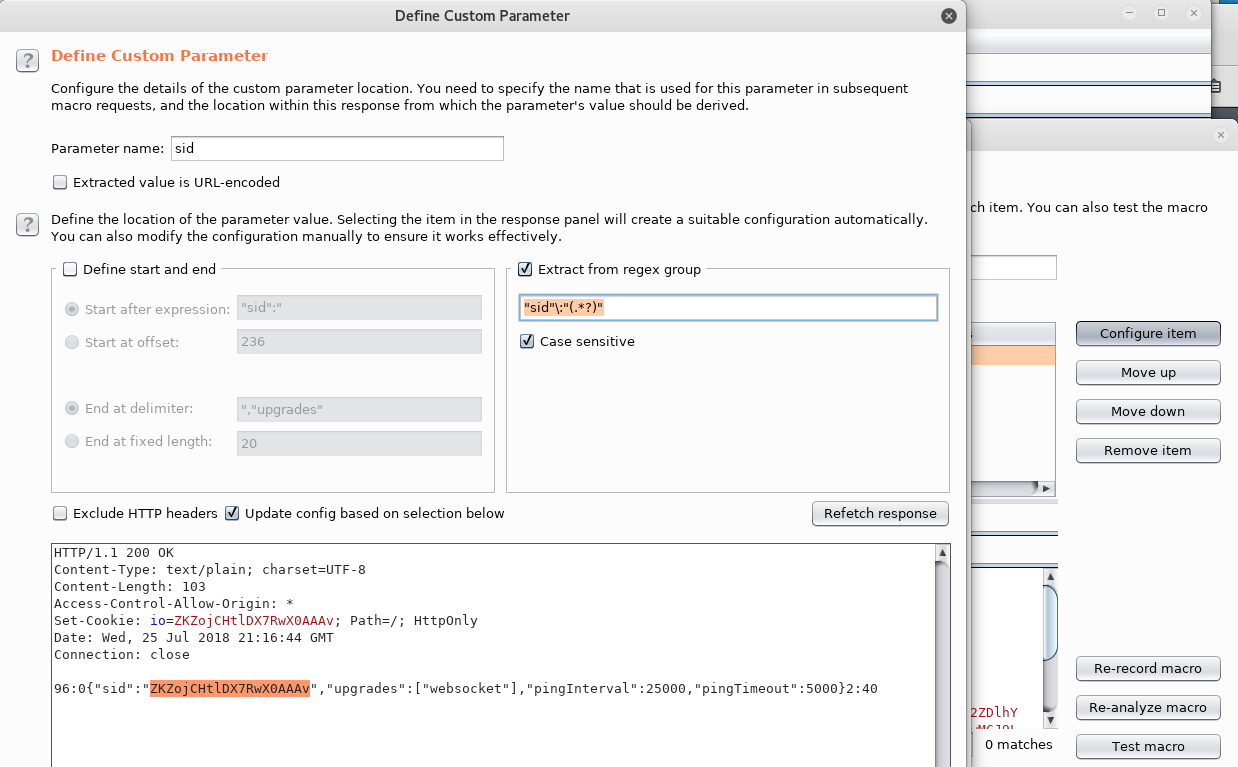
Your configuration window should look something like this:
Session Handling Rule
Now that we have a macro, we need a way for it to be triggered. This is where Burp Session Handling Rules come in. Create a new rule by going to Project options->Sessions->Session Handling Rules->Add
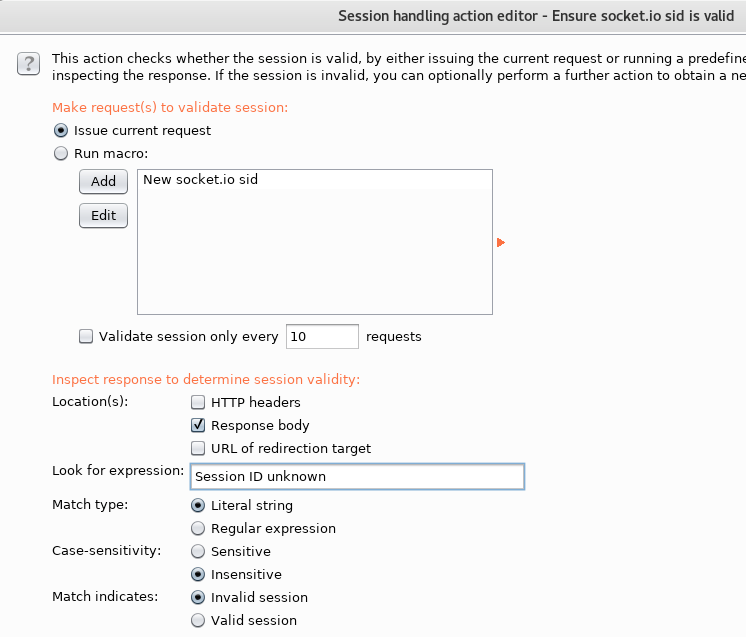
Create a new Rule Action for “Check session is valid”
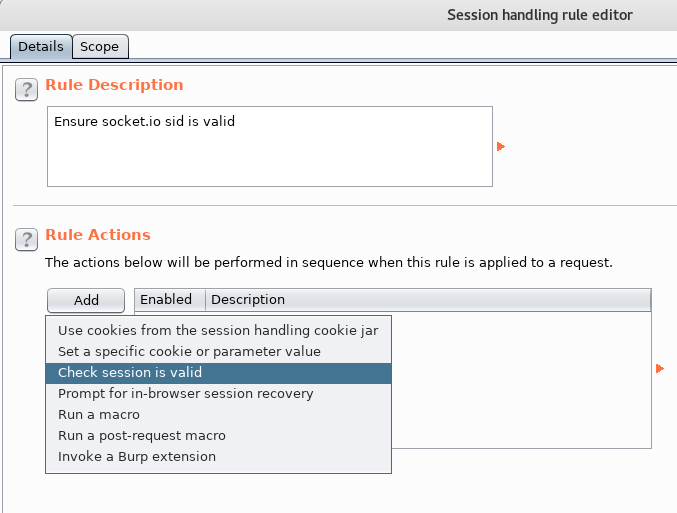
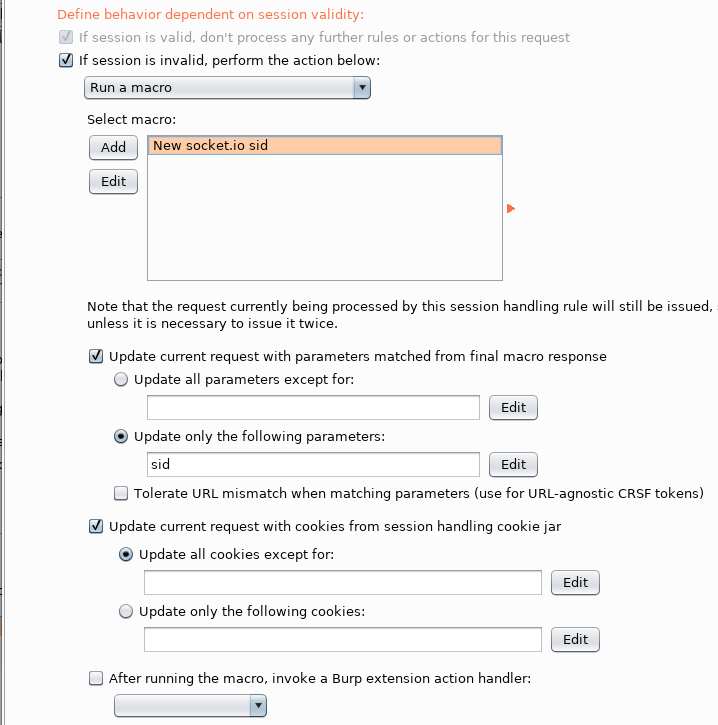
Configure the new rule action as follows:
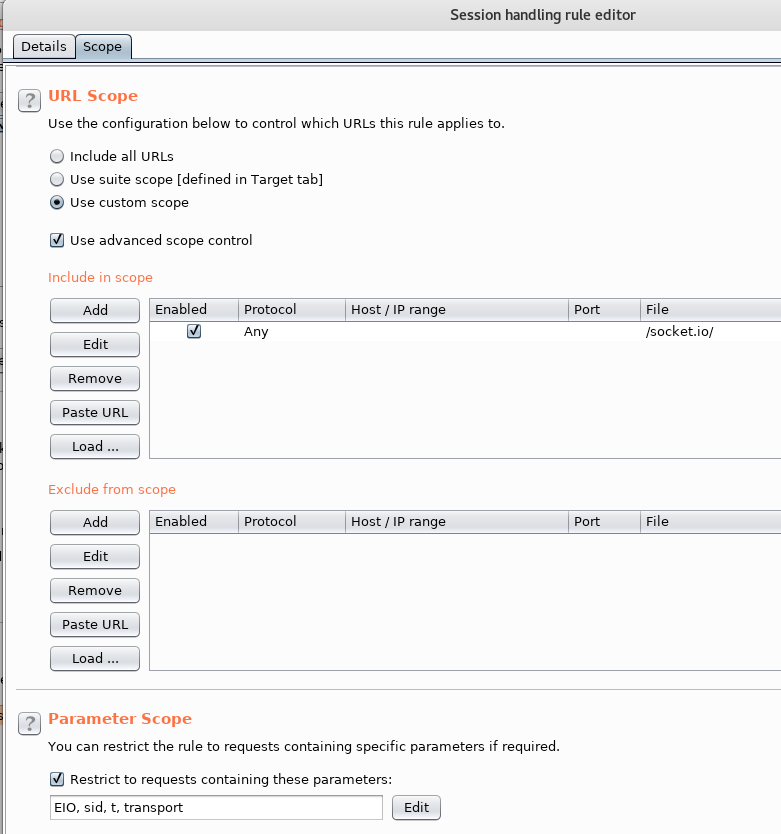
Finally, after finishing your new rule action, modify the scope of the rule. Here is where you can decide where you want this rule to apply. I’d recommend using it for Repeater at least so you can manually repeat requests.
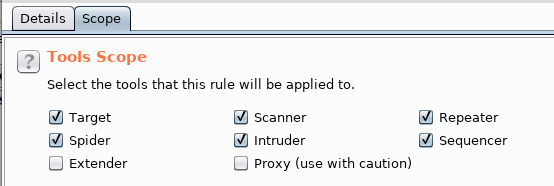
The following is how I configured the scope rules. You can get more specific with your scope but the options below should work for most.
Here is a request made without the session handling rule in place.
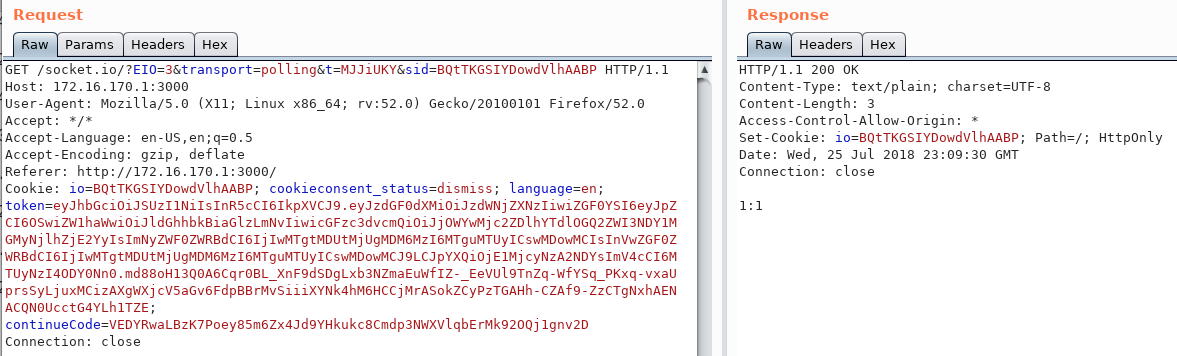
And here is the same request made with the rule in place. Notice that the session handling rule transparently updates the cookies and the value for “sid” in the request for you.
Final Thoughts
Ultimately, I was prevented from using Burp Scanner and Intruder by problem #2 discussed above. I modified an existing Burp plugin and that appeared to do the job, but the server didn’t like it for some reason. If anyone is interested in furthering this research feel free to reach out to me.
Ready to learn more?
Level up your skills with affordable classes from Antisyphon!
Available live/virtual and on-demand
