How to Monitor Network Traffic with Virtualized Bro 2.51 on Ubuntu 16.04.2 on ESXi 6.5
Kent Ickler //
ADVISORY: The techniques and tools referenced within this blog post may be outdated and do not apply to current situations. However, there is still potential for this blog entry to be used as an opportunity to learn and to possibly update or integrate into modern tools and techniques.
You’ve heard us before talk about Bro, an IDS for network monitoring and analysis. We’ve had several installs of Bro over time here at BHIS. It’s about time for another build, and I thought it would be a good time to share an example methodology. This post is going to be two parts: Configuring ESXi for a Bro install, and configuring said Bro install. It’s worth noting that there are pros and cons to operating Bro in a virtualized environment. It’s not for everyone.
For us, among other things, it allows us to utilize a single tap into an ESXi host that can run multiple IDS applications. By using vswitch in promiscuous mode, we are able to duplicate monitor traffic to multiple guest VMs (Bro, Snort, ect, ect).
Here’s a diagram of things:
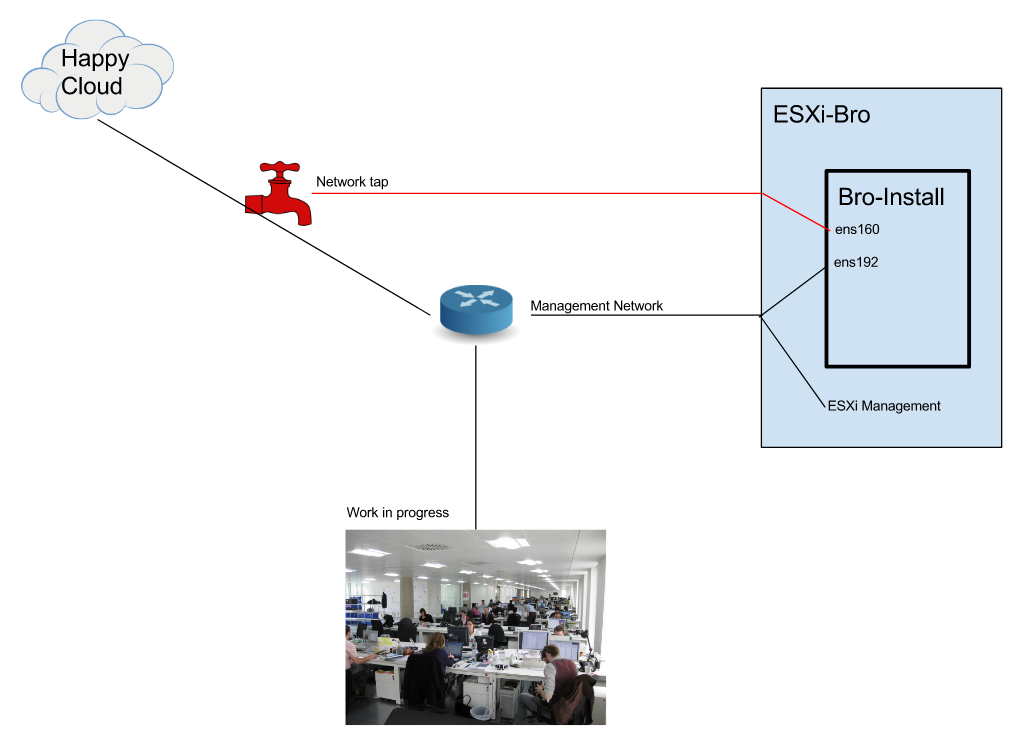
Hardware:
Running Bro on VMware increases the required resources a bit. Additionally, you need hardware that can support running a virtualized environment. Budget network cards are usually not a good mix at this point. At the very least, be sure that your hardware has two Network Interface cards, one of which can be entered into monitor/ mode.
ESXI Install:
Not really a big deal here, I’ll make an assumption you know how to get up and running. If you don’t, let us know and I’ll make another blog post.
Network Pre-Reqs for Bro
It will be necessary to send two interfaces to the ESXi server.
- ESXi Management interface
- Network Mirror/Tap
The network management interface can include other VLAN’s as you see fit, but you will need to be sure you can access both the ESXi Server and its guest from its configured VLAN.
The Network Mirror/Tap can be produced from either switch configuration to produce data mirrored from another port, or from a traditional network tap. Blog about mirror/tap methods is possible in the future! We use both dedicated-hardware and switch configurations in our office as we have multiple points of traffic to monitor. For your first Bro install, you will typically want to be mirror your WAN data– that is, a mirror of data between your internet connection and your router.
ESXI pre-req’s for Bro
ESXi will need to be configured so that you can access its management GUI from the first network interface. This can be configured with VLANS if necessary. The second interface will need to be put into monitor mode so that the ESXi OS does not filter (ignore packets for MAC addresses it doesn’t harbor) data coming into the interface (which it typically would if it had no reason to receive such traffic).
Network configuration in ESXI:
In our case, our server has 3 NICs.
NIC0: Unused
NIC1: Mirror
NIC2: Management
Login to the ESXi Web Gui, Click on Networking -> Physical NICs
Confirm your NICs are present. Determine which NICs will be used for the Mirror traffic.

Create the virtual switch that will receive Mirror data.
Click on Networking -> Virtual Switches -> Add standard virtual switch

Enter a name for the vSwitch: “MirrorSwitch”
Uplink 1: Select the NIC that will receive the mirror traffic.
Link Discover: NONE
Security: Promiscuous mode: Accept

Setup Mirror Port group to receive data
Click on Networking -> Port Groups -> Add Port Group

Configure
Name: MirrorGroup
VirtualSwitch: MirrorSwitch
Promiscuous mode: Accept

Create your new VM:
Ensure that your VM has two NICs added.
- LAN NIC (VM Network)
- Mirror Group

Install Ubuntu 16.04
Nothing specific here, move on when you’re logging at console. As usual, be sure first to apt-get update and apt-get upgrade. Oh, and for most of the configuration you will need to be sudo/root– might as well sudo -s.
Prepare Ubuntu for Bro
Configure network stack:
nano /etc/network/interfaces
Move your management interface to a static IP address (good idea). In our case, the management interface is ens192 and the mirror-data interface is ens160. I can check the interface names with a simple “ip addr” (use sudo).
Configure Mirror NIC
Let’s move the mirror-data NIC into promiscuous mode, bring it up, and check for data…
Enable and “up” the mirror interface:
$ ip link set ens160 promisc on
$ ip link set ens160 up
Make that NIC enabled on boot:
nano /etc/rc.local (add before “exit 0”)
ip link set ens160 promisc on
ip link set ens160 up

Give it a whirl (ctrl+c to exit)
tcpdump -i ens160 (ens160 is our mirror NIC, you can add -vv to check protocol processing)
You’ll see some data flowing if your tap is already set up and sending data in.

General Bro Install:
We will be generally following the Official Bro 2.5.1 install documentation, available at Bro’s website. https://www.bro.org/sphinx/install/install.html. We’re following the guide pretty close except for changing the default install location to /opt/bro instead of /usr/local/bro.
Get the pre-requisites:
sudo apt-get install cmake make gcc g++ flex bison libpcap-dev libssl-dev python-dev swig zlib1g-dev libgeoip-dev build-essential
Install PFRing
PFRing is a module that changes how packets received from the NIC are processed by the components that send data to Bro. You can build a Bro installation without it, but it helps greatly in reducing packet loss from the mirror. More information on PFRing can be found here: http://www.ntop.org/products/packet-capture/pf_ring/
cd /opt
git clone https://github.com/ntop/PF_RING.git
cd PF_RING/kernel
make
sudo insmod ./pf_ring.ko
cd ../userland
make
cd PF_RING-6.2.0/userland/lib
./configure –prefix=/opt/PF_RING
make install
cd ../libpcap
./configure –prefix=/opt/PF_RING
make install
cd ../tcpdump-4.1.1
./configure –prefix=/opt/PF_RING
make install
cd ../../kernel
make
make install
Make pf_ring module load at boot:
nano /etc/modules
Add “pf_ring”

Bro, its Time! Git the Bro code, Bro
git clone –recursive git://git.bro.org/bro
Do the things
Compile, noting that we are adding the optional PFRing module we compiled above and changing the default install location.
cd configure
./configure –with-pcap=/opt/PF_RING –prefix=/opt/bro/ (–prefix change install location)
make
make install
Doing things (this’ll take awhile):

Configure the runtime $PATH
export PATH=/opt/bro/bin:$PATH
Make that change permanent too
nano ~/.profile (add the above to the path)

Configure your Bro!
nano /opt/bro/etc/node.cfg
We have a couple of changes to make to the config file to tell Bro to use the PFRing module and to listen on the appropriate NIC. Settings will be simpler if you choose not to use PFRing.
Comment out the entire [bro] section by putting a hash # in front of each line.
Then uncomment the sections for [manager] , [proxy-1] and [worker-1].
In [worker-1] change the interface to match your mirror interface and add lb_method=pf_ring as well as lb_procs=5.

Test!
\opt\bro\bin\broctl
At the BroControl prompt
install (only need to do this once)
deploy
status
exit (don’t worry, bro is still running)
Next time, you can use just “deploy” instead of “install”. The image below shows “deploy” being used after an initial “install” had already been completed. Missed that screenshot; meow!

Check the logs!
tail -f /opt/bro/logs/current/conn.log (CTRL+C to exit this)

Auto-Start
Now, let’s make it start on boot!
nano /etc/rc.local
Add:
/opt/bro/bin/broctl start

Maintenance
Add maintenance functions to keep Bro happy:
crontab -e
(select your editor if necessary, then enter the following line at the bottom)
*/5 * * * * /opt/bro/bin/broctl cron

Reboot and make sure all is well.
Reboot -h now
Login, and test your bro logs to ensure data is flowing!
A few minutes after you have restarted, check your conn.log file to ensure you see traffic
Tail -f /opt/bro/logs/current/conn.log
If you don’t see updates here, or the file is missing, try to redeploy the bro instance now that the system is fully loaded.
/opt/bro/bin/broctl deploy
Word of caution:
Because we compiled PFRing in this kernel, any kernel builds may cause the PFRing module to fail to load. You will need to recompile PFRing if you update your kernel after compiling.
Fin!
Future Bro blogs likely!
Want to learn more mad skills from the person who wrote this blog?
Check out this class from Kent and Jordan:

CypherBit
August 3, 2017 @ 9:06 am
Great stuff! Can the same be achieved on Hyper-V?
BHIS
August 3, 2017 @ 9:18 am
We imagine, why not? You just need the ability to set the virtual and physical NIC to promiscuous mode.
Warrior
August 9, 2017 @ 10:51 am
Love the cats!