Using SDR to Build a Trunk Tracker – Police, Fire, and EMS Scanner
Ray Felch //


Introduction
Recently, I came across an interesting article on using software-defined radio (SDR) to create a Police, Fire, EMS, and Public Safety systems scanner. Viewing a few of these Trunk tracking scanners on Amazon, I quickly discovered that they are not cheap at all. You can spend several hundred dollars on a Trunked Radio tracking scanner; however, we can build one with just two $25 SDR USB dongles.
How Trunking systems work
Trunking systems carry an exceptionally large volume of analog and digital radio traffic and are a frequency hopping system. Trunk systems are controlled by computers and broadcast information to all the radios on the network by way of a control channel. In the following diagram, notice that the control channels appear in red.

The channels that are displayed in green are the allotted frequencies for a given Talkgroup (an assigned group on a trunked radio system).
Wikipedia defines a talkgroup as follows:
A talkgroup is an assigned group on a trunked radio system. Unlike a conventional radio which assigns users a certain frequency, a trunk system takes several frequencies allocated to the system. Then the control channel coordinates the system so talkgroups can share these frequencies seamlessly.
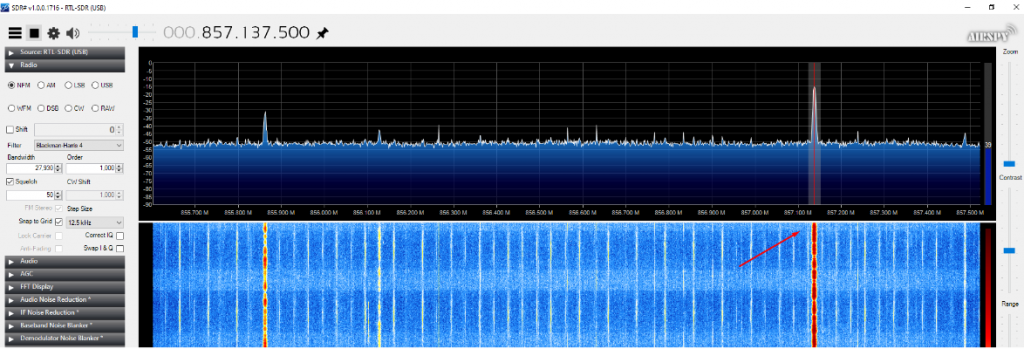
If we were to tune to the control channel frequency using SDR# (software-defined radio software), we would discover the following waterfall. Not only is it visually recognizable, but it also has an incredibly unique (raspy/metallic) digital sound.

All radios in the talkgroup monitor the control channel to know which frequency to listen to. Virtual channels are created by an admin and assigned talkgroup numbers (listed in the Target column of UniTrunker).
When the user pushes the PTT (push-to-talk) key, a request is sent to the control computer. The control computer then assigns a frequency, and all radios logged into that talkgroup, switch to that assigned frequency, so they can hear the transmission.
When the transmission is responded to, this process is repeated and typically a different frequency is assigned for the reply. It becomes apparent that if we were to monitor a single frequency, we would miss most of the radio traffic for a given talkgroup’s system.
Why the trunking system was created
Trunking systems provide very efficient use of the radio spectrum. Prior to its implementation, radio frequencies that were assigned were static. An example could be made that a police agency needing a dozen conventional channels, would waste that portion of the spectrum if the channel were idle for any significant amount of time. In the ‘trunked’ system, the officers would be assigned to a talkgroup and not a dedicated channel and share a smaller pool of channels. It is common for greater than 350 talkgroups to share as few as 20 channels.
Another benefit of a trunking system is multiple sites at separate locations can be linked together. School campuses consisting of multiple buildings in various parts of the city can all be linked. Even cities, states, and provinces can be linked together. My location here in Iowa borders Illinois, so talkgroups for law enforcement, fire, and safety share a common control channel.
UniTrunker: Trunk Radio decoding software
UniTrunker is a Trunk Radio decoder that supports Motorola Type II, EDACS, MPT1327, P25 systems and works well with RTL-based SDRs.
To build our SDR-based Trunked Radio scanner, we will need to install UniTrunker, as well as a few other required dependencies.
Note: When I first attempted to install these programs, I ran into a few problems, mostly due to the order that I installed things. That being the case, I will attempt to present this information in a structured, step-by-step manner and hopefully prevent you from making the same mistakes.
Note: We will be using an extremely popular online site (RadioReference.com) to find the control channels for our location.

We need to download the following software:
I will walk you through it. It is not that bad, really!
- SDR Sharp
- UniTrunker
- Virtual Cable
- DSDPlus
SDR Sharp (SDR#): Install procedure
Note: You will not need SDR Sharp to build our UniTrunker tracking radio scanner, however, it will come in handy to ensure the required RTL-SDR drivers and WinUSB drivers have been installed properly. Also, we will be using SDR Sharp to verify that the listed control channel frequency specified is accurate. The Radio Reference group attempts to keep their databases up to date, however sometimes the listed control channels may be outdated or recently changed (slightly shifted).
SDR Sharp is also a “fun to play with” piece of software. You can tune to frequencies in the FM radio band 88MHZ to 108MHz and find your favorite radio stations for your area!
I typically will use SDR Sharp to tune into the listed control channel frequency, to be sure the frequency is accurately listed. I.e. For my location in southeast Iowa, the RACOM Network control channel frequency for my neighboring city of Rock Island, Illinois is displayed as 857.2375MHz. (Control channels are always displayed in red)

However, checking this with SDR Sharp shows the frequency needs to be 857.1375MHz (shifted down by 100KHz). We will need to remember this frequency when we configure the UniTrunker software later.

Note: I chose the ‘unskinned’ version of SDR Sharp version for this demo.
- Visit: http://airspy.com/ and click Download

- Scroll down a few lines and find the link for ‘unskinned SDR#’, click where it says “here.”

- Insert the rtl-sdr USB dongle(s)
- Download the SDR Sharp zip file
- Double-click the zip file and extract the files to a folder of your choice
- Navigate to the extracted folder
- Execute “install-rtlsdr.bat” (This installs RTL-SDR drivers and writes the file “zadig.exe” to the folder)

WinUSB driver (using zadig,exe): Install procedure
- Right mouse-click on “zadig.exe” and Run as Administrator
- Answer “Yes” to “Allow this app to make changes to this device”

- Select “Options – List Devices”
- Select “Bulk-In, Interface (Interface 0)”
- Click “Install Driver”

Verify a successful SDR Sharp install by executing “SDRSharp.exe”
(Don’t forget to select the RTL-SDR under “Devices” after SDR Sharp loads)
DSDPlus (Digital decoder software): Install procedure
Visit: https://www.dsdplus.com/download-2/
- Click on DSDPlus v1.101 link
- Click on DSDPlus v1.101_DLL_Files

- Navigate to /Downloads folder
- Right mouse-click on the DSDPlus v1 101 zip file and “extract all”
- Right mouse-click on the DSDPlus v1 101 DLL zip file and “extract-all”
- Navigate to the DSDPlus DLL extracted folder
- Press CTL-A (select all) and move them to the DSDPlus extracted folder
- Click on DSDPlus.exe (to run DSDPlus)
We will see a few windows pop open, and we now know DSDPlus is up and running.
Virtual Cable: Install procedure
- Visit: https://vb-audio.com/Cable/index.htm
- Click the orange Download for Windows

- Navigate to the /Downloads folder
- Right mouse-click on the zip file and “extract-all”
- Navigate to the VBCABLE_Driver_Pack43 extracted folder
- Right mouse-click and Run as Administrator “VBCABLE_Setup_x64.exe”
- Click “Install Driver”
- When completed, reboot Windows
After Reboot
We can quickly verify that VB-Cable is installed properly by clicking “VBCABLE_ControlPanel.exe”.
We should see the following window open. This indicates a successful install, and we can now close this window.

Configuring VB Cable
- Hover over the speaker icon (bottom right on the task bar) Select Sounds – Playback

- Ensure that the speakers are the default for Playback
- Click the Recording tab
- Left mouse-click (one time) on the VB Cable (to highlight it)
- Right mouse-click and select “Set as default”
- Click “OK”

Configure UniTrunker
With all the required dependencies now installed, we are ready to install, configure, and run UniTrunker.
UniTrunker software: Install procedure
- Visit: http://www.unitrunker.com/download/
- Select the latest released version (UniTrunker version 1.0.33.6 in my case)

- Navigate to the /Downloads folder
- Double-click on “UniTrunker-1.0.33.6.msi” (to install)
Info: UniTrunker will be installed to C:/Program Files(x86)
Note: Do not create a shortcut for “uniform.exe” (UniTrunker), instead click the Windows logo, type “unitrunker”, right mouse-click on the app, and select “Pin to taskbar” or optionally “Pin to Start”.

- Click the UniTrunker icon on the taskbar
- Click “First time installation”

- Click the “plus” button to add a receiver (we’ll need to do this twice, once for SDR-1 and then again later for SDR-2 (for now, let us configure SDR-1)
- Click the RTL2832 button

The following is my configuration for both receivers (SDR-1 and SDR-2)


After completing the configuration for receiver #1 (SDR-1), repeat the process by clicking the “plus” button again and selecting RTL2832 for receiver #2 (SDR-2).
Important: The settings highlighted in yellow are the only differences between the two receivers and it is especially important to enumerate these settings exactly as shown above (The only exception is the name you give the receiver in the Model field. I chose to name the first receiver “SDR-1 Control channel” and the second receiver “SDR-2 Scanner”. You are free to call them anything you like.)
Also, the “Park” value (frequency) underlined in red (SDR-1 receiver) is set according to my location here in Iowa and it will need to be changed to one of your control channel frequencies (as per the Radio Reference database for your area).
That is it! Everything is installed and we are ready to operate our Trunked scanner!
Ensure that DSDPlus is running and click the Play arrow (Start) on both receivers. You should now see the following in the UniTrunker window, and the scanner should open and be operational.


Conclusion
This was a fun project that opened some new avenues for me in the realm of software-defined radio. There are a ton of interesting features to explore, as this is a very robust application! Interestingly, DSDPlus is also an amazing tool that takes care of decoding the digital trunk traffic into something we can hear.
While researching this project, I discovered that there is quite a bit of information out there regarding UniTrunker, as well as the implementation of other SDR based projects. I even ran across another SDR Trunk tracking scanner application known as “SDR Trunker”, although I have not reviewed it… yet.
Ready to learn more?
Level up your skills with affordable classes from Antisyphon!
Available live/virtual and on-demand
