Web App Pen Testing in an Angular Context
Joff Thyer //

If you are a fan of web application pen testing, you have been spoiled with a lot of easy pickings over the years. We all love our interception proxies, and I know a lot of us are huge fans of the great work that PortSwigger has done with Burp Suite over the years. Having said this, testing apps in the age of modern web applications that have Document Object Model (DOM) focused frameworks is a little bit different than testing a traditional HTML-based app.
For the remainder of this blog post, please make the assumption that I am referring to Angular versions 2 and up which are object-oriented and based on ECMAScript version 6 (ES6 or ECMAScript 2015). Angular version 1.x previously known as AngularJS is deprecated, and less likely to be encountered, although not dead yet!
Having said this, don’t panic and don’t abandon your normal web app penetration testing techniques. What you need to understand is that in the world of Angular 2+, which is designed with security in mind from the ground up, your normal opportunities specifically for injecting JavaScript into the DOM are severely limited if the developer uses the defaults and common best practices. We should celebrate that things are moving in the right direction with modern frameworks whereby developers don’t have to continually reinvent the wheel!
Here are a few references with some great background for you.
- https://blog.nvisium.com/angular-for-pentesters-part-1
- https://blog.nvisium.com/angular-for-pentesters-part-2
- https://angular.io/guide/security
There are mistakes that developers can make which render an Angular application vulnerable from the DOM perspective. These mistakes largely boil down to developers deliberately working around the safeguards that the framework puts in place. Examples would be as follows:
- If a developer combines user input with the creation of a template, then that user input can directly impact the DOM rendering leading to a template injection vulnerability. Angular considers templates as trusted by default.
- If a developer decides to mark user input as trusted and disables the extremely effective Angular sanitization and output encoding methods, then you are back to the bad old days of potential Cross-Site Scripting being introduced. As a rule, any Angular interpolated content is always escaped.
- Direct use of the DOM APIs is discouraged! There is probably an Angular method for everything you need to do. If not, there is an Angular “DomSanitize()” function if you just have to muck around where you really should not.
From an attacker perspective, a pretty sizable part of the attack surface has been removed if the developer follows the best practices. There are however opportunities to discover. Some thoughts are as follows:
- The backend of the application will most likely be JSON/RESTful-based API calls. Mistakes in proper server-side data validation are possible.
- Insecure Direct Object References (IDOR) are discoverable in API’s and you should always request multiple authenticated accounts for testing to examine cross-user role incursions.
- Session management still needs to be properly implemented. It is not unusual to see JSON Web Tokens (JWTs) used for session management in Angular-based apps.
- The session token might not be properly invalidated upon logout, might be long-lived, or token invalidation upon log out completely in the control of the client-side DOM.
- The JWT might be able to be re-signed with a “None” value as the signature algorithm creating an unsecured token, or the signing key itself might be able to be cracked.
- Signing your own application JWT could lead to other authenticated user compromise.
- For a couple of quick JWT references visit these URLs:
- Undocumented or debugging API functionality might be discovered through changing a value in the browser DOM.
- If a developer decides to implement Server-Side Rendering (SSR) rather than the normal DOM heavy Client-Side Rendering (CSR), it is possible to reintroduce JavaScript injection opportunities. The Angular project is trying to get ahead of this by introducing Angular Universal. Here are a couple of references for you.
When pen testing an Angular app, one of the results of the technology shift is that you will likely spend more time in the browser developer console as well as your interception proxy. Angular 2+ has a feature in the form of a special function called “enableProdMode()” which is called right after the framework is bootstrapped in the DOM. This assumes that the developers have indeed deployed the application in “production mode”.
The “enableProdMode()” function makes Angular skip building the debugging elements tree in the browser. This debugging elements tree is useful to you as a penetration tester as you can use the Angular “ng.probe()” function to examine page elements after selecting that element on a page. In production mode, “ng.probe()” for a page component will return a null value which is not useful.
One of the early things you want to do is modify this function “in flight” in your interception proxy so it “fails” to enable production mode.
There is one slight twist on this. If the application is also deployed with https://webpack.js.org, then it is possible that the function name is obfuscated. Fortunately, there is a string within the function that reads “Cannot enable prod mode after platform setup” which you can use to find the obfuscated function name.
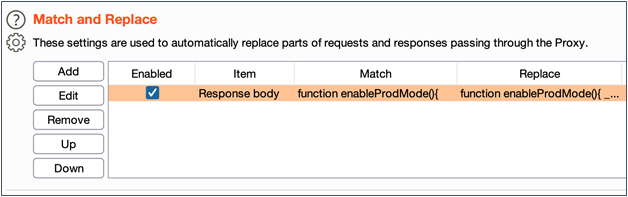
If you are using Burp Suite, here is a way you can configure the proxy to rewrite the function in flight. This example assumes that webpack has not been used to obfuscate function names. The steps are as follows:
- Select the Proxy tab in Burp Suite
- Select the Proxy -> Options sub-tab
- Scroll down to the “Match/Replace” section and remove any existing rules
- Click “Add” to add a new rule
- Select “Response Body” as the type
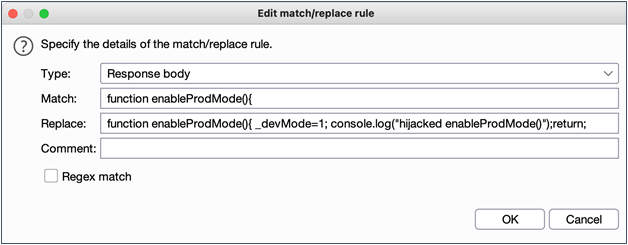
- Match the string “function enableProdMode(){“
- Add in a replacement string that adds“_devMode=1;” and returns from the function. When this is done, it is important to be careful to preserve script syntax integrity so that you don’t completely break functionality.

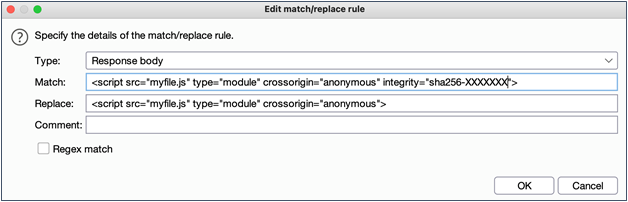
There is another snag you might run into which will force you into adding another match/replace rule. I learned this one the hard way of course (like so many things).
Since 2016, some HTML included source tags have an “integrity” option which is actually a pretty nice feature. In short, the integrity tag allows the developer to specify a hash algorithm and a base64 encoded hash. The browser will attempt to validate the hash and will not execute the JavaScript if the hash does not match.
A related defense in-depth technique is to leverage Content Security Policy (CSP). CSP is a whitelisting technique that allows web server administrators to specify the domains that browsers should be considered as valid sources of executable scripts. For browsers that support CSP, this technique further helps mitigate Cross-Site Scripting and data injection attacks. CSP is implemented with an HTTP header added to server responses. Browsers that don’t support CSP will fall back to the normal same-origin policy model. For more information, please refer to https://developer.mozilla.org/en-US/docs/Web/HTTP/CSP.
As you might imagine, rewriting a JavaScript function in flight will certainly violate the integrity tag check if it is present. A second match/replace rule similar to the below screenshot will remediate this roadblock for you to continue testing.
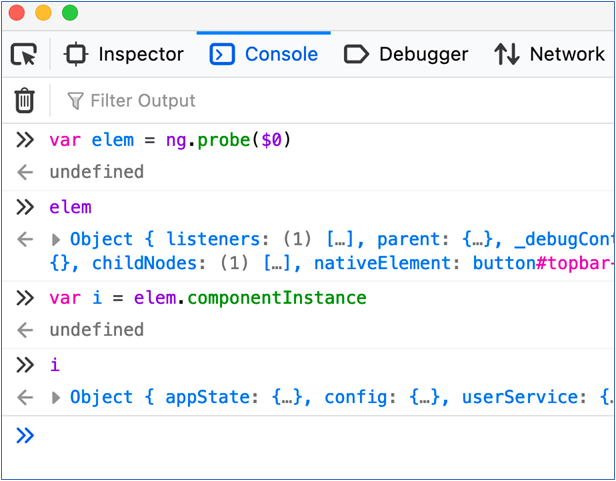
After putting this into place, and reloading your Angular app contents, you can select any page element and probe its state using “ng.probe()” in the developer tools console, and then even create an instance of the JavaScript object to begin your exploration. From here you can manipulate attributes of that object to see what impact it has. What you try to do is only limited by your creativity and time constraints. An example of using this probe technique is shown below.
That’s about all I have for you now. Happy web app testing trails and keep right on hacking.
You can learn more straight from Joff himself with his classes:
Regular Expressions, Your New Lifestyle
Enterprise Attacker Emulation and C2 Implant Development
Available live/virtual and on-demand!
