
Steganography: The Art and Science of Hiding Things in Other Things – Part 3
This is part three of a four part series. In part 1, we covered the basics of image formats and found a place to hide data in images. In part 2, we actually wrote code to steganographically encode data into an image and then extract it without making the image look different.

Tired of this picture yet?
We ran into a problem in part 2, though – compression. When images are compressed, our carefully hidden data can be damaged. We fixed that by repeating every bit in the message 9 times, but we can do better. This post will cover how we can use some math, in the form of error correcting codes, to hide more bits of data in each image.
Our friend Wikipedia gives us a good definition of what an error correcting code is:
“An error-correcting code (ECC) is a process of adding redundant data to a message, such that it can be recovered by a receiver even when a number of errors (up to the capability of the code being used) were introduced.”
The repetition we used earlier is the simplest possible ECC – we send redundant data, repeating ourselves over and over, so that even if some of the bits are wrong we can still receive the message.
Before we start figuring out something better, though, we need to define our problem. We know that compression destroys data, but how?
Firstly, we can say that compression introduces *noise* – in other words, some bits are not what we expect them to be. For instance, we might put the message `1101` in and get `1100` out – in which case, we would say that the last bit was “flipped” from a 1 to a 0. Now that we know we have some noise, how can we define it?
Well, we have several options here. You can read papers, like [this 8 page one](http://csrc.nist.gov/nissc/1996/papers/NISSC96/paper014/STEGOX.PDF) written by someone at the Fleet Information Warfare Center, or you can make some assumptions and see if they work.
Let’s compromise and make some assumptions that are informed by reality. They might not be 100% right, but they’re right enough. So, for our sake, we can assume:
1. Random, position-independent noise: there are no specific patterns in the noise; any given bit has the same chance of being flipped as any other bit of the same significance. This means it doesn’t matter *where* in the image we encode data; a pixel in the bottom left hand corner of the image (for example) is as likely to be changed as a pixel in the middle.
2. More significant bits have less noise: the least significant bit of any pixel is the most likely to be flipped since compression tries to eliminate useless data, and the chance that a bit will be flipped decreases as the bits become more significant.
3. The noise is binary symmetric: this is a fancy way of saying that the noise is unbiased and evenly distributed – a zero is just as likely to be flipped as a one.
Rather than spend a lot of time uploading and downloading images from web sites where they’ll be compressed, we can simulate this type of noise by randomizing some bits in the image. This lets us use code, which is nice and controllable so we can do lots of testing easily.
Here’s our image before and after blurring:


It may not look very different, but it turned `we’re going to hide this message in an image!` into `we’re eking to hide this message in an image` (without the exclamation point on the end), so it’s definitely causing some damage.
The challenge now is to be able to extract data from the blurred image, even though there’s noise. The repetition from part 2 works, but having to repeat every bit 9 times means we can’t transfer nearly enough data. We can do better.
Before we can dive into error correction, though, we need to talk about parity bits. Essentially, a parity bit adds a check to any given binary string that tells us whether the number of 1-bits in the string is odd. For instance: the string `000` has no 1-bits, so its parity bit would be 0 (leaving us with the final string `0000` ). In contrast, the string `010` has an odd number of 1-bits, so its parity bit is 1, leaving us with `0101` . You’ll notice that this means every string has an even number of ones in it once the parity bit is added.
The process is:
1. Compute parity bits based on your message. If it has an odd number of `1` values, the parity bit is `1` , otherwise the parity bit is `0` .
2. Put those parity bits into the message; they’re frequently on the end, but it doesn’t actually matter where they are so long as the receiver knows where to find them.
Why do we do this? Simple – if a bit gets flipped somewhere in the string, we can tell something is wrong by checking the parity bit (if the string `0101` from above comes across as `1101` , we know that the parity bit of `110` should be 0 – but it’s 1, so something must be wrong). Unfortunately, this only tells us that something is wrong – not what. We have no way of knowing which bit was flipped.
Enter Richard Hamming, who invented Hamming codes, a way of combining parity bits to both *detect* and *correct* errors. Hold on, this is about to get awesome (and really math-y).
For this next part, let’s assume you’re trying to send 4 bits of data, and you know (somehow) that you won’t have more than one error in them.
Say you’ve got your usual parity bit with the 4 bits of data. If there’s an error, how can you tell which bit is wrong? You can’t – one of the four is flipped, but there’s no way to know which. (Note that the circles in these graphics each represent a parity group – once all the parity bits are computed and added, each will have an even number of ones in it. This means that if a circle *doesn’t* have an even number of ones in it when we receive the message, we know something is wrong.)
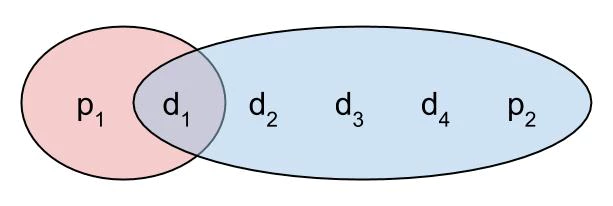
If you just add another parity bit, that’s great, but all you’ve done is repeated the parity bit – which is useful, since it means you can maybe tell if either of them is wrong by checking the other. But this mostly seems like a waste. You still can’t tell which data bits have been flipped if anything goes wrong – the second parity bit provides no new information.
Let’s try something weird. What if you exclude the 4th data bit from the first parity bit? If either of the first three data bits are flipped, the first parity bit will tell us, and if any of them are flipped, the second parity bit will tell us as usual, but… if the first parity bit is wrong, it can be any of the first three data bits that are wrong, but if the second parity bit is wrong, it can be any of the four. Seems like we’re kind of narrowing in on something here.
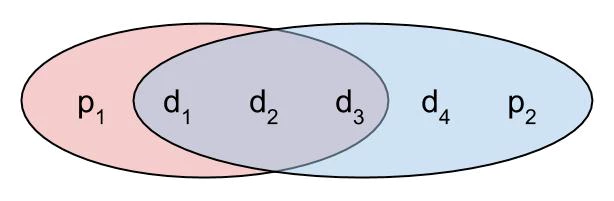
If we take this one step further and keep shrinking the number of bits covered by the first parity bit, we get to the layout below. We’ve done an incredible thing here! If both parity bits are wrong, we know that the first data bit is wrong – not just “a bit,” but *exactly which bit is wrong!*
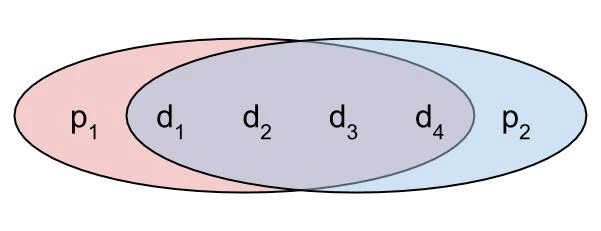
If you take this further, you can end up here:
Seriously, take a minute to look at the image above. This means that if *any one of the data bits is flipped, you can tell which it is and fix it*, because you know that each circle must contain an even number of ones. By extending this idea, you can play with the number of parity bits and data bits to handle different levels of error – broadly speaking, more parity bits help you correct more errors, but it means you have less space for data.
If error correcting codes are still confusing, think of it this way – we’ve created a bunch of potential messages which are *invalid to receive*, so that if you get them, you know something is wrong (the valid messages are known as “code words” – the “code” in “error correcting codes”). When you get one of these messages that you know is wrong, you can correct for errors by choosing the valid code word that is most similar to what you received (which means we want code words to be as different as possible so that it’s obvious which code word any given incorrect message is supposed to be).
This is the math behind correcting errors in a much more efficient way than the simple repetition we’ve used before – in our case, we can fit more than four times the amount of data! Next time, we’ll take this math and put it to work.
Ready to learn more?
Level up your skills with affordable classes from Antisyphon!
Pay-Forward-What-You-Can Training
Available live/virtual and on-demand
