
EyeWitness Cheatsheet
By Chris Traynor || https://ridgebackinfosec.com
This blog is part of Offensive Tooling Cheatsheets: An Infosec Survival Guide Resource. You can learn more and find all of the cheatsheets HERE: https://www.blackhillsinfosec.com/offensive-tooling-cheatsheets/
EyeWitness Cheatsheet: PRINT-FRIENDLY PDF
Find the tool here: https://github.com/RedSiege/EyeWitness
The Basics
Offensive Purpose:
- Efficient way to gather info about web services & their hosting infrastructure
- Automates taking screenshots for quick & easy review
Limitations:
- Only works on HTTP services
- Can only capture a screenshot of the landing/login page; will NOT do spidering
Key Features:
- Output in multiple formats (i.e. – HTML & text)
- IDs web server software on target systems
- Can use Nmap & Nessus output files
- Ability to resume from the last scan point if it gets interrupted
Installation Methods
Git & GitHub
This will ALWAYS have the latest and greatest features but requires a few additional setup steps. You might also run into Python dependency issues that need to be worked around depending on your OS.
git clone https://github.com/RedSiege/EyeWitness
cd EyeWitness/Python/setup
sudo ./setup.sh
cd ..

python EyeWitness.py [options] 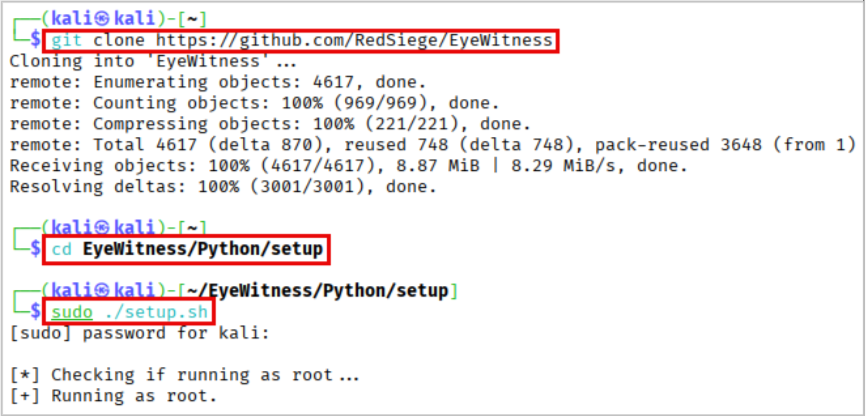
Advanced Package Tool (APT)
APT can lag in new feature/fix releases compared to the direct repository method.
sudo apt install eyewitness -y

eyewitness [options]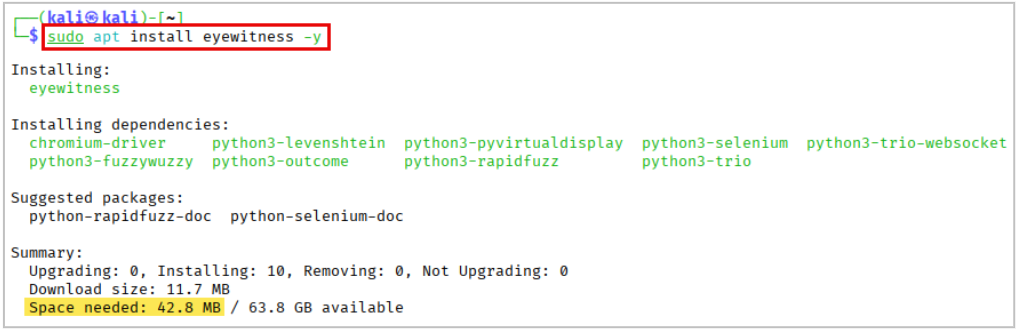
Basic Execution
Input Options:
-f Filename | Line-separated file containing URLs to capture |
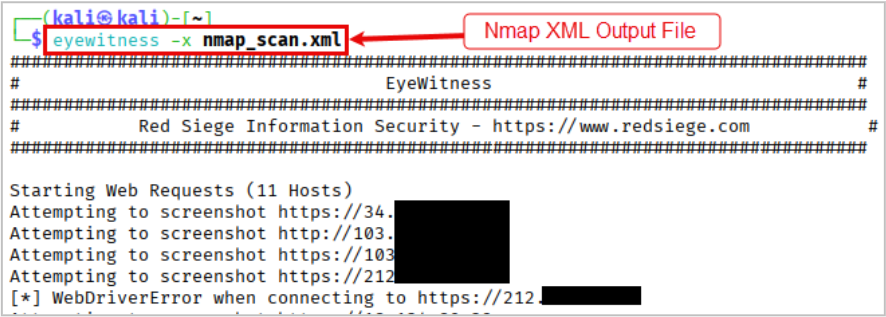
-x Filename.xml | Nmap XML or .Nessus file |
--single Single URL | Single URL/Host to capture |
--no-dns | Skip DNS resolution when connecting to websites |
Tips
- Always set a custom
--user-agentvalue to blend in with traffic.
- The
--resumeoption is useful if your execution gets interrupted.
- EyeWitness accepts Nmap & Nessus XML output files, and it’ll automatically parse them for targets.
- Always see if the report contains any possible “default credentials” alongside the screenshots.
- The report can sometimes reference white papers for potentially vulnerable targets.
Key Customization Options
--user-agent User Agent | User Agent to use for all requests |
--proxy-ip 127.0.0.1 | IP of web proxy to go through |
--proxy-port 8080 | Port of web proxy to go through |
--proxy-type socks5 | Proxy type (socks5/http) |
--resolve | Resolve IP/Hostname for targets |
--prepend-https | Prepend http:// and https:// to URLs without either |
--cookies key1=value1,key2=value2 | Additional cookies to add to the request |
--resume ew.db | Path to db file if you want to resume |
--max-retries N | Max retries on timeouts |
-d Directory Name | Directory name for report output |
--threads # of Threads | Number of threads to use while using file-based input |
--results Hosts Per Page | Number of hosts per page of report |
Further Learning
- https://ridgebackinfosec.com/recordings/
- https://www.blackhillsinfosec.com/six-tips-for-managing-penetration-test-data/

Explore the Infosec Survival Guide and more… for FREE!
Get instant access to all issues of the Infosec Survival Guide, as well as content like our self-published infosec zine, PROMPT#, and exclusive Darknet Diaries comics—all available at no cost.
You can check out all current and upcoming issues here: https://www.blackhillsinfosec.com/prompt-zine/