
How to Build a C2 Infrastructure with Digital Ocean – Part 1
Lee Kagan* //
ADVISORY: The techniques and tools referenced within this blog post may be outdated and do not apply to current situations. However, there is still potential for this blog entry to be used as an opportunity to learn and to possibly update or integrate into modern tools and techniques.

Deploying an offensive infrastructure for red teams and penetration tests can be repetitive and complicated. One of my roles on our team is to build-out and maintain the red team systems and control accesses to and from them. There’s an endless variety of what you may wish to deploy but I found I was consistently repeating the same baseline deployment.
In the cat and mouse game of red vs. blue there are challenges for both sides with regards to successfully launching an offensive and successfully defending against one.
For red teams, and as our team infrastructure handler, the following items are my concerns:
- Stability
- The general system performance and reliable communications channels and accesses
- Security
- OPSEC and defenses against investigators / blue teams
- Functionality
- Add/remove/modify features and capabilities as the team requires
The Red Team Infrastructure wiki is a great example and resource of this exact concept. You can read more at https://github.com/bluscreenofjeff/Red-Team-Infrastructure-Wiki
Here I’ll cover using Digital Ocean with Cobalt Strike team servers in a semi-automated fashion that is the beginning of a more complex and automated process and tooling I hope to release shortly in part 2. For now, this should serve as a good starting place.
What we’re going build:
- 3 Digital Ocean droplets
- for the different roles, our team servers play Cobalt Strike
- Customize the SSH configuration
- Server health monitoring
- Firewall access to and from the team servers
- Let’s Encrypt for HTTPS beacons
Here are the things you’ll need in advance:
- Cobalt Strike license or trial version
- Can replace this with MSF or Empire etc.
- Digital Ocean account
- C2K Files https://github.com/invokethreatguy/C2K
- DNS configuration access for your domain(s)
- Will need to set DNS A records
The infrastructure we are going to set up will do the following (mostly scripted):
- Deploy our droplets via Digital Ocean web UI
- SSH into each and add new sudo user, add SSH keys and transfer the C2K files
- Restrict SSH access to the new user with keys only
- Run the C2K builder script which will:
- Update the system
- Install lterm for console logging
- Much thanks to KillswitchGUI for this tool https://github.com/killswitch-GUI
- Install Java dependencies for Cobalt Strike
- Activate Cobalt Strike
- Replace current SSH config with custom file
- Create firewall rules
- Run HTTPsC2DoneRight.sh
- Much thanks to KillswitchGUI for this tool https://github.com/killswitch-GUI
Let’s begin!
The Steps
Log in to your Digital Ocean control panel. As you can see I have no droplets yet so let us go through the steps.

We’re going to create three droplets. The settings that I’m using are Ubuntu 14.04 for the OS and the $40 per month pricing. I don’t recommend going lower than this if you expect your Cobalt Strike team servers to do some heavy lifting. (screen2)

I’m selecting the Toronto region because that’s where I am, but feel free to choose your location. From an OPSEC perspective, it is not only advised to spread out your team servers in different geographical locations but depending on the defensive level you require, perhaps even different VPS providers (in case blue team blocks the entire Digital Ocean range, it could happen).

In the above image, I’ve also selected “Monitoring” which we’ll come back to and I’ve attached an SSH key that I’ve added to my Digital Ocean account.
Finally, create the three droplets as seen below. I’ve named my droplets “cnc1”, “cnc2”, and “cnc3”. Going forward I will be demonstrating the rest of our deployment on “cnc1” for the sake of time but the process will be identical to the others.

The droplets should take a short moment to be created. Once they are live, SSH in using the root account and the SSH key you’ve added when we constructed the droplets.

I’ll pause here for a moment and mention a fairly new feature to the Digital Ocean control panel (although what I am about to show you is built into the provided script, this is just to point out a cool feature achieving the same result).
Firewalls!
Click on Networking from the control panel and select Firewalls.
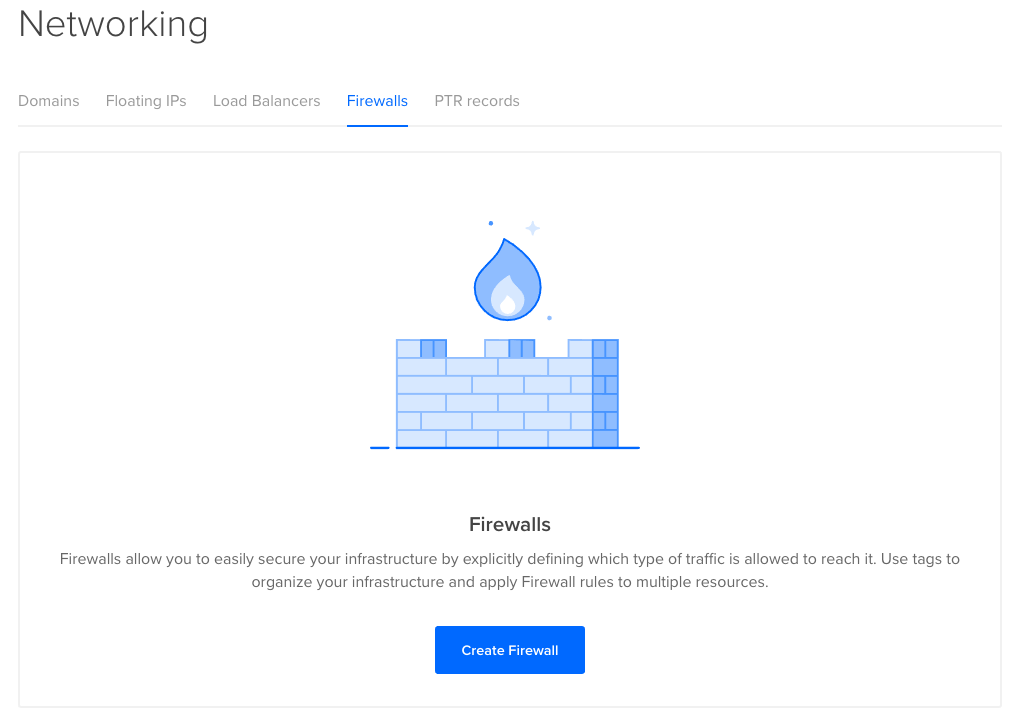
Click “Create Firewall” and you should be presented with a configuration menu that has one current inbound rule, SSH. What I’ll demonstrate in the images below is creating the same rules that we will use in the script.

In the above image, I’ve created the following inbound rules:
- HTTP and HTTPS for our HTTP/S beacons
- DNS UDP and TCP for DNS beacons and evil DNS things you may need
- Cobalt Strike team server port (50050)
- Our custom SSH port (7654)
Save the rules and then apply them to your droplets. You can either select droplets by name or by tag and add the firewall rules to all of them. Very convenient!


Okay, let’s get back to the droplets. I’ve logged in via SSH and now we’re going to do some manual configuration. In the image below, I’m adding a password for the root account, adding a new user called “demouser” who will be added to the sudoers group and will be our main account for everything.

While still logged in as root, edit the SSHD configuration file:
~# nano /etc/ssh/sshd_config
Quick side note, in the C2K folder, there’s a pre-made SSHD config that has the exact same modifications as I’m describing below. In the builder script we’ll use later, you can optionally comment out or delete this part of the script.
Lets’ change the following to:
- Port 7654
- PermitRootLogin no
- PasswordAuthentication yes (bear with me)


At the very bottom add the following:
- AllowUsers demouser

Exit the SSH session as root and transfer your SSH public key to the demouser account:
~# ssh-copy-id demouser@<teamserverIP>
Now you should be able to log in with keys only. SSH in as the demouser and edit the SSHD config file again and change the PasswordAuthentication setting to no.
You’ll need to transfer the files.zip to your team server somehow (SCP, wget from github) which you can find here: https://github.com/invokethreatguy/C2K
You’ll also need to provide you own Cobalt Strike trial and place it into the unzipped files.zip folder once you get to that point (mine is already bundled in as you’ll see later).
With everything unpacked in your users home folder (that’s my preference) you are ready to run the installer script.
Before you do, if you wish to follow along with me exactly then move everything (the unpacked files.zip contents and cobaltstrike-trial.tgz) into your home folder. For example, wherever you unpacked everything you could do this by:
~# mv files/* ~
Now let’s run the installer script C2Ubuntu.sh and take a look at what this script will do:

The first part will ask you if you’re ready to proceed. There’s no clever input handling here so type “yes”.
The script will then install lterm which is a fantastic terminal logging utility by @Killswitch-GUI and can be found here: https://github.com/killswitch-GUI/lterm

Next, it will prepare the dependencies for Cobalt Strike and prompt you for your license key

The script will then copy over the custom SSHD configuration file it ships with but this is entirely optional to your preferences. Simply comment this out if you do not wish for this to happen. The firewall rules I demonstrated in the control panel will be set and saved across reboots then the SSH service will be restarted.

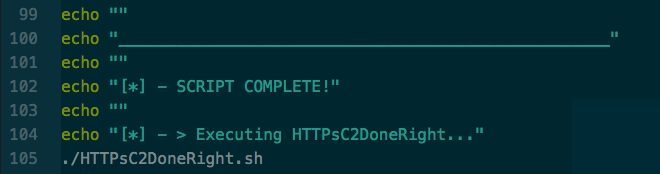
When the script completes it will execute the HTTPsC2DoneRight.sh script also courtesy of @Killswitch_GUI and can be found here separately:
https://github.com/killswitch-GUI/CobaltStrike-ToolKit/blob/master/HTTPsC2DoneRight.sh
I highly recommend you ensure the DNS A records for you team server you wish to enable HTTPS on is already configured as the Let’s Encrypt process will need to verify it as being live.

If all went well, you should see the following image near the end of the output:

This script will automatically pull the Amazon Malleable C2 profile and add the correct entries into its configuration to allow the certificate to be used.

Here is the Amazon.profile file and certificate added to its configuration:


Now we can verify if all is working correctly by visiting our servers address over SSL and you should be presented with the default Apache welcome page.

Before you start Cobalt Strike, be sure to stop the apache2 service otherwise your listeners will bark at you:
~# sudo service apache2 stop
Now connect to your Cobalt Strike team server and load the amazon profile:
~# ./teamserver <teamserverIP> <teamserverPasswords> httpsProfile/amazon.profile
Stand up an HTTPS listener, deliver to you target and if all is well:
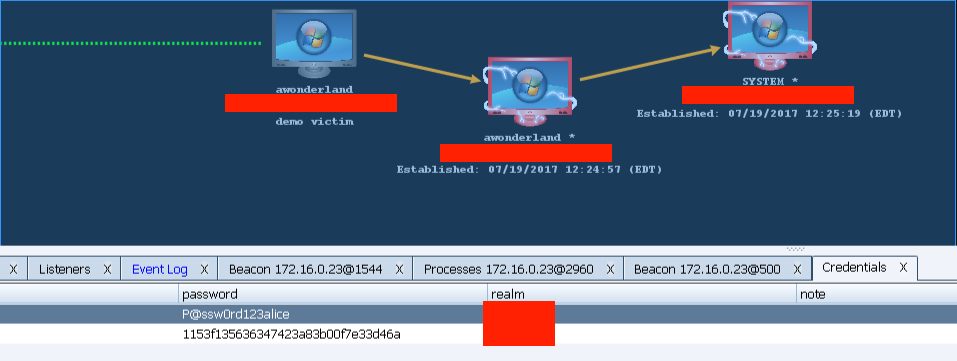
Your C2 should be ready to go!
Before we wrap up, I wanted to touch on the droplet monitoring we enabled in the beginning. C2 performance monitoring is somewhat under appreciated and if you’re expecting a lot of traffic, this is a great way to keep an eye on things.
Back in the Digital Ocean control panel, select Monitoring and create an alert policy.

I’ve just the default settings for a CPU performance monitor. The cool part is you can automatically receive emails and connect the alerts into a Slack channel.

Any new performance alerts will be sent your specified Slack channel.

Conclusion
This script is in its early phase and I hope to develop a framework with some killer automation features. For now, feel free to change settings as you like or need and feedback is always welcome.
In part 2 of this series, we’ll move forward in adding additional features into our script and deployment such as:
- Automate everything in this post
- Use the Digital Ocean cloud_config feature
- Add more monitoring to the droplets for defensive and OPSEC purposes
- i.e. logwatch, AIDE,
- Expand the C2 to include redirectors for each C2 team server
Thank you very much to BHIS for having me contribute to this awesome blog. You all rock!
____________

*Lee Kagan is a guest blogger from RedBlack Security. He is an offensive security professional with almost a decade in IT and InfoSec. A penetration tester, red teamer and currently lead for RedBlack Security’s Rogue Team specializing in threat and adversary emulation in Toronto, Canada. Lee’s focus on the team and in practice is offensive infrastructure support, post-exploitation of Windows and Active Directory environments, PowerShell and C# weaponization.
Ready to learn more?
Level up your skills with affordable classes from Antisyphon!
Available live/virtual and on-demand
