
Hunt for Weak Spots in Your Wireless Network with Airodump-ng from the Aircrack-ng Suite

Sean Verity began working for Black Hills Information Security (BHIS) in March of 2022 as a Security Analyst. Sean is excited to be on a team with like-minded individuals and to participate in passing on knowledge. Outside of work, Sean enjoys laughing at his wife’s jokes, hunting, mountain biking, and all things outdoors.
One of the biggest challenges with wireless penetration testing is sifting through all the access points that are out there. Everything, and I mean everything, is using WiFi these days. From personal vehicles to coffee makers, or egg dispensers. That’s not to mention the dozens, hundreds, or thousands of access points that are in scope during a wireless penetration test.
In this blog, I’m going to walk you through how to get started with airodump-ng and some of the techniques that you can use to home in on access points of interest. First, a quick review of terminology that will be used throughout the blog:
- BSSID: MAC address of an access point
- SSID: Network name
- Band: Frequency range of access points. This is typically 2.4 or 5Ghz. When shopping for wireless adapters, make sure that it is 2.4 and 5 GHz capable.
- Channel: Frequency within a band. Channels are subdivisions of the frequency bands.
- Encryption type: Open, Personal, and Enterprise. Open has no encryption. Personal oftentimes refers to WPA-PSK (pre-shared key). There are many flavors of EAP. Technically, EAP isn’t even a “wireless thing.” It’s also commonly applied to network access control for ethernet ports. 802.1x to be specific. We’re not going to get into wired equivalent privacy (WEP). WEP has been broken for decades and there are countless tools and videos to teach you how to find and break WEP almost instantaneously.
- Probe request / response: Wireless devices send probe requests to look for wireless networks they’ve been connected to before. “Hidden” networks rely on wireless clients to send a probe request with the correct SSID before they respond. This is a form of security through obscurity.
Introduction to Aircrack-ng
Aircrack-ng’s operating system support is just okay-ish. I mean…it doesn’t support Plan 9. I’m joking! Aircrack-ng’s support is amazing. All the major OSs and BSDs are supported and I’m pretty sure they’ve cornered the market for WiFi hacking tools that run on Solaris.
Below, is a list of tools in Aircrack-ng. We’re going to dig into two of them: airmon-ng and airodump-ng.

Airmon-ng
Hardware Setup
The first thing you’ll want to do is find a wireless card that is supported by aircrack-ng. The aircrack-ng team publishes a thorough tutorial that describes the process of finding a supported card that I recommend you look at here: https://www.aircrack-ng.org/doku.php?id=compatible_cards.
The material for this blog was generated with Kali Linux virtual machines running ASUS AWUS036ACH wireless cards. The AWUS036ACH card used to be very reliable and worked well for wireless pentesting. However, I ran into some very serious issues in running AWUS036ACH on Kali last year. Hat tips to Heyholiday067 for writing a patch and JsphByd for finding it.
Here’s a quick fix if you’re running into issues while following along with the same set up.
sudo apt update && sudo apt upgrade
sudo reboot now
git clone https://github.com/Heyholiday067/rtl8812au
cd rtl8812au
sudo apt install linux-headers-$(uname -r)
sudo apt install dkms
sudo make dkms_install
make && sudo make install
I recently learned that aircrack-ng team acknowledges instability in the AWUS036ACH driver. The currently recommended cards are the Alfa AWUS036AXML and Alfa AWUS036AXM (https://www.aircrack-ng.org/doku.php?id=faq#what_is_the_best_wireless_card_to_buy).

Configure Adapter for Wireless Sniffing
To run airodump-ng reliably, you need to stop all services that will contend for control of your wireless card. Fortunately, you don’t need to figure out which services could cause problems. There is a check command in airmon-ng that will tell you if any potentially troublesome processes are running.
sudo airmon-ng check
In this case, NetworkManager is running which is known to cause problems. Add the kill subcommand to the previous command to stop NetworkManager. There won’t be any output from check kill, but you can verify that no interfering processes are running by rerunning the check command. Notice how there is no output from the check command after running the check kill command.

The next step is to put the adapter into monitor mode so that it can sniff traffic. You need the name of the interface to do so. The name of the interface for the wireless adapter here is wlan0. Yours may be different. You can verify your interface name with the iwconfig command.

Put your wireless card into monitor mode with the airmon-ng start command.
sudo airmon-ng start wlan0
Restore Network Settings
You won’t be able to connect to any wireless networks when the card is in monitor mode. To restore your network settings so that you can connect to wireless networks, disable monitor mode and restart the NetworkManager service.
sudo airmon-ng stop wlan0
sudo systemctl start NetworkManagerAirodump-ng
Always Save to a Packet Capture File
Now that you know how to configure your adapter for wireless sniffing, it’s time to do some recon and home in on access points of interest. Before we get too far with this, a word of wisdom.
Always include the
-wflag when runningairodump-ng. This is how you can save a packet capture for offline cracking. You don’t want to observe a WPA2 handshake withairodump-ngonly to realize that you forgot to save a packet capture. You won’t be able to crack the handshake if you don’t have it saved. It’s also useful for reporting purposes. You can open the packet capture with Wirehsark, set theeapoldisplay filter and show the four-way handshake.

Filter Output
The figure below was entirely simulated as I didn’t think my neighbors would want their access points included in a blog about wireless hacking 🙃. The mixture of Corporate and Guest SSIDs is representative of what you would see during a typical wireless penetration test. It’s also very common to encounter a few hidden wireless networks. The following command is what I’ll typically run during an initial survey. I included the -b abg options to ensure that my wireless card is capturing on both the 2.4 GHz and 5 GHz bands. By default, airodump-ng will only capture on the 2.4 GHz band. The five access points on channel 36 would have been missed otherwise.
sudo airodump-ng wlan0 -w handshakes -b abg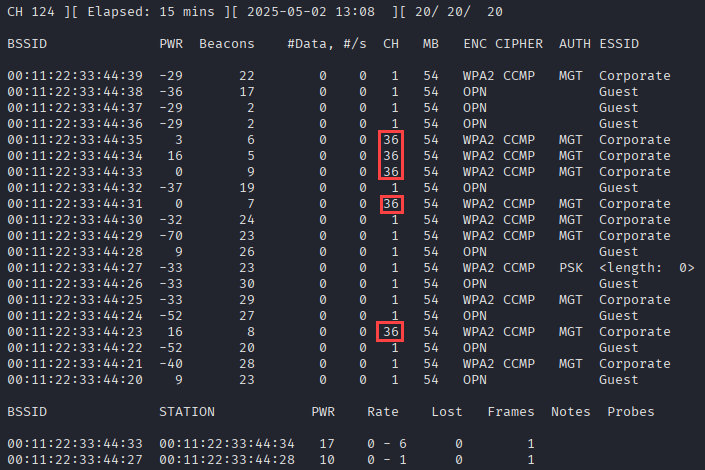
That “hidden” network is sticking out like sore thumb, right? Let’s restart airodump-ng with a couple of filtering options to decloak the access point and capture a handshake. By default, airodump-ng will change the channel its listening on many times per second. This is called “channel hopping” (https://www.kismetwireless.net/docs/readme/datasources/channelhop/). This is useful to gain a high level overview of a wireless network, but you could miss traffic as it switches from one channel to the next. As an example, you might only get pieces of a 4-way handshake for a WPA pre-shared key network. To lock in on the hidden network, we’ll use the -c 1 option since it was found to be using channel 1. We’ll also include the -t option and set it to WPA. Finally, we’ll filter on the BSSID, 00:11:22:33:44:27, with the -d flag.
TIP: Oftentimes, you’ll want to copy/paste a BSSID from airodump-ng output to use with other tools. To do so, you need to pause airodump-ng by tapping the space bar. At which point, you’ll be able to double-click the BSSID to select it. After copying the BSSID, tap the space bar again to resume airodump-ng output.
sudo airodump-ng wlan0 -w handshakes -c 1 -t WPA -d 00:11:22:33:44:27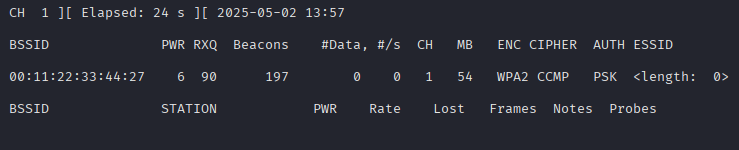
Would you look at that? We happened to “catch” a client connecting to the hidden network, revealing its SSID and giving us a WPA handshake to crack.

At this point, we could crack the handshake with aircrack-ng or hashcat, connect to CantHackMeIfYouCantSeeMe and figure out if it’s connected to the production network or anything else that’s critical.
Was it strictly necessary to filter on the hidden access point to capture a WPA handshake? No, but it does tip the odds in your favor, especially if you’re in a busy setting like downtown New York City. Below, are a few bonus filtering tips and why you might want to use them.
| Bonus Filter Tips | |
-a | Only show connected stations. This is useful when targeting PSK networks so that you can identify clients to target in deauthentication attacks for the purposes of recovering a WPA handshake. |
-z | This is useful for finding network names in probe requests. I’ve used network names from probe requests to decloak hidden networks. |
-z -a | You can really cut down on airodump-ng output with these two flags. This will hide all stations so that you only see access points. |
-B {{SECONDS}} | Not a filter, but you change the amount of time that airodump-ng will keep track of a BSSID. By default, a BSSID will roll off the output if it’s not seen after 120 seconds. |
-d {{OUI}}:00:00:00 -m ff:ff:ff:00:00:00 | Only display BSSIDs from a specific OUI. |
Further Reading on Aircrack-ng and Wireless Hacking
- https://www.aircrack-ng.org
- https://www.aircrack-ng.org/doku.php?id=airmon-ng
- https://www.aircrack-ng.org/doku.php?id=airodump-ng
- https://hashcat.net/wiki/doku.php?id=cracking_wpawpa2
- https://www.blackhillsinfosec.com/wifi-forge/
- https://www.youtube.com/watch?v=pXFIhBl-ryo
Ready to learn more?
Level up your skills with affordable classes from Antisyphon!
Available live/virtual and on-demand
