
How to Bypass Web-Proxy Filtering

Someone recently posed a question to BHIS about creating C2 channels in environments where heavily restrictive egress filtering is being utilized. Testers at BHIS, and in the industry as a whole, routinely run into this type of scenario. BHIS strongly encourages the use of egress filtering. As with many other security approaches, however, it is important to realize that this is just one piece of the overall security puzzle.
There are multiple ways to get around heavy egress-filtering (thanks to Beau for the links and insights in this section). In some cases, tools such as ICMPSploit [1] can be used to create C2 channels using the ICMP protocol. DNScat is a well-known tool that utilizes DNS requests and responses for C2 traffic. For this blog, we are going to focus solely on environments that are only allowing web-based traffic in and out of the environment. We will place an additional restriction on this scenario and assume that the environment also uses web-proxy filtering. It’s becoming more common to see companies not only block known bad sites but also block access to sites that have not received a categorization (e.g., Shopping, Financial, Sports, etc.) Even in this type of environment, there are numerous ways to establish C2 channels. Some of the methods include leveraging Gmail [2] and Outlook [3]. Domain-fronting via CDN services is also becoming increasingly popular [4].
I would like to focus on a web-proxy filtering bypass method that is known as domain-categorization take-over (thanks to harmj0y for the idea). I will walk you through the process of getting your own categorized domain and talk about some of the ways you can utilize it.
The first step is to find a recently expired domain that received a “good” categorization before it expired. The idea is that if you re-register a domain shortly after its previous owner failed to renew it, the categorization that was given to that domain will remain intact. How do we go about doing that? Easy!! Head on over to the site located at https://www.expireddomains.net. Now, you can use this service without signing up for anything. I suggest taking just a few minutes to sign up for a free account. With a registered account, you are afforded access to a lot more content than you do if you just browse anonymously. After logging in, you should see something similar to the screenshot below. I’ve highlighted the main area of interest. Click on one of the domain suffixes (e.g., “Deleted .info Domains”). The .com sites will likely be the most expensive to register. I typically go for .info, which can usually be bought for about $1/year.
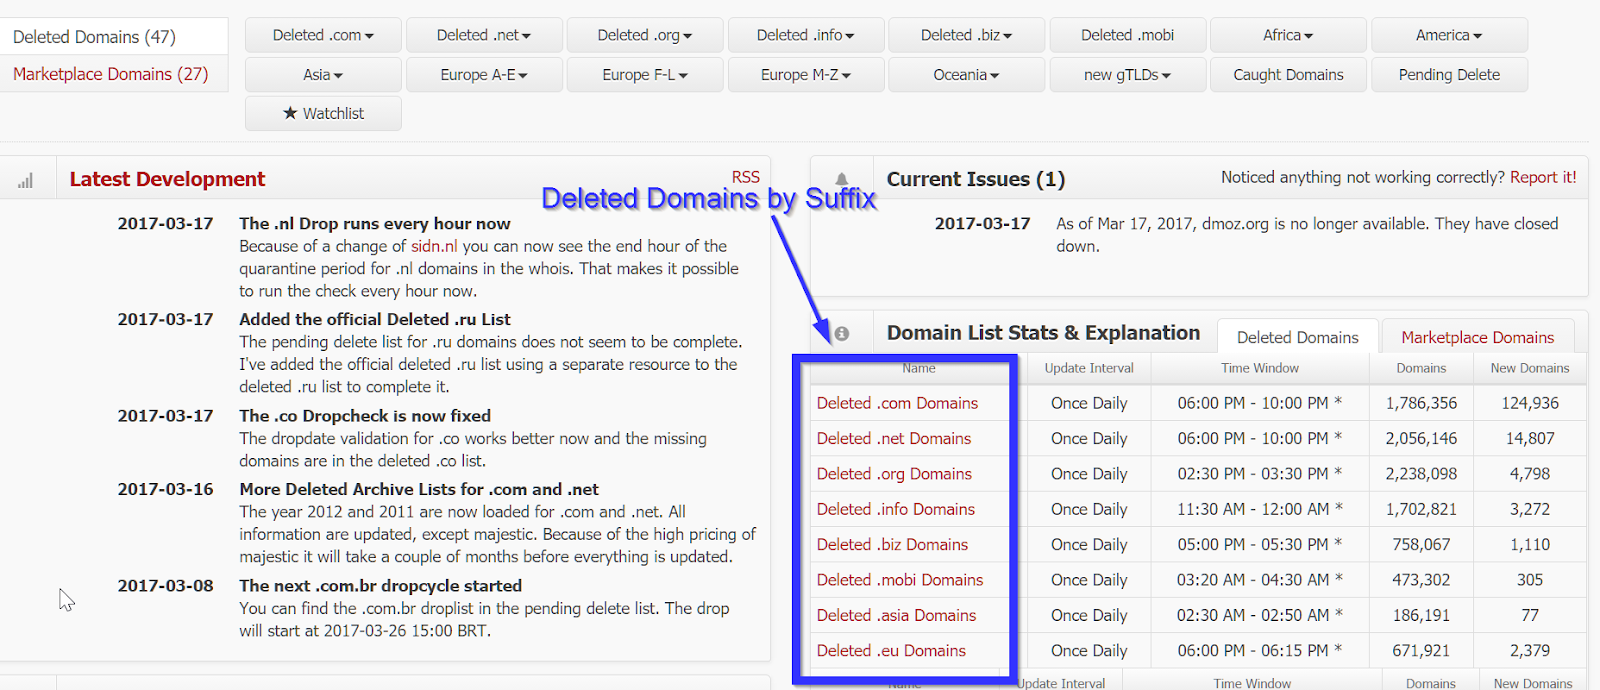
After clicking a Deleted Domain suffix, you will be taken to a page that shows recently expired domains with that suffix and a lot of information to go along with it. What does all of it mean? Well, I will talk about what I feel are the most important statistics. First, click on the “Show Filter” option.

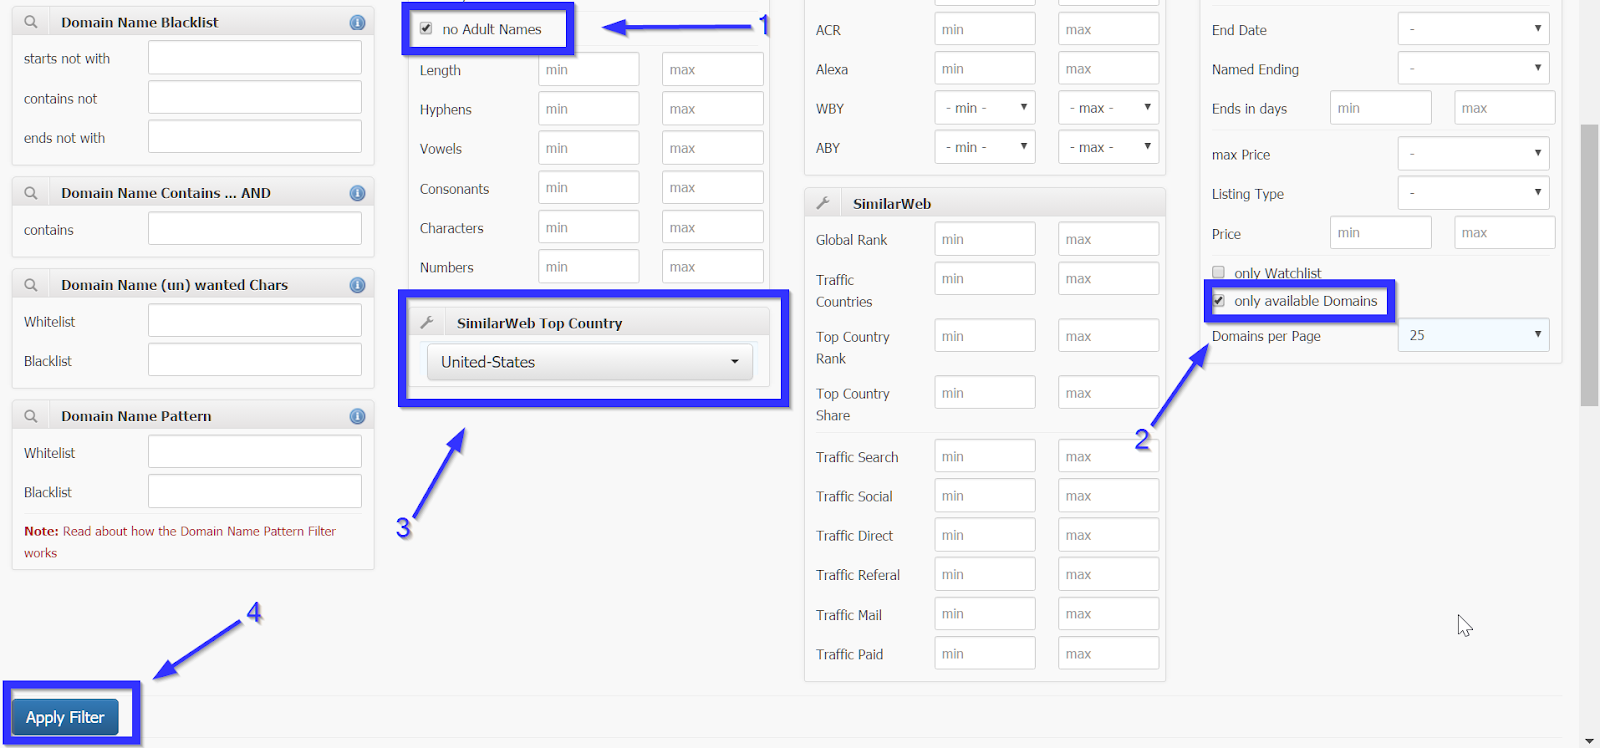
The first thing that I like to do is to check the “no Adult Names” box. We don’t pass judgment here, but web-proxy filters sure do! Next, I check the “only available Domains” box to ensure that domains that are currently registered do not appear in the list. The last change that I make is to select the “SimilarWeb Top Country” to be the country in which my target resides. This can help to reduce the suspicion of web-proxy filters. Once you’re satisfied with the filter options, click the “Apply Filter” button towards the bottom of the page.
Next, click on the “SimilarWeb” heading to sort the expired domains by their SimilarWeb ranking. Essentially, the lower the number the more “reputable” the site. Once I’ve applied the sorting, I start clicking through the SimilarWeb rating for the domains until I find one that has been assigned a category. In this case, clicking the SimilarWeb link for gtavdata.info shows that this site was categorized as “Reference->Maps” site. Seems innocuous enough for our needs!


Now that we’ve found a suitable categorized-domain, we need to register it. I suggest using https://www.namesilo.com since it has a nice interface, seems to keep the domain categorization intact, and provides free WHOIS privacy. We don’t need hosting or anything fancy, just something to register the domain and set the A record for the domain. NameSilo also makes it easy to set up Office 365 Mail with your domain but that is a discussion for another blog post. Just type in the name of the domain that you found in the previous step and register away. Make sure to pick the correct domain extension (e.g., .info, .com, .net, etc.) or else the trick likely won’t work.

After registering the domain name, sign in to namesilo.com and head to the DNS settings for that domain. The sequence of images below shows the general steps to get there.


Once you’ve found the DNS settings, click the edit button next to the first A record in the list. Change the IP address of that A record to be the IP address of your C2/testing server and then click submit button.


Next, delete the other three default DNS records that NameSilo created for you so that you are left with only the A record that you just edited in the previous step.


Now, we patiently wait for the A record changes to propagate to the public. Namesilo.com seems to propagate the changes within fifteen minutes in most cases. Keep checking for the update by using your favorite DNS resolution tool against your new domain. In the image below, you can see that I’ve used dig to verify that gtavdata.info now points to my C2 server.

The next step that I usually take is to generate a valid, signed SSL-certificate for the new domain. Having a trusted certificate to use for encrypting your traffic will add to the ability to bypass traffic-filtering mechanisms, help protect any sensitive data that might be transferred, and it can also evade some anti-virus tools that would otherwise see the unencrypted payload coming across the network. I suggest logging into your C2 server and then checking out Carrie’s awesome blog post on how to do this quickly and for free! [5]
After generating your shiny-new SSL certificate, you’re ready to use your categorized domain-name for testing! Continue reading Carrie’s post to see how to use your domain with PowerShell Empire.
You can also use your certificate and categorized domain with meterpreter and metasploit. Below is an example of using msfvenom to generate an HTA payload for my domain.

Before starting a listener for meterpreter, you might want to host your payload so that you can transfer it into your testing environment. You might also have other tools that you’d like to have on your testing system for the assessment. Apache is one easy way to do this that takes advantage of your certificate and domain. One suggestion is to create a folder in the /var/www/html directory on your system. For this example, let’s call it serverfolder.
mkdir /var/www/html/serverfolder
Copy your payload file and other tools to the directory that you just created. After copying the files, make sure that the Apache service is running. In the image below, I’ve copied the met_pay.hta payload file and the PowerLine toolset (teaser:upcoming webcast!) to my serverfolder directory.

You can now reach your files by opening a web browser and typing https://yourdomainname.net/serverfolder.

The next task we will do is to create a listener for our meterpreter payload. After downloading the files to your testing system, kill the Apache service on your server and start-up msfconsole.

Issue the commands shown in the screenshot below. Make sure to replace the handlersslcert value with the path to your certificate file.

Head back to the testing system on which you downloaded the payload and run it. Head back over to your server and enjoy the new session that was created using your categorized domain and signed SSL-certificate.
Follow Brian on the Twitters: @fullmetalcache
Shout-outs: Carrie Roberts, Sally Vandeven, Derek Banks, Beau Bullock, harmj0y (and APT team), and others that I’m probably forgetting…
[1] http://www.labofapenetrationtester.com/2015/05/week-of-powershell-shells-day-5.html
[2] https://github.com/byt3bl33d3r/gcat
[3] https://github.com/colemination/PowerOutlook
[4] https://blog.cobaltstrike.com/2017/02/06/high-reputation-redirectors-and-domain-fronting/
[5] http://www.blackhillsinfosec.com/?p=5447
Ready to learn more?
Level up your skills with affordable classes from Antisyphon!
Available live/virtual and on-demand

Michael Horch
April 13, 2017 @ 10:31 am
I’ve also found that hosting a webpage with content from another webpage on your C2 server that was known to have a “good” categorization for a time (a week seems to do it) will seem to bypass the filtering based on categorization. What this shows us as defenders is we need to limit what kind of content can be downloaded from specific categories. There’s really no reason for an executable to be downloaded from any category other than one designated for software downloads. Obliviously there are exceptions but overall preventing this helps.
Brian Fehrman
April 13, 2017 @ 4:52 pm
Hi Michael,
I agree that this is another example of the importance of a layered-security approach. Each layer has it’s flaws but they can still help overall. The important part, in my opinion, is realizing that no single layer is going to solve everything.
Thanks for the great comment!
ReconCounts
April 18, 2017 @ 6:40 am
Categorization is pretty simple to bypass and doesn’t require all these steps. Use some recon and identify their content filtering system. Mostly Palo Altos now adays. Register a new domain, submit a request to https://urlfiltering.paloaltonetworks.com/TestASite.jsp and use certbot. Done in 3 steps.
Brian Fehrman
April 20, 2017 @ 8:11 am
Hello,
I have run into a few environments where they blocks sites that do not have a categorization or are pending in the process. For instance, type fullmetalcache.com into that Palo Alto site. You’ll see that it isn’t categorized yet. That doesn’t mean you can’t get it categorized by placing content on it, as Michael pointed out.
If you can’t wait for your site to be categorized, this is one method that seems to work well.
Thank you!