
Intercepting Traffic for Mobile Applications that Bypass the System Proxy
by Cameron Cartier and Dave Blandford

This is a foolproof guide to intercepting traffic from mobile applications built on Flutter, which historically have been especially challenging to intercept. The methods presented should work for other types of applications as well. In the first half of this blog, we will discuss a method of intercepting iOS traffic via internet sharing on Mac. In the second half, we will show you how to intercept traffic from a rooted Android virtual device (AVD) using HTTP Toolkit.
Need help with the rooting process? You can check out Dave’s blog on ‘How to Root Android Phones’ here: https://www.blackhillsinfosec.com/how-to-root-android-phones/

Internet Sharing for iOS
Warning: If you don’t follow every step exactly as specified, you will spend hours banging your head against a wall thinking you’ve gone crazy because it worked yesterday, and now everything looks broken because you forgot a single step. Ask me how I know.
Requirements:
- A Jailbroken iOS Device (tested on iPhoneX running iOS 16.5.1)
- MacBook Pro
- Some combination of adapters to connect the two
From the computer, go to Settings -> Sharing -> Internet Sharing. Before toggling this on, click the info icon on the right-hand side.

This will bring you to the menu shown below.
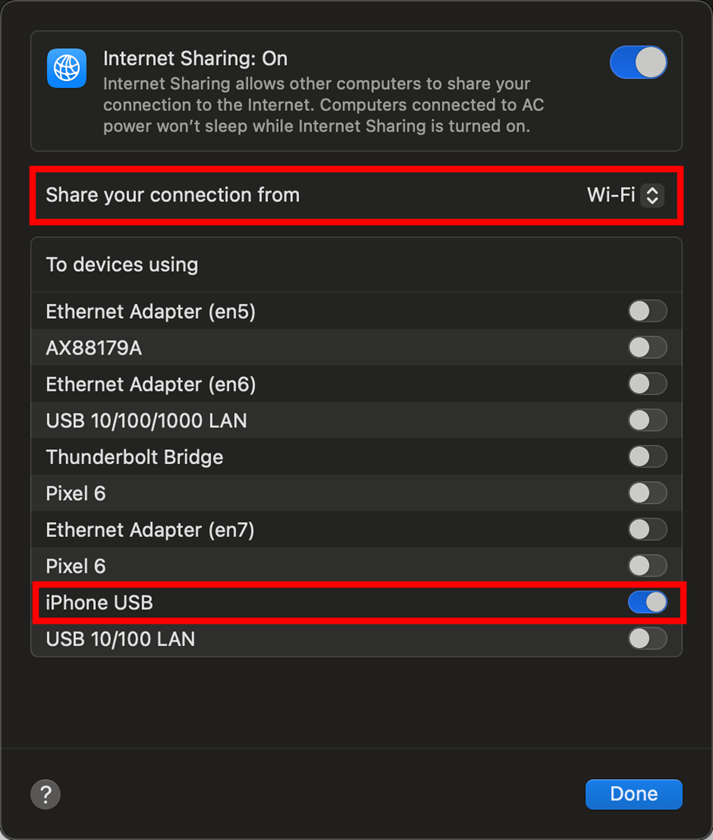
Next, connect your iOS device via USB. This should still work if you’re using a program like USBFlux. Once you do this, you should see the “iPhone USB” option shown above. Change the settings to share from Wi-Fi to the iPhone. This should match the screenshot above. In addition, make sure that Wi-Fi and any other network interfaces are turned off on the phone.
This will create a new network interface on the Mac, which will show up if you run ifconfig. In my case, the new interface was bridge103.
To verify that the traffic you are interested in is now visible from the Macbook, you can run:
tcpdump -i <bridge interface for the phone>You should see traffic when using the iOS device. This indicates you are successfully sharing internet with the device over the bridge interface.

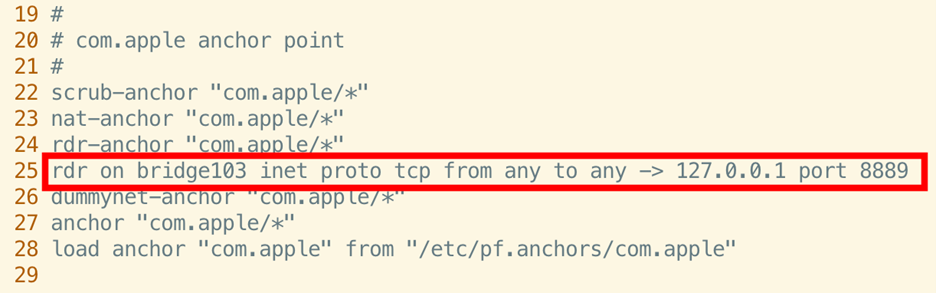
Next, open the pf.conf file in your favorite text editor:
sudo vim /etc/pf.confAdd the following line:
rdr on bridge103 inet proto tcp from any to any -> 127.0.0.1 port 8889This must be added in the exact position shown below (after the rdr anchor and before the dummynet-anchor line), otherwise you will get an error when you run the next command.
Now, flush the rules with the following command.
sudo pfctl -f /etc/pf.confThen we enable IP forwarding:
sudo sysctl -w net.inet.ip.forwarding=1This should forward all traffic coming into the bridge103 interface over to localhost:8889. Now we will start a Burp Suite listener on that port.

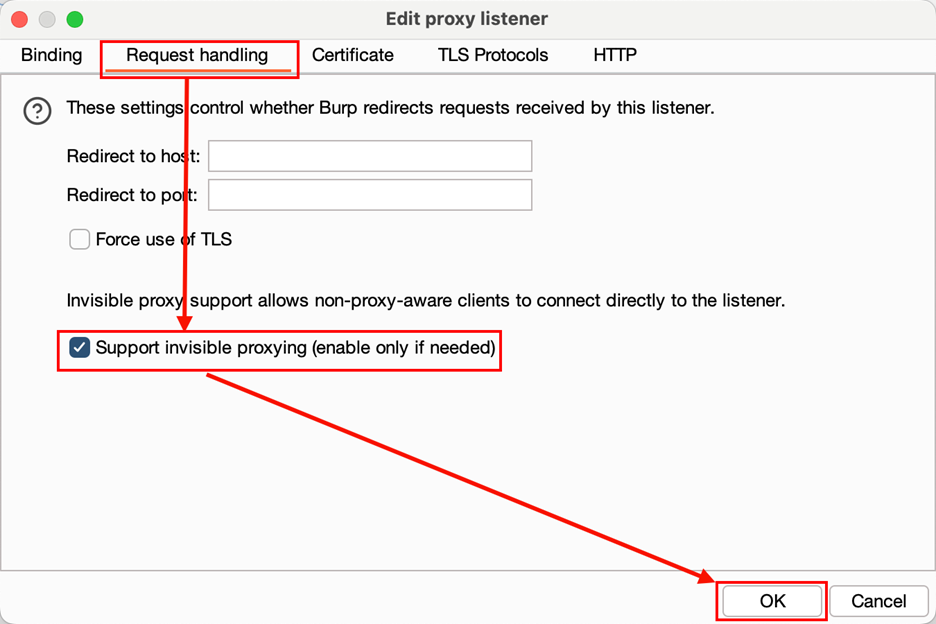
In addition to changing the host and port shown above, we need to enable support for invisible proxying. Invisible proxying is a method for non-proxy-aware clients or applications to connect directly to a Burp Proxy listener. This is useful at times when the requests are not formatted in a way the proxy is expecting. More information can be found in this Portswigger blog.
This can be enabled simply by checking a box on under the “Request Handling” tab.
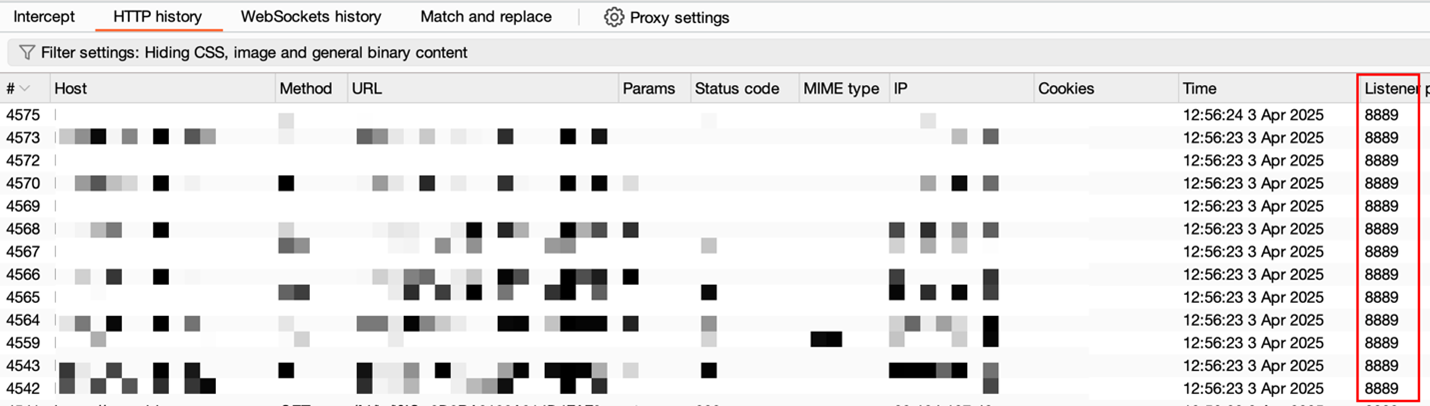
That’s it. You should now see the HTTP history tab populating.
HTTP Toolkit for Android
With apps that do not use the system proxy, like Flutter apps, there is more attention and effort needed to capture the traffic leaving the application and going to the backend servers. There are many solutions to capture Flutter traffic but the easiest method I have found is detailed below.
Capture the Traffic
Now on to what we came to do, capture traffic for apps that do not use the system proxy. First, download HTTP Toolkit (https://httptoolkit.com/). To use the HTTP Toolkit with an upstream proxy (like Burp Suite), we need the Pro version. At the time of this blog publication, a Pro subscription was $14.00 (https://httptoolkit.com/get-pro/). They offer a monthly subscription so you can turn Pro on/off as needed when testing calls for it.

Next, open HTTP Toolkit. In the Intercept tab, options are presented for what type of traffic to intercept. Review the Android options.
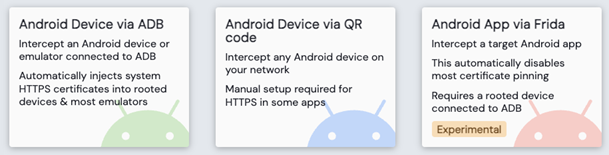
Use the Android Device via ADB option. This option will set up a VPN connection from the phone to HTTP Toolkit, capturing all traffic.

After you accept the VPN request, your device will connect to HTTP Toolkit. Because HTTP Toolkit is connected to a rooted device, it will automatically install the certificate on the device. In addition, the HTTP Toolkit app will be installed on the device.

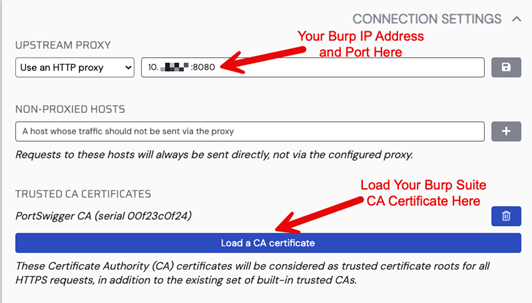
To configure the upstream connection to Burp Suite (or your hacking tool of choice), navigate to the Settings option inside HTTP Toolkit. Scroll down to CONNECTION SETTINGS and select Use an HTTP Proxy. Set the value to your Burp Suite instance IP address and port that Burp is listening on. For example: 10.X.X.X:8080
The Burp Suite CA certificate will need to be loaded in the TRUSTED CA CERTIFICATES section. Upload your .der cert where it says Load a CA certificate.
Now navigate the application. You should be capturing the app’s traffic in your web application proxy. If you encounter errors, it may be related to certificate pinning or Flutter stuff, such as the usage of the BoringSSL library (https://github.com/dart-lang/boringssl_gen) for certificate verification. Additional effort is needed to bypass certificate checks, which is not covered in this blog.
Note about iOS and HTTP Toolkit: On iOS, HTTP Toolkit uses Frida to hook into the application. The method can bypass some certificate pinning implementations but applications that are not system proxy aware need another method to capture traffic (such as the one described in the first section of this blog). HTTP Toolkit will not capture traffic for applications that are system proxy unaware on iOS.

Wrapping Up
Mobile application frameworks and technologies are always changing, which can make figuring out how to proxy traffic incredibly difficult. However, it is not impossible, and the methods demonstrated will hopefully make it less of a challenge, both on Android and iOS devices.
HTTP Toolkit is a great option to have in your toolbox! If you are using a physical device, you can still use ADB either connected with a USB or, for Android version 11 and higher, over wireless.
Also, Jeroen Beckers has conducted some great research into this area and his blogs are a great resource in mobile testing—specifically, testing Flutter applications. So, if you ever get stuck on a mobile application, his blogs are a great resource to use (https://blog.nviso.eu/category/mobile-security/).
Ready to learn more?
Level up your skills with affordable classes from Antisyphon!
Available live/virtual and on-demand
