
How to Weaponize the Yubikey
A couple of years ago, I had a YubiKey that was affected by a security vulnerability, and to fix the issue, Yubico sent me a brand new YubiKey for free. Since I didn’t use the old YubiKey for authentication after receiving the new one, I decided to see if I could turn it into something similar to a USB Rubber Ducky – a USB device that emulates a keyboard and sends a computer a series of pre-programmed keypresses when it is plugged in.
It turned out that I was able to do just that, and although a stock YubiKey isn’t ideal as a USB drop, it’s convenient for everyday carry, is often less conspicuous than a flash drive, and has come in handy for me several times as an impromptu way to break out of a kiosk’s restricted shell when other tools were not available.
In this post, I’ll explain how I identified all the key presses that could be generated by my stock YubiKey using a US keyboard layout and then crafted payloads using those keys.
Step 1: Download the YubiKey Personalization Tool
YubiKey provides a program on their website called the YubiKey Personalization Tool (YPT) that can be used to customize the different features of the YubiKey on Linux, Windows, or Mac. I’m using the Linux version in this post, but the Windows and Mac versions should work very similarly.
If you use the Linux version as I did, you may need to build the program from the source code provided by YubiKey. Instructions for how to do so are included in the README file that comes with the source code and are easy to follow, so I won’t cover them here.
Step 2: Programming the YubiKey with a static password
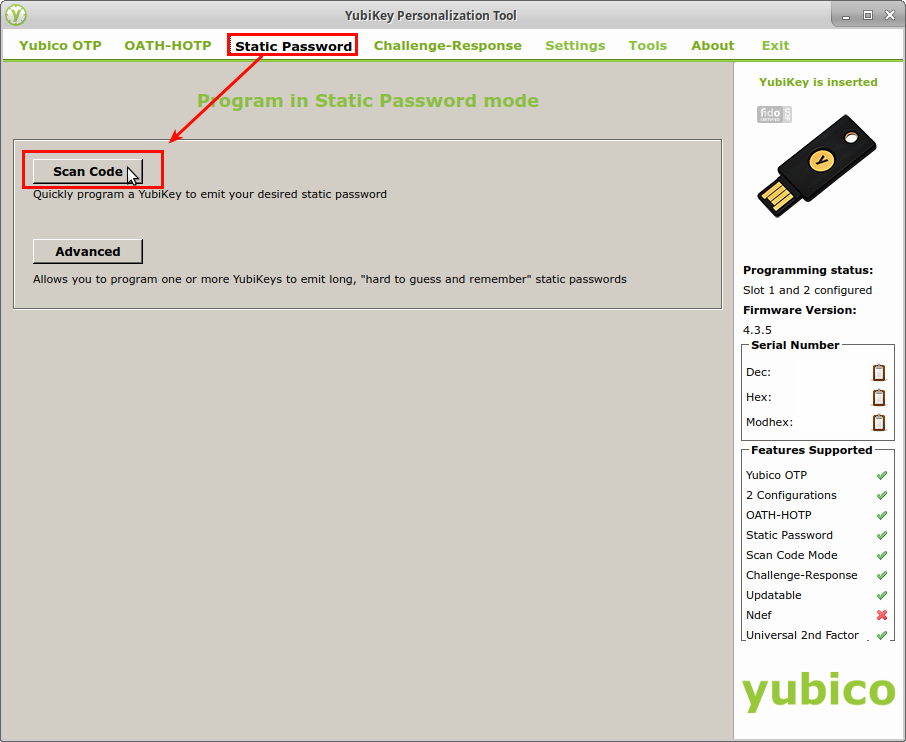
In its default configuration, the YubiKey will type a unique authentication token whenever it is used, and that token changes on each use. However, the YubiKey can also be programmed to type in a static, user-defined password instead. Since the YubiKey enters data into the computer just like a regular keyboard, I wanted to find out whether it could be used to press more interesting keys like CTRL, ALT, or the Windows key in addition to the standard letters, digits, and symbols. To test this, I started up the YPT and selected the Static Password option from the bar across the top. Then on the Static Password page, I clicked the button labeled, “Scan Code”.
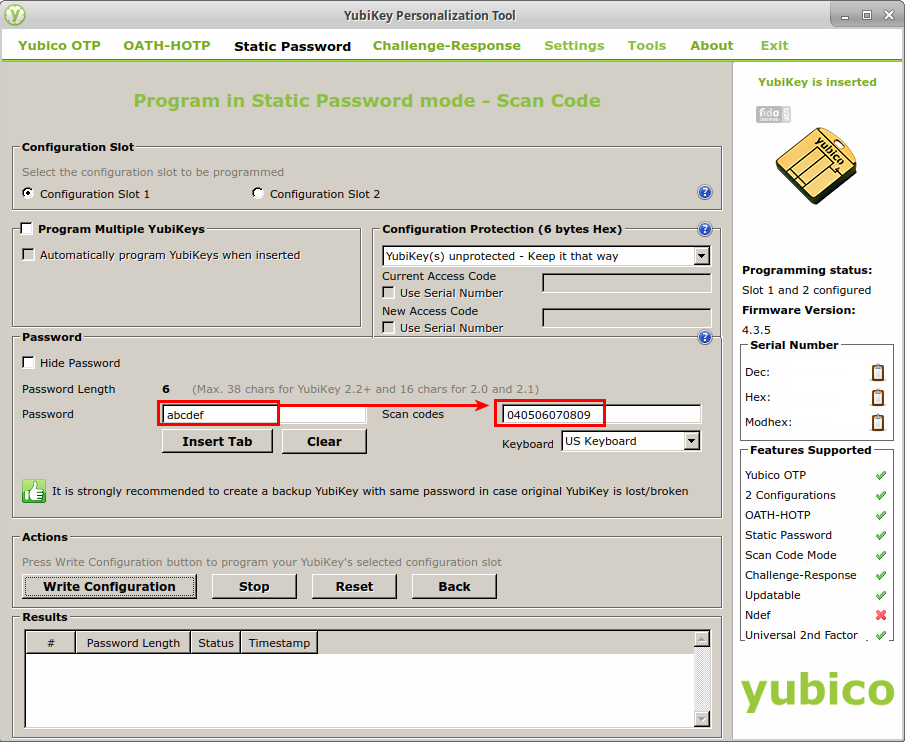
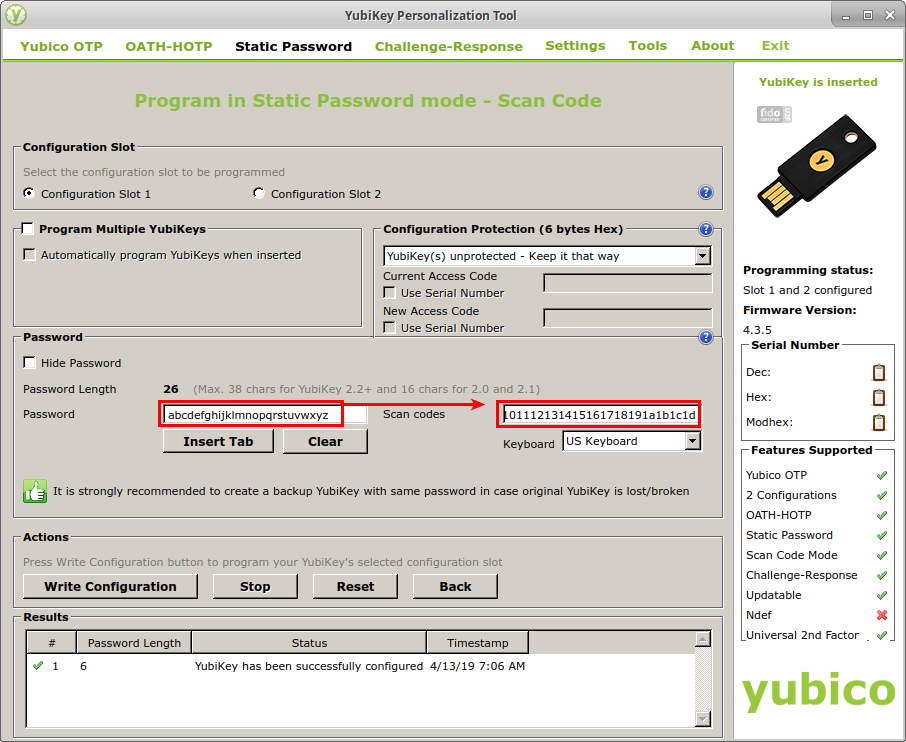
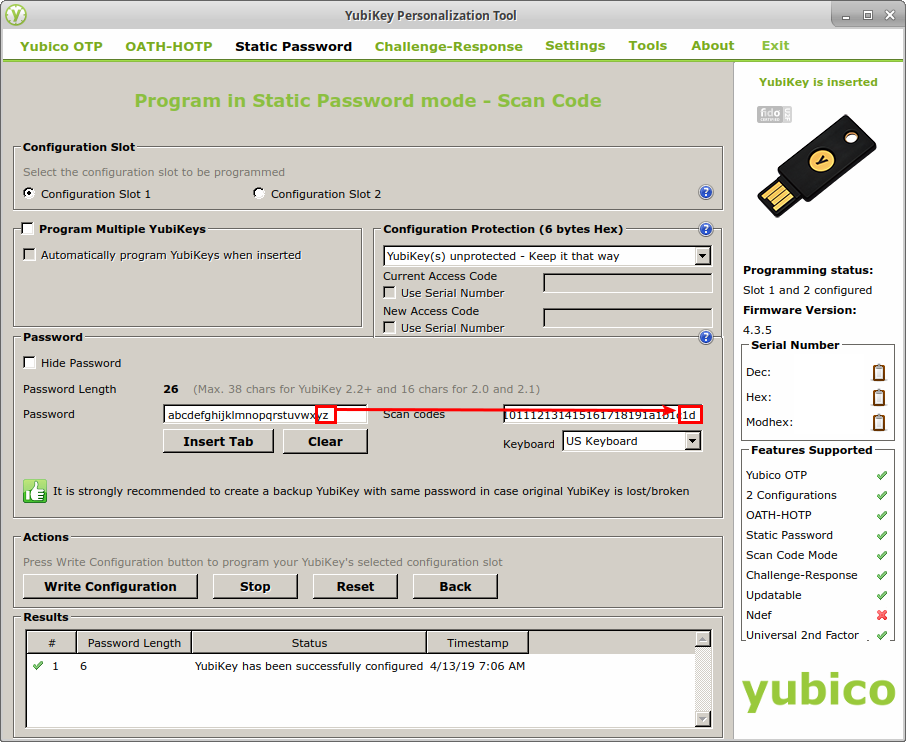
To understand how everything worked, I started by programming the YubiKey with the very simple static password, “abcdef”. To do that, I selected the following options in the Static Password window:
- Configuration Slot: Configuration Slot 1
- Keyboard: US Keyboard
- Password: abcdef
I noticed that while I was typing my password into the Password field, hexadecimal values started showing up in the Scan Codes field to its right. I took note of that and decided that my next step after programming the YubiKey with a static password should be to identify the hexadecimal value for every key I wanted to type. That way I might be able to program it with keypresses that I couldn’t type into the password field – keys like CTRL and ALT.
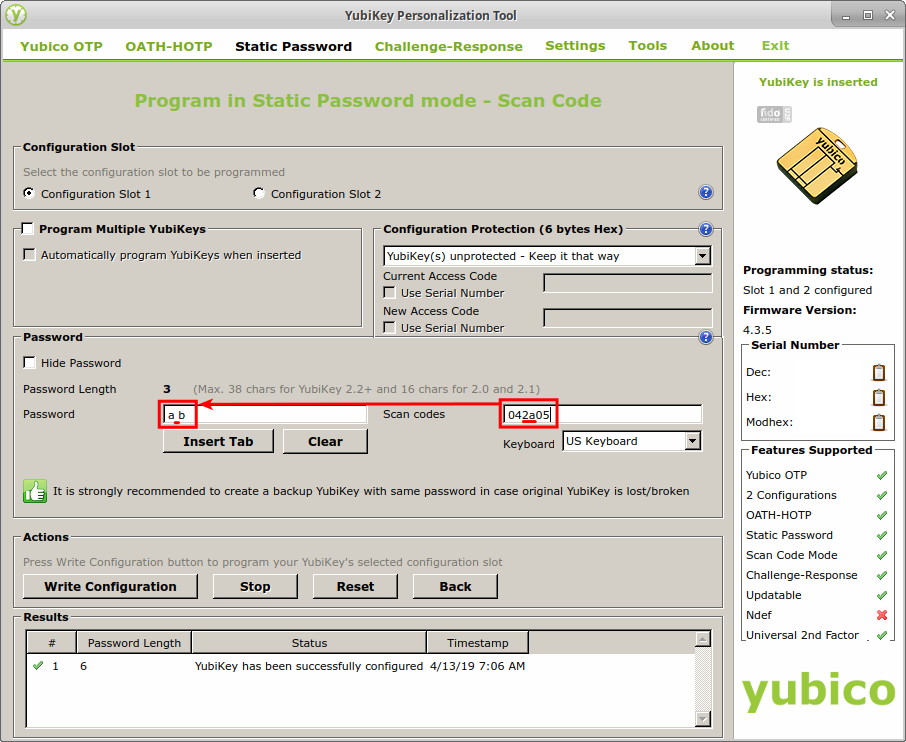
The following screenshot shows all the settings I outlined above and the scan codes that were generated by typing in my password:
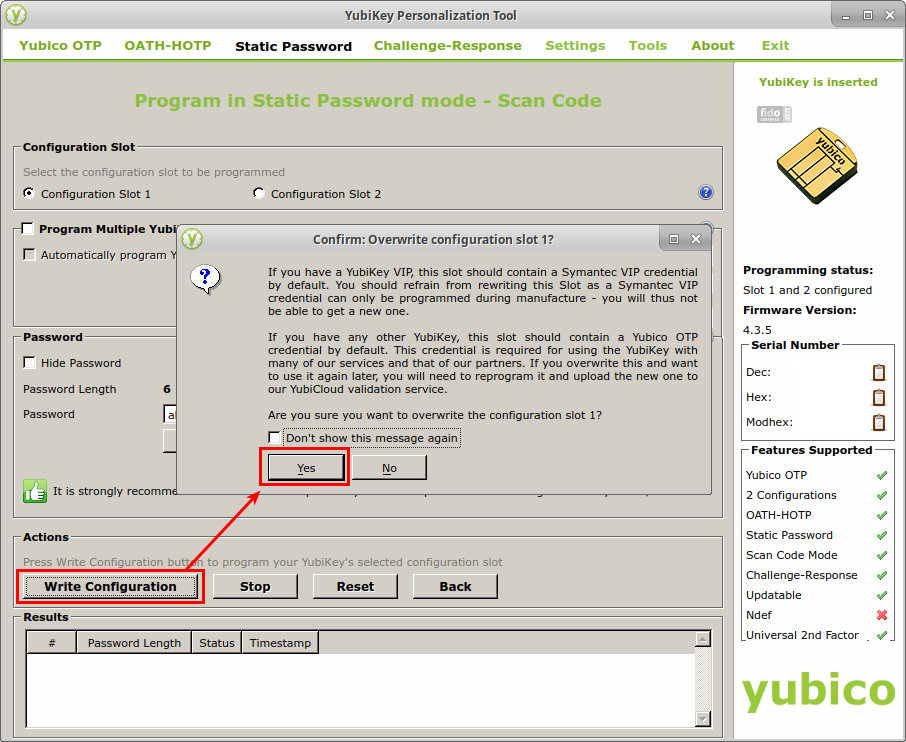
Next, I clicked “Write Configuration” to write the static password to my YubiKey. When doing this for the first time, a dialog box popped up asking me to confirm that I wanted to overwrite the current configuration of Slot 1 on my YubiKey. I checked the box labeled, “Don’t show this message again,” and clicked Yes to write the changes to the device.
WARNING: If you’re following along with your own YubiKey, make sure it’s one you’re not currently using for authentication. Writing the new configuration to the YubiKey will erase the settings stored in the Configuration Slot you select, and you’ll have to reprogram your YubiKey and re-register it with the services you use to use it for multi-factor authentication again. If you use only one Configuration Slot on the YubiKey for authentication, you can probably overwrite the other one safely. But if you’re unsure, it might be best to either unregister your YubiKey from any services you use first or to just use a different YubiKey.
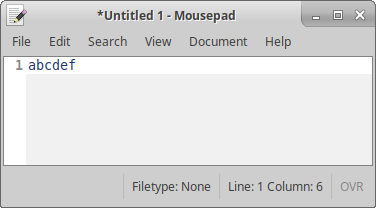
After writing the changes, I opened a text editor and pressed the hardware button on the YubiKey. The YubiKey typed the password, “abcdef,” on the screen as expected.
Step 3: Identifying YubiKey’s hexadecimal key codes
Now that I had confirmed I could get the YubiKey to enter a series of predefined keys, the next thing I wanted to do was figure out whether I could make it press more interesting keys by specifying hexadecimal “Scan Codes” in the YPT. To start mapping scan codes to their corresponding key presses, I started with the very low-tech approach of typing the letters “a” through “z” into the Password field of the YPT and observing the results in the Scan Codes field. This resulted in the hexadecimal values 04 through 1D appearing in the Scan Codes field.
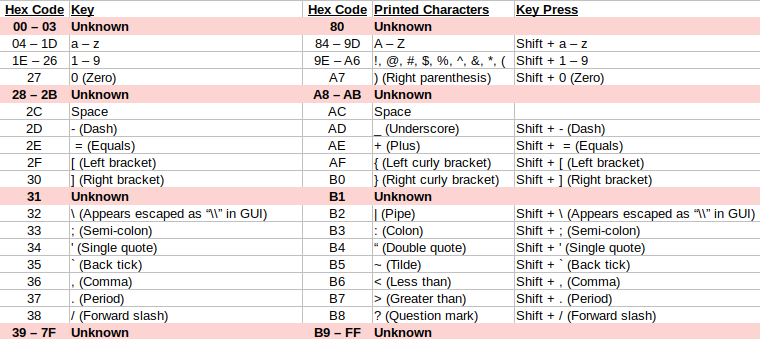
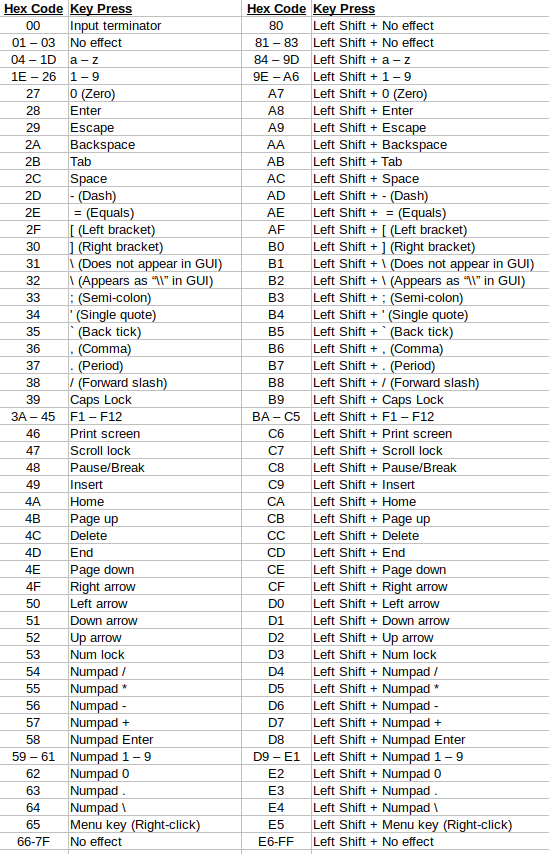
I repeated this process for all the other printable keys on my keyboard, as well as the uppercase version of each. I made a note of all the hex values I collected and of the ranges of values that I hadn’t yet matched to a key on the keyboard. I organized all the characters I was able to decode into a table, and after doing so, I noticed a pattern. It appeared that the scan codes were divided down the middle, with the lowercase characters all located between 00-7F and the uppercase, or “key + Shift,” versions present in the same location between 80-FF. This can be seen more clearly in the table below.
Now all that was left to do was identify the keypresses generated by the hex values in each unknown range. Because typing the hex values into the Scan Codes field in YPT didn’t display any output, and because I expected many of the keys pressed in the unknown ranges to be keys that didn’t generate any printable output (e.g. the CTRL key), I needed a way to capture the raw keypresses generated by the YubiKey. For this, I decided to use the Linux tool, xinput, and my xinput-keylog-decoder script to decode the output.
If you’re not familiar with xinput, it is a command-line tool that’s commonly included in many Linux distributions along with the graphical desktop environment. It’s also commonly abused as a keylogger when those systems are compromised, and I created the xinput-keylog-decoder tool for that purpose.
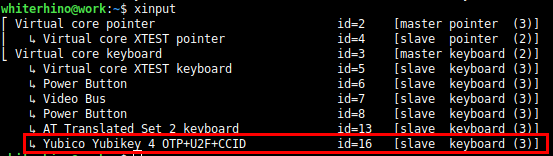
Since the YubiKey is essentially a keyboard, the first thing I did to start capturing its keypresses was to identify its ID number within xinput. I checked this by running the xinput command without any arguments and determined that its ID was 16 as shown in the output below.
By default, the example script that comes with xinput-keylog-decoder logs input from all keyboards attached to the system, but knowing the ID of the YubiKey let me target that device specifically when parsing the output.
Next, I opened three terminal windows and ran commands to log and analyze the keypresses generated by the YubiKey. An explanation of the purpose of each command follows the screenshot below.
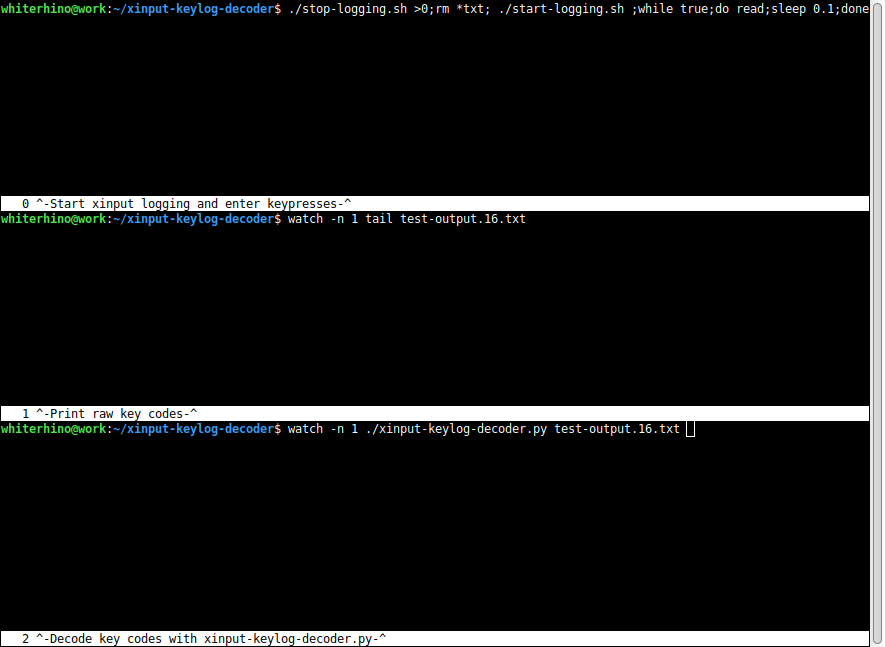
- Top terminal: Stop any currently running xinput processes, start a new xinput process, and start an infinite loop to read input from the keyboard. This is the terminal window I kept selected while the YubiKey typed keys into the system. That way anything it typed wouldn’t interfere with the other terminal windows.
./stop-logging.sh >0; rm *txt; ./start-logging.sh; while true; do read; sleep 0.1; done
- Middle terminal: Display the raw output of test-output.16.txt on-screen every one second. test-output.16.txt is the file where keypresses from keyboard ID 16 were automatically saved. Displaying the raw key codes output by xinput allowed me to get more information in case xinput-keylog-decoder.py failed to decode a keypress in the third terminal window.
watch -n 1 tail test-output.16.tx
- Bottom terminal: Every second, decode the keylog file and display it as human-friendly text.
watch -n 1 ./xinput-keylog-decoder.py test-output.16.txt
Finally, when programming the hexadecimal scan codes into the YubiKey, I started by entering them between two known characters – usually “a” (scan code 04) and “b” (scan code 05). This way I could confirm that the keys before and after the target key press were actually pressed, and it allowed me to identify whether the keypress had any effect on those other keys. Below is an example of this process while targeting the scan code, “2A”.
In the first screenshot, you can see the unidentified scan code, “2A”, sandwiched between the scan codes for “a” and “b”. You might also notice the apparent blank space between “a” and “b” in the password field.
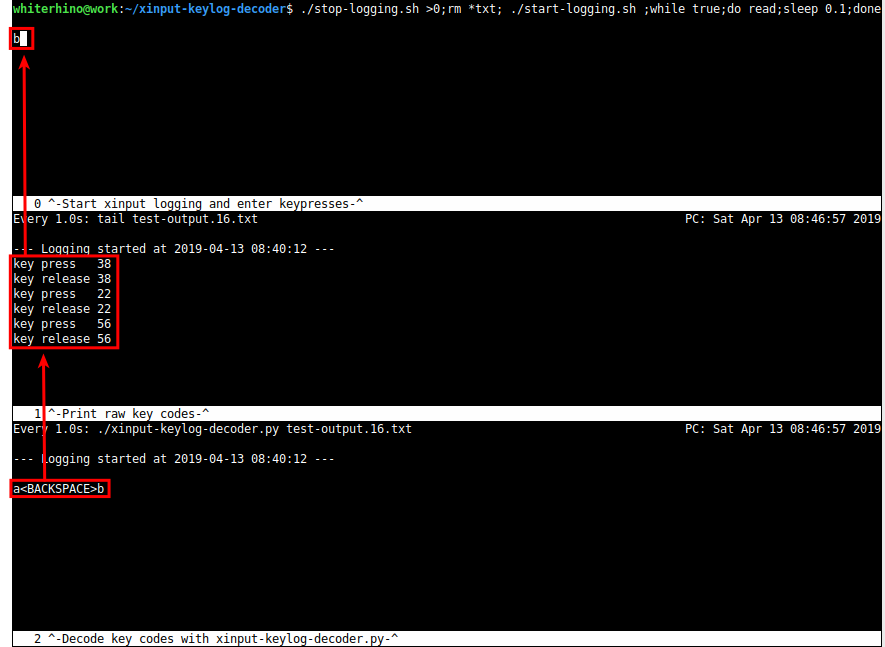
In the next screenshot, I selected the top terminal and pressed the button on my YubiKey. At first glance, it appears that only the “b” key was pressed and the “a” was omitted. However, after examining the middle window, you can see that three keys were each pressed and released in succession. In the third window, the key codes from the middle window are decoded into a human-friendly format, and it’s clear that the keys pressed were “a”, the backspace key, and “b”. This explains why “a” didn’t appear in the first window and identifies the target scan code, “2A”, as the backspace key.
After identifying a key this way, all I did next was press CTRL+C to stop the running loop in the top window, run the command again (to clear the log and restart the logger), and then repeat the process above. After repeating these steps for every unidentified hex value, I confirmed the keypresses generated by every possible scan code and collected them in the table below.
While decoding the scan codes, I also observed that the YubiKey will automatically press the Enter key at the end of some sequences of key presses. In some cases, I was able to prevent this behavior by terminating the sequence with the scan code, “00”, but it didn’t always work. To demonstrate, here is a screenshot of the YubiKey being configured to type the letters “a” through “z” and a screenshot of the output once the YubiKey’s button is pressed. Note that the “z” key (scan code “1D”) was the last key programmed into the YubiKey, but the YubiKey pressed Enter at the end of the string anyway. This is different than the behavior observed when decoding the code for the backspace key in the previous example, where the Enter key was not pressed.

Both the length of the key-press sequence and the YubiKey’s output speed (configurable from the Settings screen in YPT) appear to affect this behavior. In my testing, the extra Enter key didn’t appear in sequences less than 23 keys long that were typed at the standard output character rate. However, slowing the character rate by 60 ms caused the Enter key to be automatically pressed on sequences as short as one keypress. Watch out for this when creating payloads on your YubiKey if you don’t want it to automatically press Enter at the end.
Step 4: Creating useful payloads
With all of the scan codes matched to the keys they press, I was now ready to start building payloads. Unfortunately, none of the scan codes I tested pressed the CTRL, ALT, or Windows keys I had hoped to find; so while it could be used to type in a long one-liner, it was not ideal as a fully-automated command injection tool or USB drop like a Rubber Ducky or Teensy.
Even though the YubiKey won’t press CTRL, ALT, or the Windows key, it still has access to several other potentially interesting keys, including:
- Shift (By using one of the “Shift + No effect” scan codes)
- Function Keys (F1-F12)
- Menu Key (equivalent of a mouse right-click)
- Escape
- The Shift key in combination with all the identified keys
Although these keys might not be preferred for injecting an executable payload into a target system, one scenario where they are extremely helpful is when trying to break out of the restricted shell of a computer kiosk.
Because of the difficulty in fully securing kiosk software, kiosk makers often physically remove keys from keyboards, right-click buttons from pointing devices, or completely remove both devices in favor of a touch screen. But it’s not uncommon for USB ports on the kiosk to remain exposed so technicians can attach their own keyboards for troubleshooting. In that scenario, an attacker armed with a keyboard of their own (or in this case, a YubiKey) can just plug their keyboard into the kiosk and use one of many well-known methods to break out of the restricted shell and take control of the computer.
The first step in escaping from a restricted shell on a kiosk is often just opening a new application window – be it a dialog box, a new browser window, or anything else. And this is often the step where a keyboard is most helpful since the rest of the attack can usually be done with minimal input from a pointing device. The table below describes key presses the YubiKey can inject to attempt to execute that first step.
| Key Presses | Impact on the Computer Kiosk |
| Escape | Exits the current window |
| Press Shift five times | Opens Windows’ Sticky Keys dialog box |
| F1 | Opens the Help dialog on many applications and operating systems |
| F6 | Selects the web browser address bar |
| F10, Down Arrow | Opens the application menu in many applications |
| F10, Down Arrow, “n” | Opens a new window in Chrome, Firefox, and Windows Explorer |
| F10, Down Arrow, “p” | Opens the print dialog in many applications |
| F11 | Exits full-screen mode. May reveal a web browser’s address bar |
| F12, Esc | Opens web developer tools and selects the JavaScript console |
| Shift + F10 | Right-click with the mouse. Opens the shortcut menu |
| Shift + Menu | Shift + right-click. Opens the shortcut menu with extended options to run command prompt or PowerShell in Windows Explorer |
| Other Function Keys (F1-F12) | Extra functionality in many applications. Hidden features/menus in some kiosk software |
| Print Screen | Opens a screenshot dialog on some systems |
With these functions in mind, I created the three payloads below to use my YubiKey as a kiosk break-out device.
YubiKey Payloads
- Payload 1 – Simple function key and Sticky Keys test
- Scan codes: 522c3a3b3c3d3e3f404142434445e6e6e6e6e6e652
- Output character rate: Standard
- Key presses executed:
- Activate hyperlink in Sticky Keys dialog if present: Up arrow, Space bar
- Press each function key: F1, F2, F3, F4, F5, F6, F7, F8, F9, F10, F11, F12
- Open the Sticky Keys dialog by pressing Shift five times, plus one to be safe: Shift, Shift, Shift, Shift, Shift, Shift
- Select the hyperlink in the Sticky Keys dialog and attempt to block the Enter key from closing the window if it is pressed: Up arrow
- Payload 2 – Browser hotkeys and Sticky Keys
- Scan codes: 3f2a06b3a83f4dca06b3283c443e3b3d40ab2c29e5115128454142435113113ae6e6e6e6e652
- Output character rate: Slow down by 60 ms
- Key presses executed:
- Open “c:” in a new browser window: F6, Backspace, Type “c:”, Shift+Enter
- Open “c:” (Chrome): F6, End, Shift+Home, “c:”, Enter
- Press function keys: F3, F11, F5, F2, F4
- Try F7 and close the dialog box if one appears: F7, Shift+Tab, Space, Esc
- Open a new browser window: Shift+Menu, n, Down, Enter
- Try F12/Web developer console: F12
- Try F8 and F9: F8, F9
- Open the print dialog or a new browser: F10, Down, p, n
- Try F1/Help: F1
- Open the Sticky Keys dialog: Shift, Shift, Shift, Shift, Shift
- Prevent the Enter key from closing the Sticky Keys dialog: Up
- Payload 3 – Shift+Right Click
- Scan codes: e5
- Output character rate: Standard
- Key presses executed: Shift+Menu key
The first payload is very simple: it presses the up arrow, the space bar, each function key (F1-F12), and then presses the Shift key six times before pressing the up arrow again. The purpose of this payload is to test each function key to see if it provides a way to access additional functionality on the kiosk, and then press the Shift key repeatedly to open the Sticky Keys dialog box. Once the Sticky Keys dialog is open, the button on the YubiKey can be pressed a second time, and the up arrow and space bar key presses will open the hyperlink in the dialog box to navigate to Windows’ Ease of Access settings. This was the first payload I created for the YubiKey, and it’s been very successful at breaking out of restricted shells on multiple platforms in the field.
The second payload is an attempt to improve on the first by adjusting the use of the function keys to reflect their functions in common web browsers. For example, it doesn’t make sense to press F7 and then immediately try F8 because pressing F7 in most browsers causes a prompt to appear, effectively blocking F8 from being pressed in the context of the browser. Every function key is still pressed, along with the Sticky Keys sequence, as in the first payload. Additional keys are included to attempt to automatically select menu options and provide browser cross-compatibility. This payload is a new one that I put together while writing this article, so it hasn’t been used in the field yet. It’s worked well in a lab environment so far – especially when run more than once.
Finally, the third payload just presses Shift plus the Menu key. This is effectively the same thing as holding the Shift key and right-clicking with the mouse. It gives me the ability to add a right mouse button to the kiosk so I can right-click on different things once I get an initial foothold. It also provides a quick shortcut to PowerShell or a command prompt if I can right-click inside an Explorer window. I usually keep this payload in Slot 2 on my YubiKey, with one of the other payloads in Slot 1.
Conclusion
Although the YubiKey is an excellent two-factor authentication device, it’s definitely missing a few features that would make it an ideal USB HID attack tool, and there are other products that already do the job much better. Probably the main strength of the YubiKey as an attack tool is that it looks like a YubiKey. In high-security environments where flash drives are not allowed, it might be possible to smuggle in a YubiKey; and in close-up social engineering scenarios, it might be easier to convince an employee to open up the cabinet of a public Internet kiosk so you can “authenticate” to your email account than it would be to plug in some unrecognized device.
In my mind, that’s the main takeaway from experimenting with the YubiKey. With a little bit of effort and a relatively small amount of technical know-how, even trusted electronic devices can be made into tools of attack.
Want more content from Michael? Why not take a class with him?
Available live/virtual and on-demand!
