
Steganography: The Art and Science of Hiding Things in Other Things – Part 2
Part 2: Hiding Data in Images
Dakota Nelson* //
In part 1, we talked about how bits make up images, and what that means for our game of digital hide-and-seek. In this post, we’ll take our new hiding place and put it to work hiding things, as one does.
Now that we know where to hide, how do we actually take advantage of that knowledge? With programming, of course!
The first thing we need is something to hide. I’ll leave the more questionable part of that to you, and just use this snippet of Python instead, which will take some text and turn it into a list of bits:
    # let's get our message set up

    message = list('this is a message')

    # convert to binary representation

    message = ['{:07b}'.format(ord(x)) for x in message]

    print("Message as binary:")

    print(message)

    # split the binary into bits

    message = [[bit for bit in x] for x in message]

    # flatten it and convert to integers

    message = [int(bit) for sublist in message for bit in sublist]

    print("Message as list of bits:")

    print(message)
The final output of this should be a message that looks like this:
    [1, 1, 1, 0, 1, 0, 0, 1, 1, 0, 1, 0, 0, 0, 1, 1, 0, 1, 0, 0, 1, 1, 1, 1, 0, 0,
    1, 1, 0, 1, 0, 0, 0, 0, 0, 1, 1, 0, 1, 0, 0, 1, 1, 1, 1, 0, 0, 1, 1, 0, 1, 0,
    0, 0, 0, 0, 1, 1, 0, 0, 0, 0, 1, 0, 1, 0, 0, 0, 0, 0, 1, 1, 0, 1, 1, 0, 1, 1,
    1, 0, 0, 1, 0, 1, 1, 1, 1, 0, 0, 1, 1, 1, 1, 1, 0, 0, 1, 1, 1, 1, 0, 0, 0, 0,
    1, 1, 1, 0, 0, 1, 1, 1, 1, 1, 0, 0, 1, 0, 1]
Which is the phrase “this is a message” in binary. Woo! We have something to hide!
Now we have to take this image:
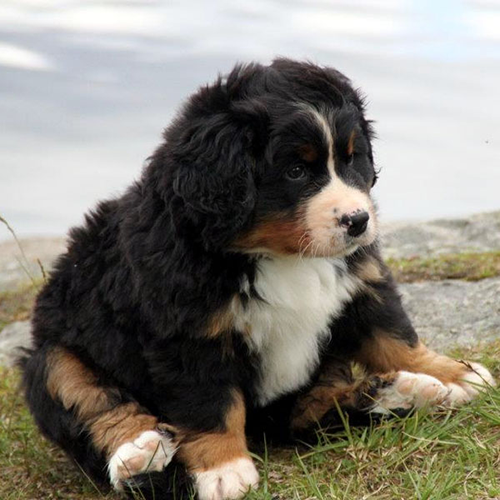
And put our message into it, hiding it in the least significant bits of the image.
We’ll use this code snippet, which opens up an existing image and adds a message into it, repeating each bit in the message nine times for reasons that will become clear in a moment:
 from PIL import Image, ImageFilter

    import numpy as np


    # first, open the original image

    imgpath = 'images/original/image.bmp'

    img = Image.open(imgpath)


    # we'll use simple repetition as a very rudimentary error correcting code to try to
     maintain integrity

    # each bit of the message will be repeated 9 times - the three least significant
     bits of the R,G, and B values of one pixel

    imgArray = list(np.asarray(img))


    def set_bit(val, bitNo, bit):

        """ given a value, which bit in the value to set, and the actual bit (0 or 1)
            to set, return the new value with the proper bit flipped """

        mask = 1 << bitNo

        val &= ~mask

        if bit:

            val |= mask

        return val


    msgIndex = 0

    newImg = []

    # this part of the code sets the least significant 3 bits of the

    # R, G, and B values in each pixel to be one bit from our message

    # this means that each bit from our message is repeated 9

    # times - 3 each in R, G, and B. This is a waste, technically

    # speaking, but it's needed in case we lose some data in transit

    # using the last 3 bits instead of the last 2 means the image looks

    # a little worse, visually, but we can store more data in it - a tradeoff

    # the more significant the bits get, as well, the less likely they are to be

    # changed by compression - we could theoretically hide data in the

    # most significant bits of the message, and they would probably never

    # be changed by compression or etc., but it would look terrible, which

    # defeats the whole purpose

    for row in imgArray:

        newRow = []

        for pixel in row:

            newPixel = []

            for val in pixel:

                # iterate through RGB values, one at a time

                if msgIndex >= len(message):

                    # if we've run out of message to put in the image, just add zeros

                    setTo = 0

                else:

                    # get another bit from the message

                    setTo = message[msgIndex]

                # set the last 3 bits of this R, G, or B pixel to be whatever we decided

                val = set_bit(val, 0, setTo)

                val = set_bit(val, 1, setTo)

                val = set_bit(val, 2, setTo)


                # continue to build up our new image (now with 100% more hidden message!)

                newPixel.append(val) # this adds an R, G, or B value to the pixel

            # start looking at the next bit in the message

            msgIndex += 1

            newRow.append(newPixel) # this adds a pixel to the row

        newImg.append(newRow) # this adds a row to our image array


    arr = np.array(newImg, np.uint8) # convert our new image to a numpy array

    im = Image.fromarray(arr)
    im.save("image_steg.bmp")
You’re probably wondering… why are we repeating the message so much? Nine times per bit seems excessive.
It turns out that we aren’t the only people who have noticed that the least significant bits in an image are basically random. Someone has beaten us to our own hiding place, and they’re using it for boring stuff.
The objective of compression, according to Wikipedia, is “to reduce irrelevance and redundancy of the image data in order to be able to store or transmit data in an efficient form.”
But that “irrelevant and redundant data” is where we wanted to put our sneaky message stuff, and compression destroys those bits. Drat. Turns out if there are useless bits, such as the least significant bit of each pixel value, they’re perfect for hiding things in because nobody cares about them, but also the first to get thrown out by compression… because nobody cares about them.
So we fight back, by repeating ourselves a bunch so that even if some bits get flipped by compression, our data still mostly makes it through. It’s not elegant, but it works. (This will be better explained in part 3, where we’ll get into more elegant methods using some cool math.)
Once we run the image through our code, it looks like this:
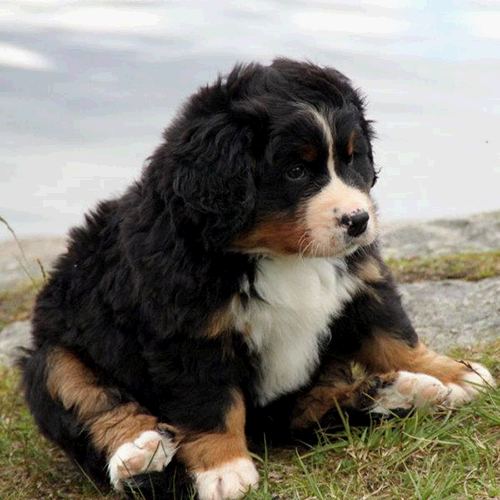
Which might look familiar – and now we know the message that this puppy is hiding from part 1! But… how do we get it out once it’s been put in?
Here’s how:
   # open the image and extract our least significant bits to see if the message made it through


    img = Image.open(path)

    imgArray = list(np.asarray(img))


    # note that message must still be set from the code block above

    # (or you can recreate it here)

    origMessage = message[:20] # take the first 20 characters of the original message

    # we don't use the entire message here since we just want to make sure it made it through

    print("Original message:")

    print(origMessage)


    message = []


    for row in imgArray:

        for pixel in row:

            # we'll take a count of how many "0" or "1" values we see and then go with

            # the highest-voted result (hopefully we have enough repetition!)

            count = {"0": 0, "1": 0}

            for val in pixel:

                # iterate through RGB values of the pixel, one at a time

                # convert the R, G, or B value to a byte string

                byte = '{:08b}'.format(val)

                # then, for each of the least significant 3 bits in each value...

                for i in [-1, -2, -3]:

                    # try to get an actual 1 or 0 integer from it

                    try:

                        bit = int(byte[i])

                    except:

                        # if, somehow, the last part of the byte isn't an integer...?

                        # (this should never happen)

                        print(bin(val))

                        raise


                    # count up the bits we've seen

                    if bit == 0:

                        count["0"] += 1

                    elif bit == 1:

                        count["1"] += 1

                    else:

                        print("WAT")


            # and once we've seen them all, decide which we should go with

            # hopefully if compression (or anything) flipped some of these bits,

            # it will flip few enough that the majority are still accurate

            if count["1"] > count["0"]:

                message.append(1)

            else:

                message.append(0)


    # even though we extracted the full message, we still only display the

    # first 20 characters just to make sure they match what we expect

    print("Extracted message:")

    print(message[:20])
Run this on the image, and you get the first 20 characters of the original message and newly-extracted message:
    Original message:

    [1, 1, 1, 0, 1, 0, 0, 1, 1, 0, 1, 0, 0, 0, 1, 1, 0, 1, 0, 0]

    Extracted message:

    [1, 1, 1, 0, 1, 0, 0, 1, 1, 0, 1, 0, 0, 0, 1, 1, 0, 1, 0, 0]
Awesome! They’re the same! We just moved data around hidden in an image using steganography! (Something to try on your own: can you reassemble these bits back into text by reversing the process from earlier?)
Being able to extract steganographically encoded data from an image is cool, but having to repeat ourselves so much means that we can’t move very much data, and that it’s fairly obvious – the image with hidden data in it looks different enough from the original that you can tell something is up if you look closely enough. This image is 500 by 500 pixels, which means (since we can only hide one bit of data per pixel) that we can only hide just over 31 kB of data in this image. That’s great, and somewhat useful, but you’re going to need a lot of pictures to send any significant amounts of data – especially since we’re using the least significant 3 bits in the image, and we’d prefer to use less so that the image doesn’t look any different. In part 3, we’ll explore how to use more complicated error correcting codes to make our data hiding more efficient.
Special thanks to Zoher Ghadyali and Philip Seger for collaborating years ago on an original version of the code that these code snippets have been modified from.
______
Ready to learn more?
Level up your skills with affordable classes from Antisyphon!
Available live/virtual and on-demand

Mike
November 2, 2016 @ 10:24 am
Question…If I was doing a forensic analysis of your system, and I came across the original and the altered pic, would I be able to tell it was altered by simply looking at the hashes?
Dakota
November 2, 2016 @ 11:12 am
Yep! Hiding data will change the image’s hash. Here’s what I get on my system when I compare image.bmp, the plain image, and image_steg.bmp, which has hidden data:
“`
[dnelson@blueharvest hamming-stego]$ md5sum image.bmp image_steg.bmp
026398a0a441b1b4e736432d1de05f76 image.bmp
0b231f3a1d7839c89c404f2dda922a28 image_steg.bmp
“`
Of course, this requires that you have an original to compare to. Things such as image compression, cropping, any other edits, etc. will also change the hash, so just because two visually similar images have different hashes doesn’t necessarily mean that data is hidden in one… but it could be. 🙂