
Breaching the Cloud Setup Instructions
This document serves as prerequisite information related to the Breaching the Cloud training. There are some items that need to be set up prior to the training by each attendee in order to have success with the labs. You will need a computer that can run two (2) virtual machines (VM) simultaneously using a total of 6 GB of memory. Both of the VM’s will need to have Internet access.
These are the primary items we will be setting up:
- Windows 10 VM
- Kali VM
- A Microsoft Azure Account (Azure may not be supported in some countries! If you are unable to register you will not be able to perform some of the labs. Check whether this service is available in your country before proceeding further.)
- An Amazon AWS Account (AWS may not be supported in some countries! If you are unable to register you will not be able to perform some of the labs. Check whether this service is available in your country before proceeding further.)
First, we need to set up two (2) virtual machines to do the labs from. It is recommended that you install VMware’s Workstation Player to use with this training: https://www.vmware.com/products/workstation-player.html. This version can be run for free. If you have the commercial version of VMware Workstation or VMware Fusion these should work as well. Alternatively, VirtualBox is another option.
These instructions only focus on VMware Workstation Player.
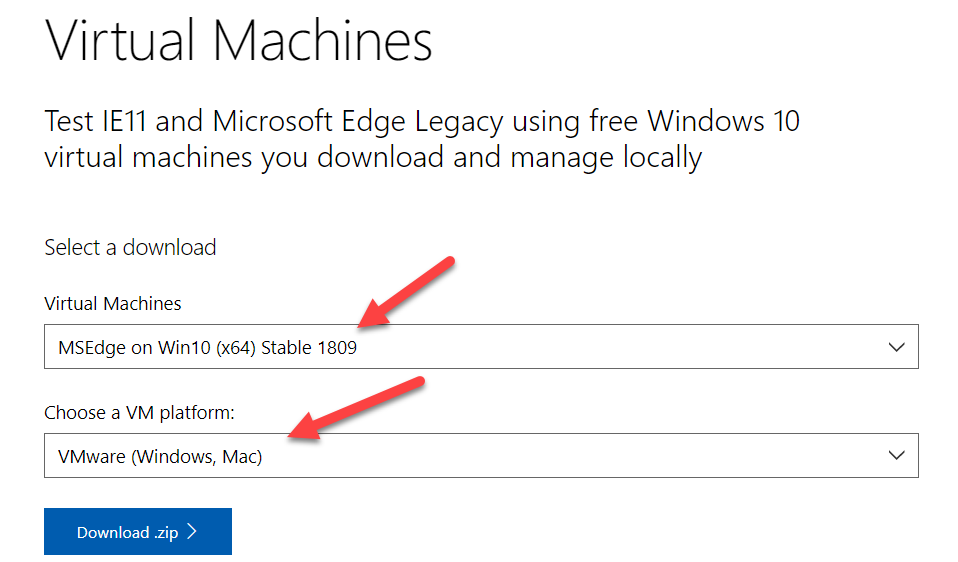
The first VM we need is a Windows machine. Microsoft offers a development virtual machine for free that can be downloaded at the following URL:
https://developer.microsoft.com/en-us/microsoft-edge/tools/vms/
The password to the user account in the VM is “Passw0rd!”
Select the “MSEdge on Win10 (X64)” Virtual Machine and download the appropriate package for your hypervisor.
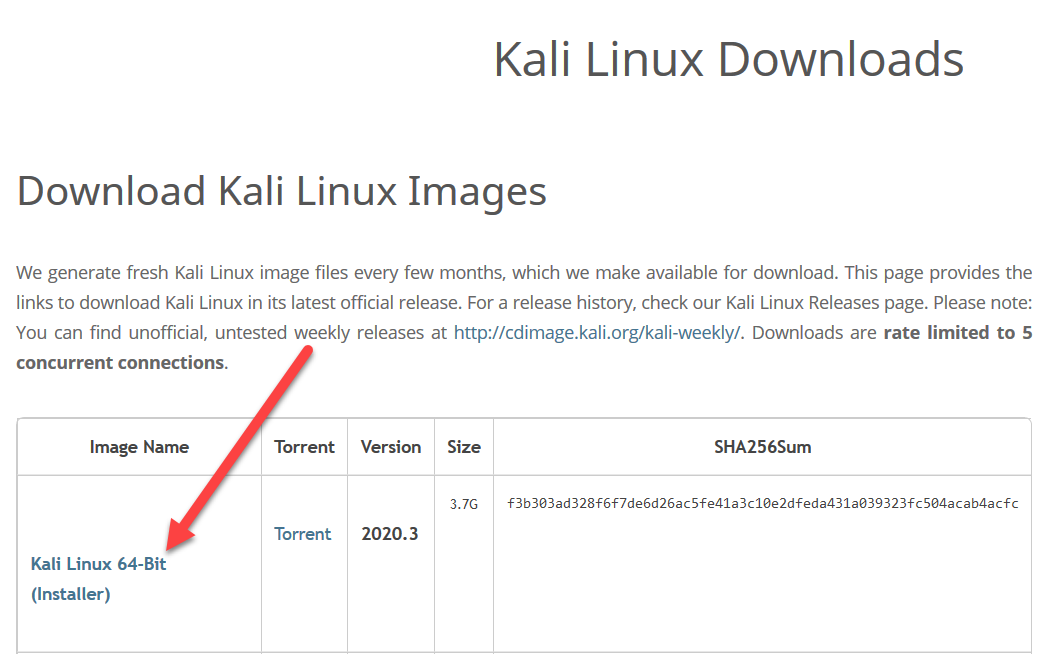
We are also going to be using a Kali virtual machine. Download the “Kali Linux 64-Bit (Installer)” by clicking on the image name from here:
https://www.kali.org/downloads/
Kali VM Setup
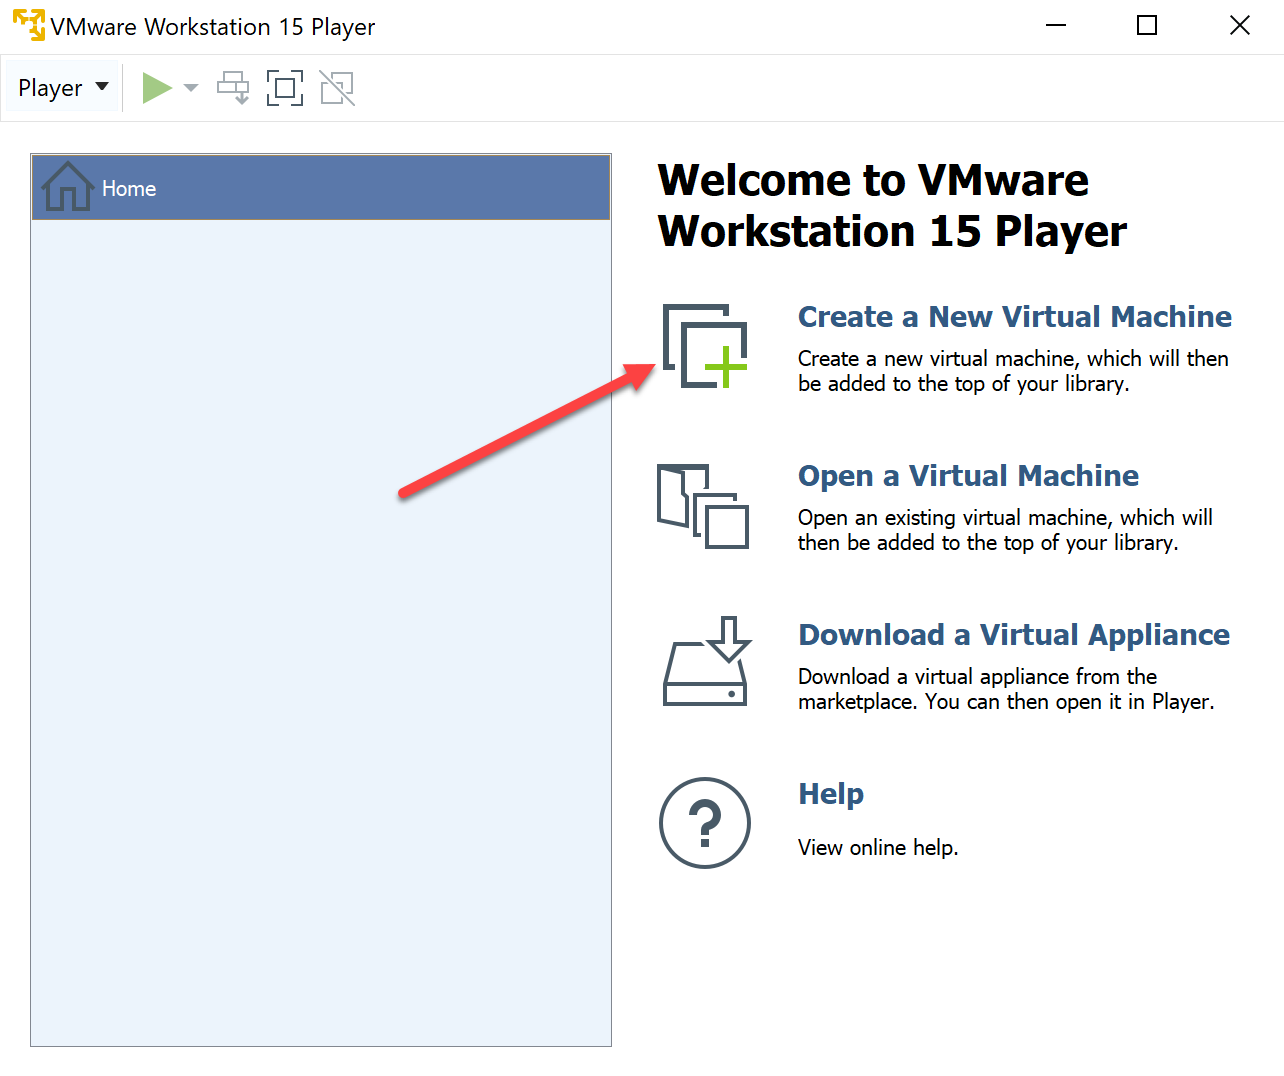
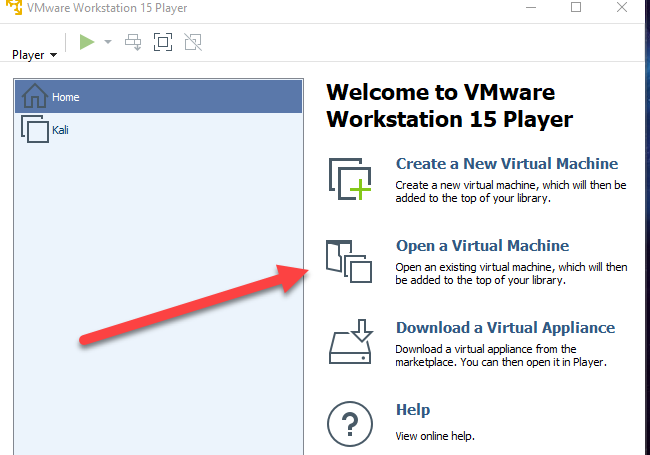
In VMware Workstation Player click “Create a New Virtual Machine”.
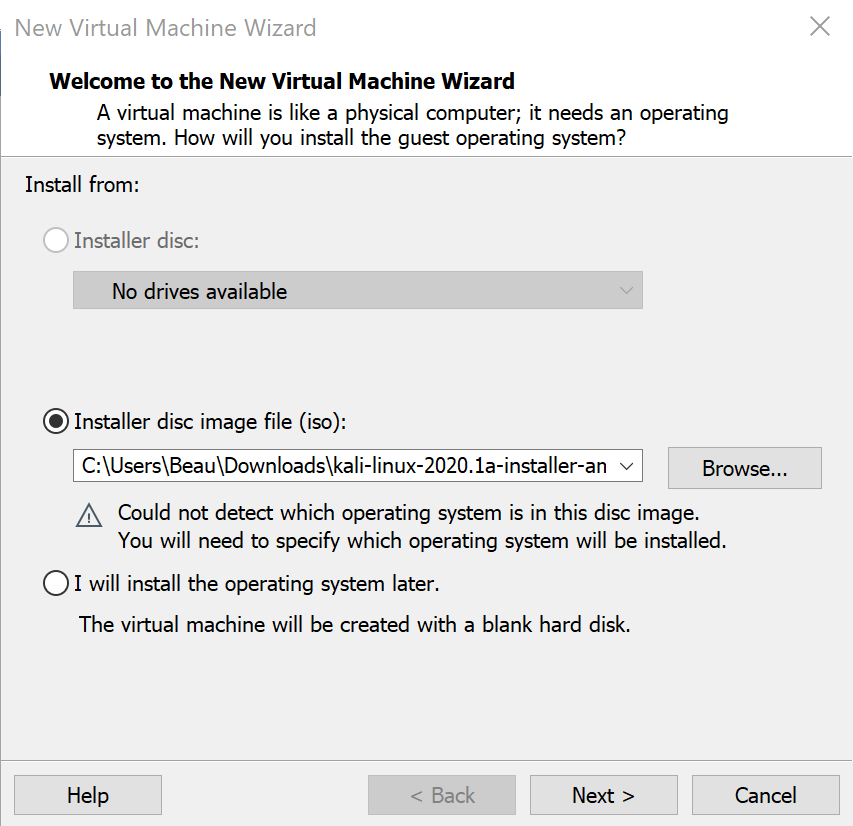
Browse to the Kali ISO you just downloaded and click “Next”.
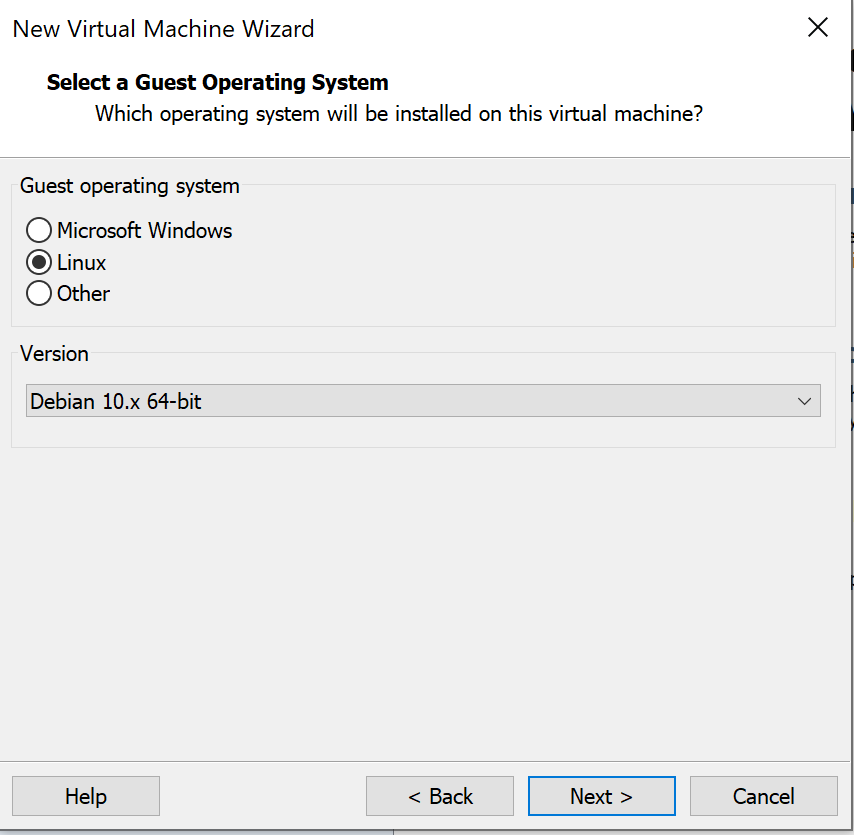
Select “Linux” and then change the Version to “Debian 10.x 64-bit” and click Next. Change the name of the virtual machine to “Kali” and click Next.
You can leave the hard disk size at 20 GB.

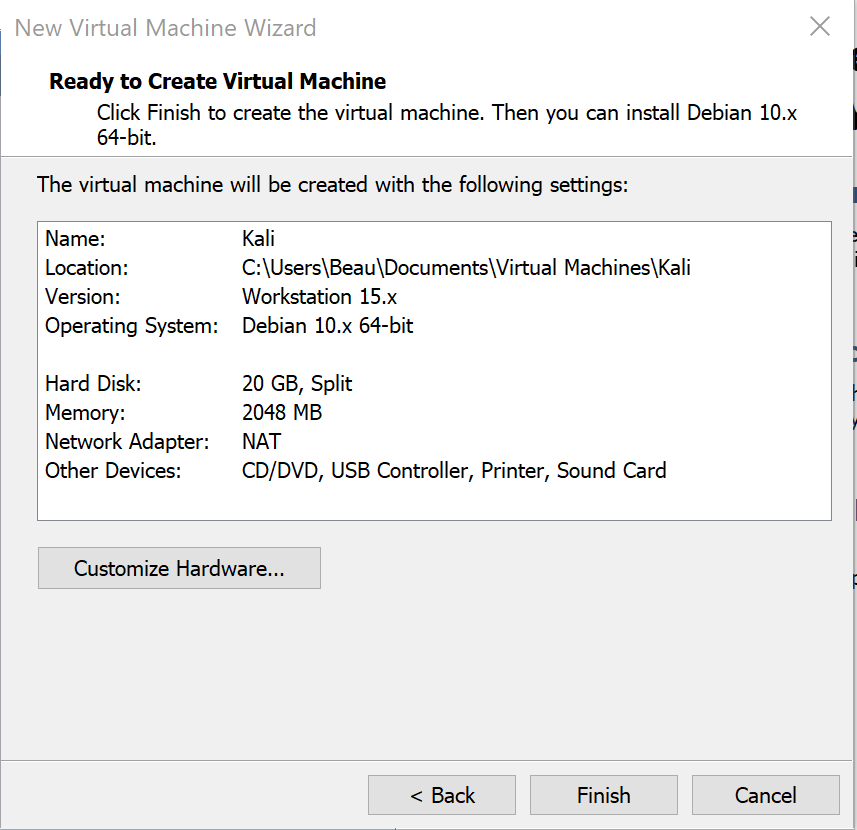
Your settings should look similar to the below settings, then click Finish.
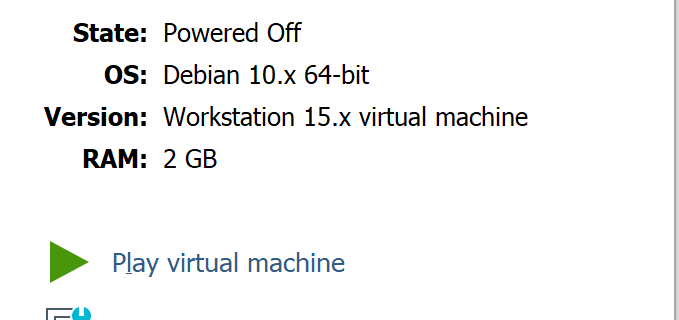
You should be able to see the VM in your VM Player library now. Select the Kali VM, and click “Play virtual machine”
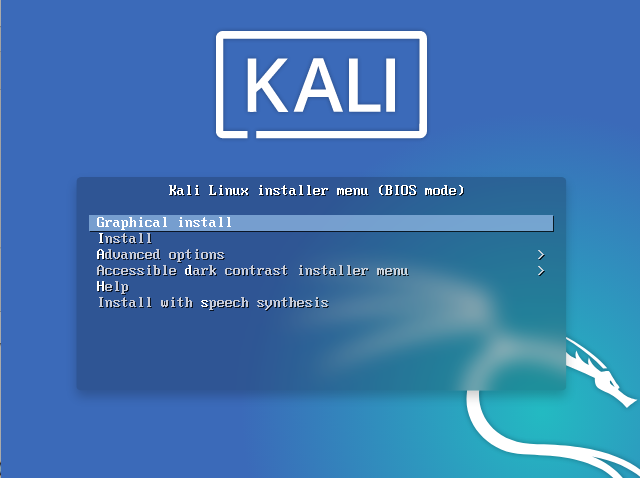
When Kali boots up select “Graphical install” and press enter.
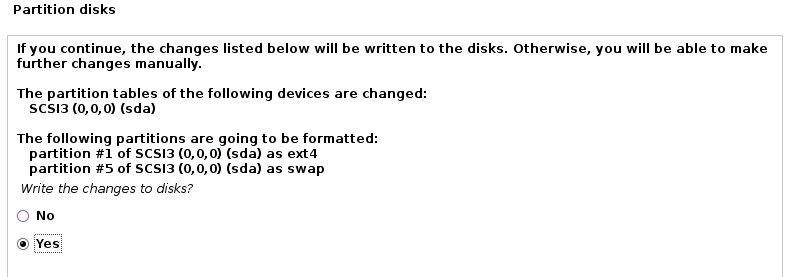
Follow the on-screen Kali installation process. You will be asked to create a username and password for a non-root user. You will need these credentials to authenticate to the system once installation is complete. For the most part, you can just click “Continue” through the installation process. Unless otherwise noted below just click “Continue” on each screen. When you reach this screen make sure to select “Yes” to write the changes to disks and then click continue.
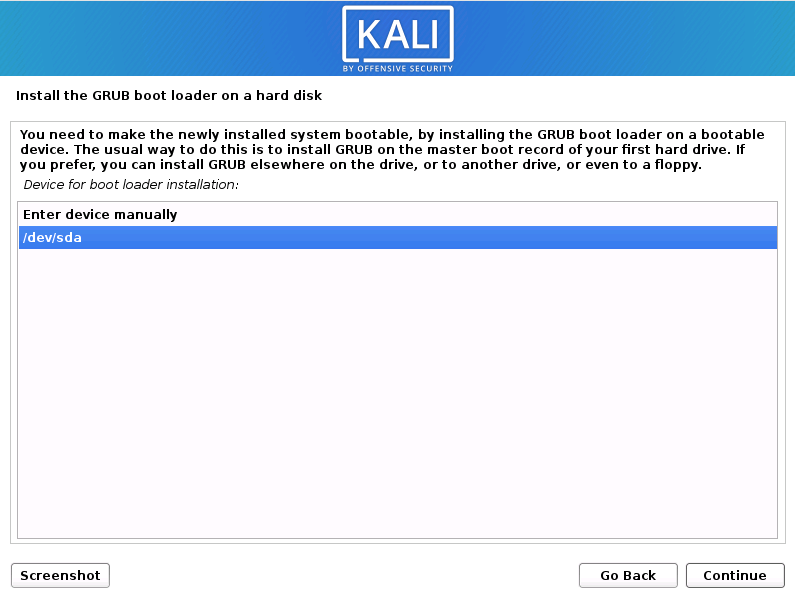
The next screen where you will need to interact is the below. Click “/dev/sda”, then continue.
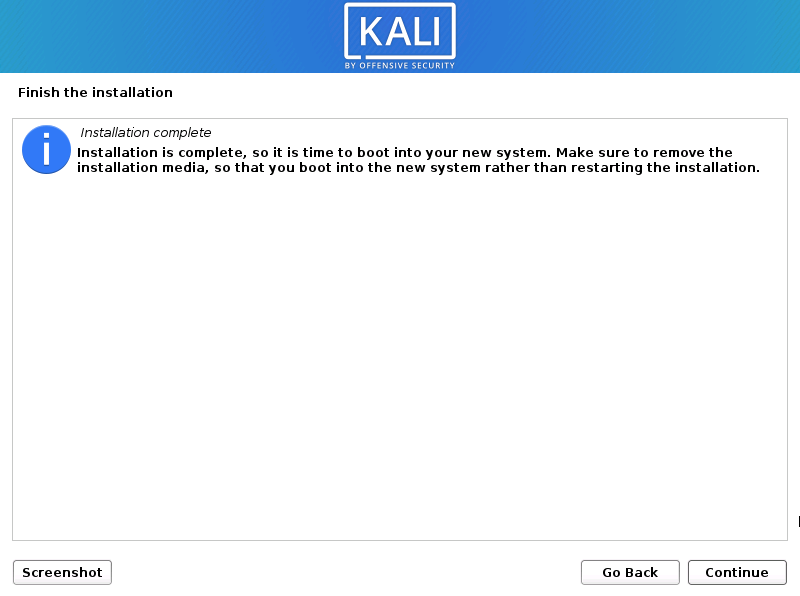
Upon completing the installation you will see this screen. Click continue to reboot the VM.
Once the Kali VM reboots make sure you can login with the user credentials you created. Open a terminal by clicking the black box in the upper left as shown in the screenshot below. Then type the following command to update the system (Your system must be connected to the Internet for this to work). You will be asked to enter your password.
sudo apt-get update && sudo apt-get upgrade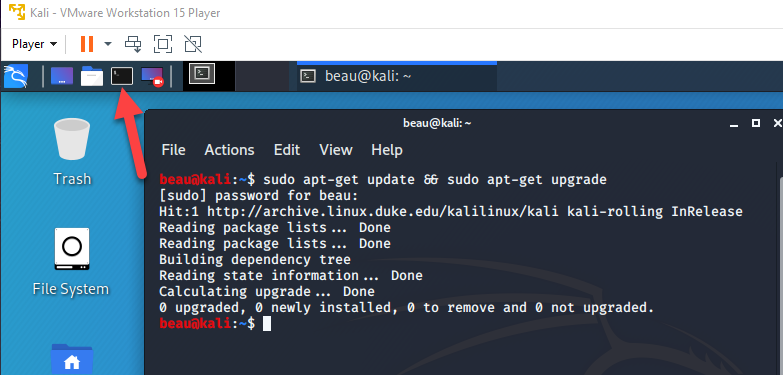
Next, let’s install Docker in our Kali VM. We’ll need it for one of the labs later on. In your fresh Kali VM run let’s first install dependencies
sudo apt -y install curl gnupg2 apt-transport-https software-properties-common ca-certificates Next we import Docker’s GPG key & add the Docker repo
curl -fsSL https://download.docker.com/linux/debian/gpg | sudo apt-key add -
echo "deb [arch=amd64] https://download.docker.com/linux/debian buster stable" | sudo tee  /etc/apt/sources.list.d/docker.list
Install Docker
sudo apt update
sudo apt install docker-ce docker-ce-cli containerd.io -y
Test it out by running the Docker “Hello World” container
sudo docker run hello-world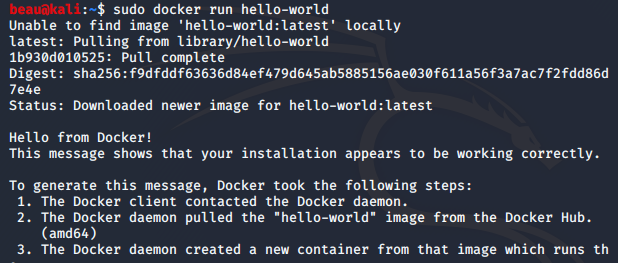
NOTE: If you reboot your system the docker service will not automatically restart. If you try to run Docker and you get this error that means the service isn’t running: “docker: Cannot connect to the Docker daemon at unix:///var/run/docker.sock. Is the docker daemon running?”
To start the service run:
sudo service docker start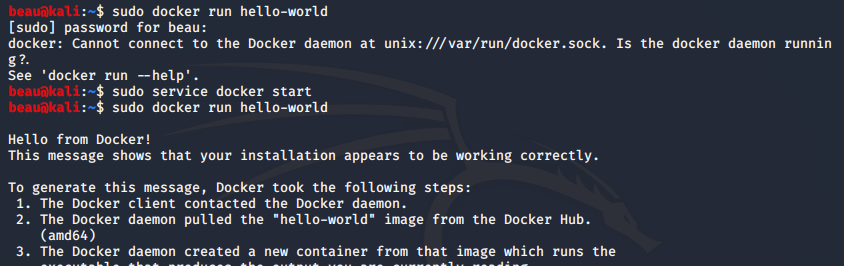
Install Pacu
cd ~/Desktop
sudo apt-get install python3-pip

git clone https://github.com/RhinoSecurityLabs/pacu
cd pacu
sudo bash install.sh
sudo pip3 install urllib3==1.25.10
Windows VM Setup
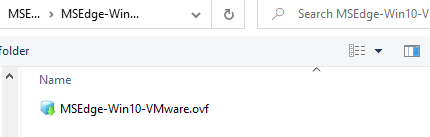
Next, we are going to boot up our Windows VM. Navigate to where you downloaded the VM Package and extract it to disk. If you downloaded the “VMware” version you should have a folder that contains a .ovf and .vmdk file. Open a new VMware Workstation window and click “Open a Virtual Machine”.
Navigate to where you extracted the VM Package and open the .ovf file.
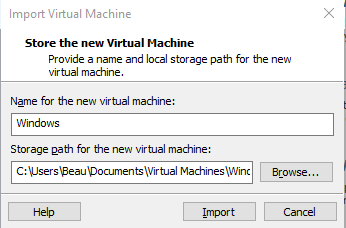
This should open a new window called “Import Virtual Machine”. Change the name of your virtual machine to “Windows” and click Import.
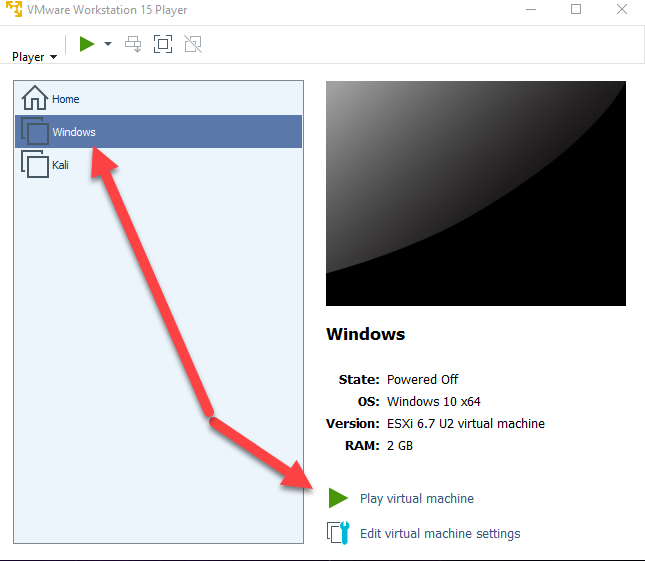
After the VM has been imported click it’s title in the VM Player library then click “Play virtual machine”.
Next, login to the virtual machine.
The password to the user account in the VM is “Passw0rd!”
Note that this developer VM will attempt to activate itself and will reboot after activation.
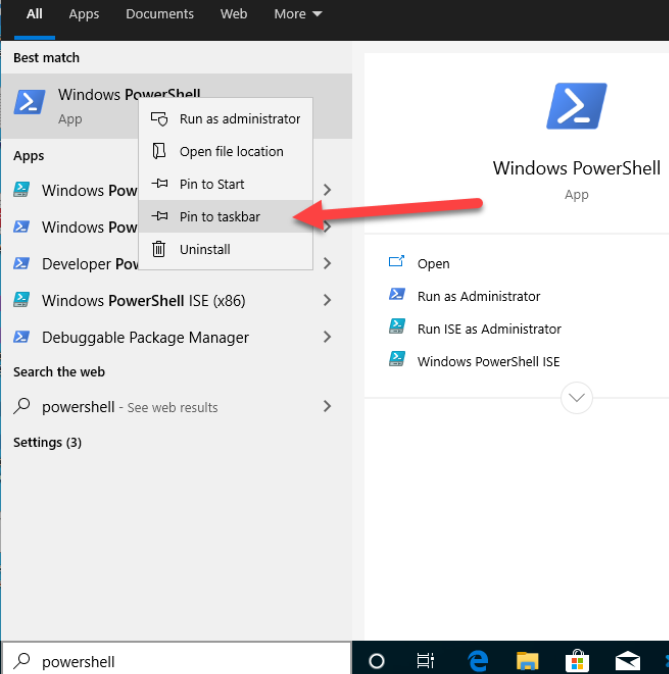
Let’s add PowerShell to our taskbar. Click in the search bar on the bottom left of the Windows VM and type “powershell”. Right-click the “Windows PowerShell” app and click “Pin to taskbar”.
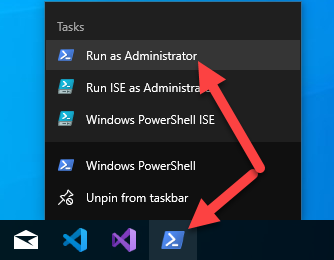
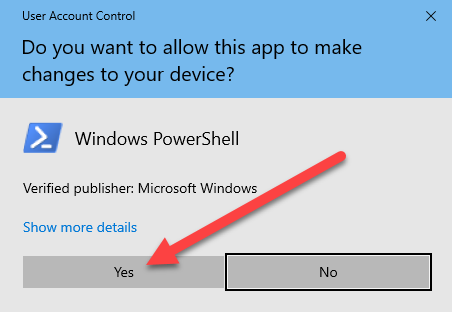
Next, Right-click the PowerShell icon in the taskbar and click “Run as Administrator” to start a new Administrative PowerShell window.
Click “Yes” on the User Access Control prompt.
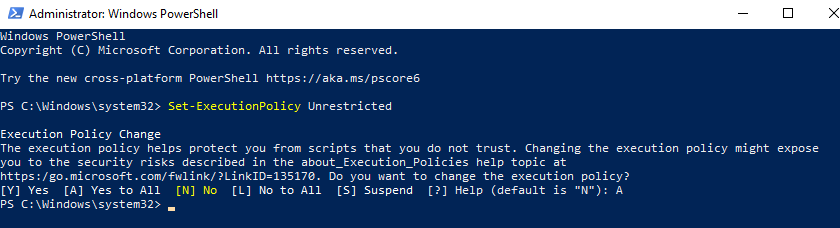
In the Administrative PowerShell window let’s set the execution policy to unrestricted. Run “Set-ExecutionPolicy Unrestricted” and then type “A” to answer the execution policy change so that all scripts can run unrestricted.
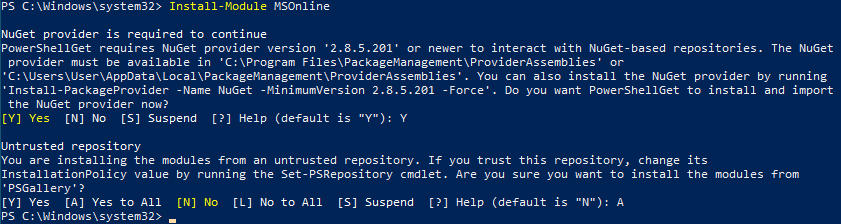
In the same Administrative PowerShell window, we will next install the MSOnline and Az PowerShell modules. First, run “Install-Module MSOnline”, then if prompted to install NuGet enter “Y”. If prompted to install from an untrusted repository enter “A”.
Next, run “Install-Module Az -AllowClobber”. If prompted to install from an untrusted repository enter “A”.

Some of the commands we will run from the Azure Command Line Tools. Install AZ CLI tools by running this command in your PowerShell window.
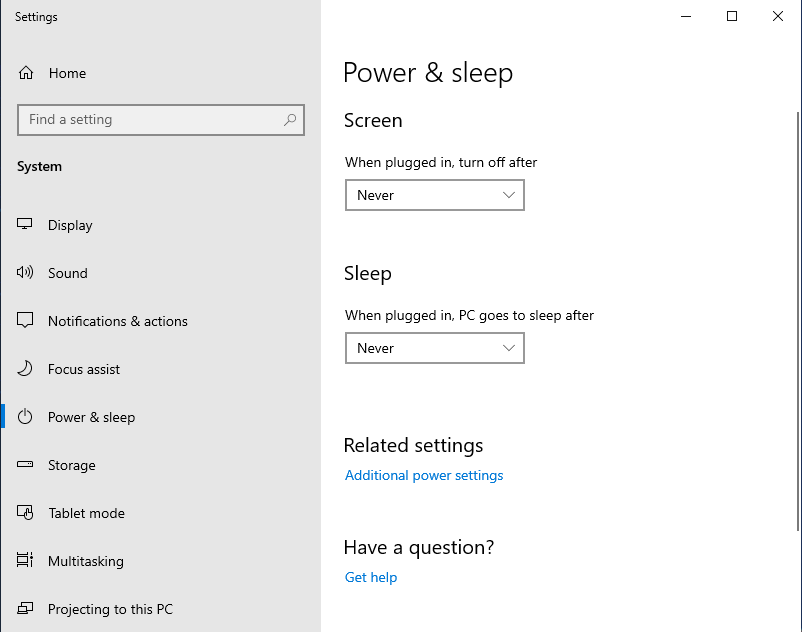
Invoke-WebRequest -Uri https://aka.ms/installazurecliwindows -OutFile .\AzureCLI.msi; Start-Process msiexec.exe -Wait -ArgumentList '/I AzureCLI.msi /quiet'Set the Power & sleep settings to “never” so the VM stays active. Do this by typing “power & sleep” in the search bar in the bottom left of the VM and then click on “Power & sleep settings”. Set both the “Screen” and “Sleep” settings to “Never”.
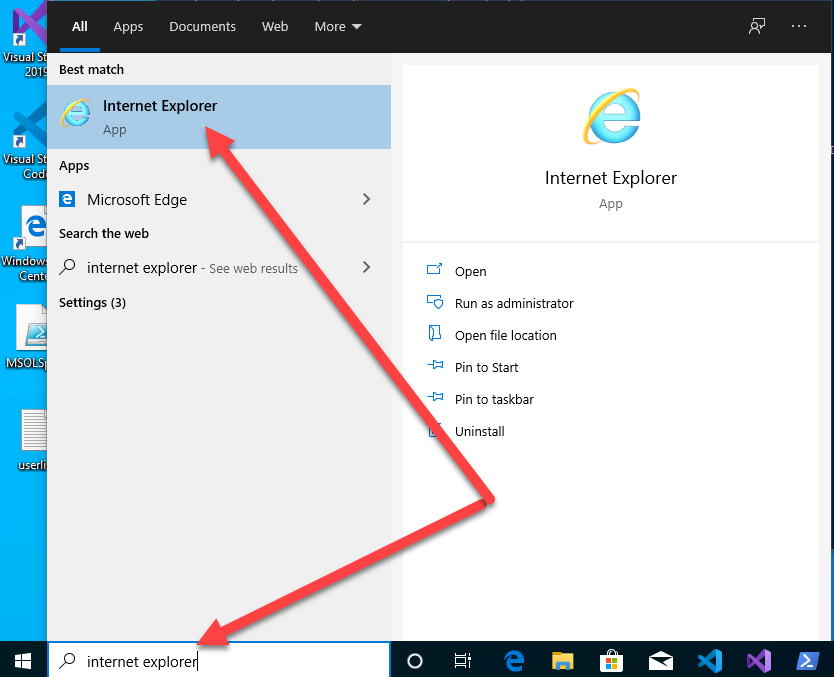
Lastly, we need to launch an Internet Explorer initial session to trigger the IE engine for Powershell. In the search menu type “internet explorer” and then click the “Internet Explorer” app. After the browser window fully loads the IE first-launch configuration should be complete so you can close this window.
Azure Account Setup
Part A
Now we need to create an Azure account. Microsoft gives you 12 months of free services and $200 of free credit towards services that are not free for the first 30 days. Be advised that Microsoft does require a valid phone number and credit card number for identity verification purposes but it is not billed unless you actually use up your free credits and still are using Azure services. They do put a $1 hold on the card. This is a cloud pentesting course and you will need some cloud assets of your own to target throughout the training.
NOTE: It is highly recommended that you set up a new Azure account that is not associated with your corporate email address and that does not have any important personal or corporate resources in it. During the labs, you will be creating vulnerabilities in your cloud subscriptions for testing the techniques taught throughout the course. In order to avoid breaking anything important, it’s best to just use a new account.
You must have administrative access over your Azure subscription. You will not be able to modify resources within your subscription if you are not an administrator, which means no labs will work.
If you already have your own personal Microsoft Azure account with administrative access skip to “Part B”.
Azure provides many of their services for free and we should not be using anything that should end up costing you anything however note that some costs may occur. Just keep in mind that by signing up your credit card will be tied to your account so be cautious about your usage. For a better understanding, I highly recommend reading through the FAQ here: https://azure.microsoft.com/en-us/free/free-account-faq/
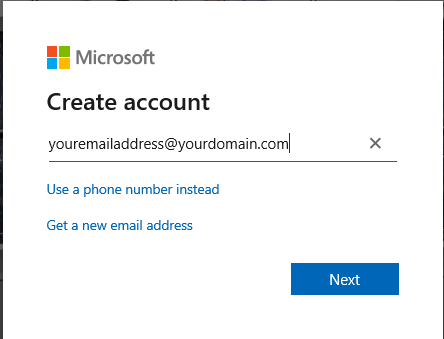
To sign up for an account first open a web browser to https://azure.Microsoft.com/en-us/free/. Click the “Start Free” button. If you already have a Microsoft account login with those credentials. If not, click “Create one!”. Enter an email address you control.
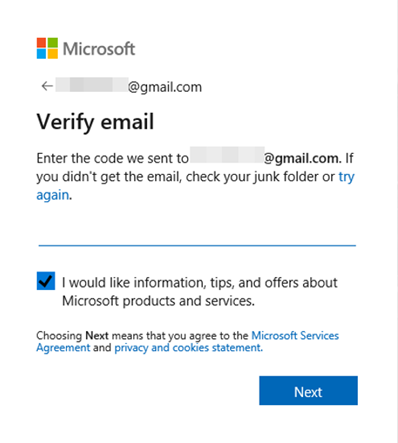
Create a password then hit “Next”. Microsoft will email you a security code. Enter the code and click “Next”. If a CAPTCHA code is presented enter the correct response.
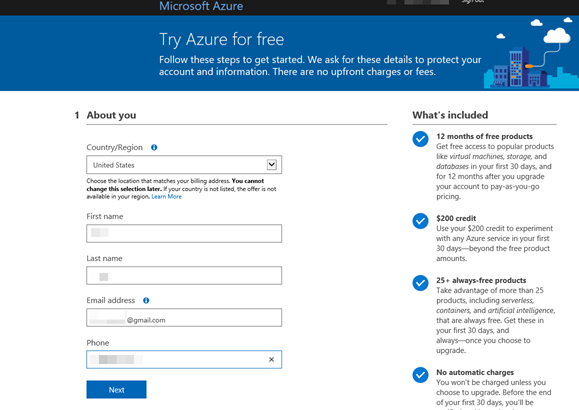
Next, Azure requires that you enter contact information along with a Credit Card. (This card is not billed at this time. Upon completion of the training feel free to cancel your account if you no longer wish to have it). They require a text message be sent to the contact number for verification.
If you have ever signed up for an Azure account previously and used the same contact information or credit card information you will not be eligible for the “Free account”. However, that being said there are still many “free” resources available if you have a “Pay-As-You-Go plan as well. If you get a response stating that you are not eligible for Free credit sign up with the Pay-As-You-Go plan. On the payment information page click “No technical support” to avoid getting billed for it.

Part B
Upon completing these steps you should now be able to authenticate to https://portal.azure.com using the credential you just set up.
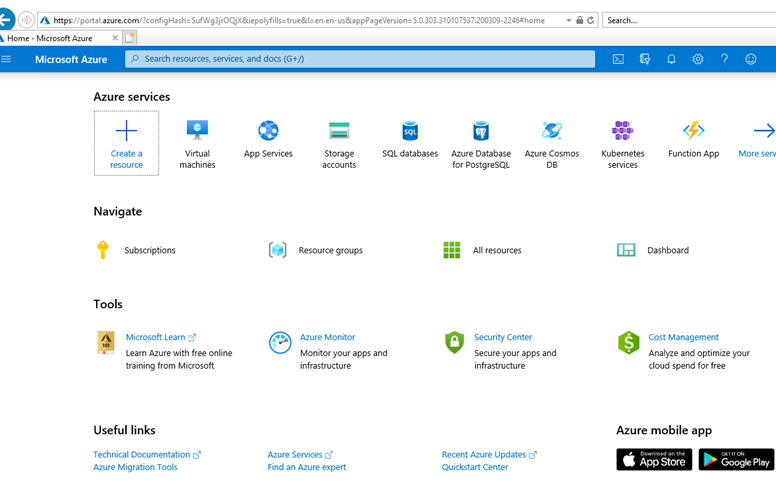
We will need an actual Azure Active Directory user for testing later. Let’s set that up now.
Click the menu on the left, then Azure Active Directory. Now click Users, then click “New user”.

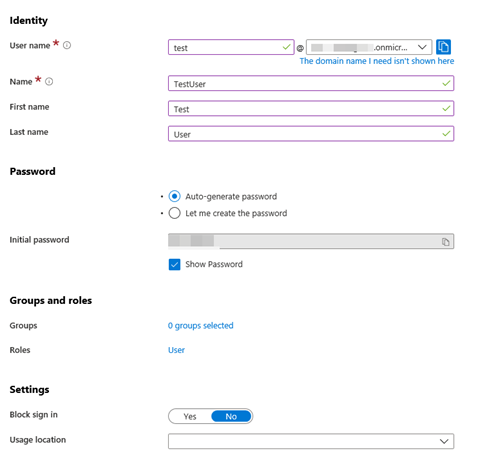
Now we create a user with a *.onmicrosoft.com domain address. Fill out the user name, and name fields however you want. Using the auto-generated password here is fine. It will make you change it on your first authentication anyways. Just make sure to note it before moving on.
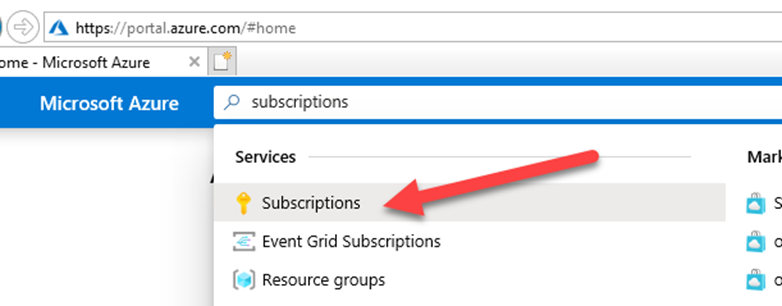
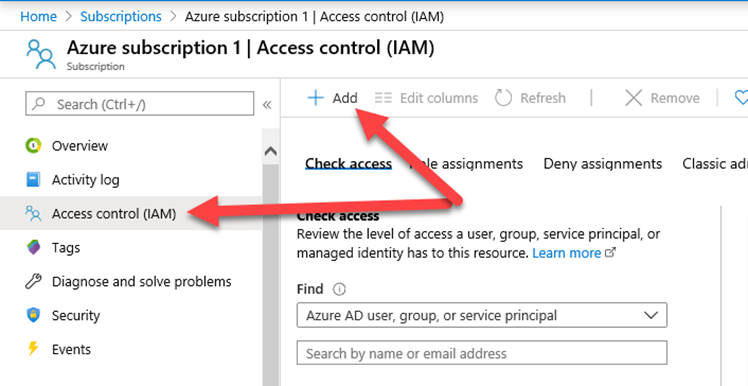
Now you need to add the user to your primary subscription. Go to https://portal.azure.com and search in the search bar for “subscriptions”, and click it in the Services list.
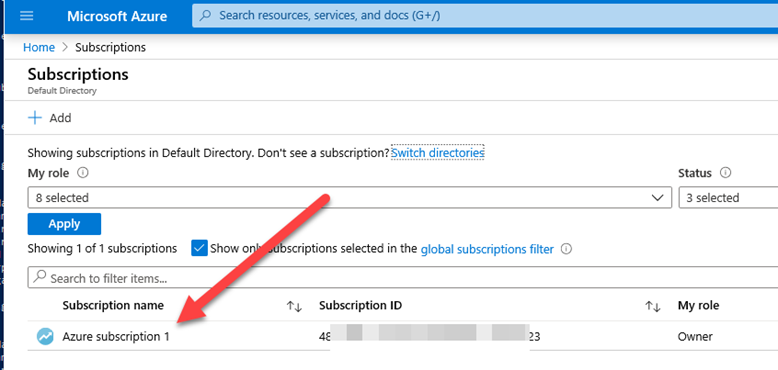
Click on your subscription name.
Click on “Access control (IAM)” on the left, then click the “Add” button.
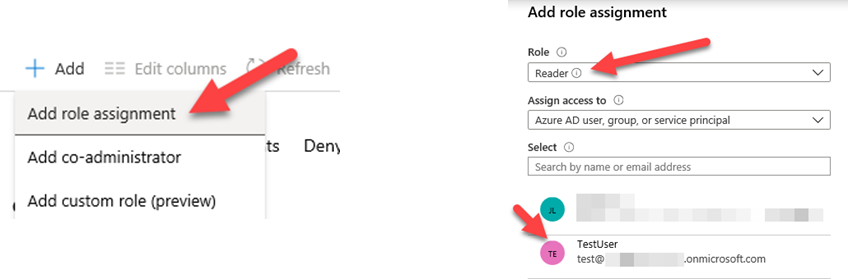
Click “Add role assignment”. In the “Add role assignment” form click the “Role” drop-down menu and select “Reader”. Leave “Assign access to” as “Azure AD user, group, or service principal”. Select your test user you created, then click save.
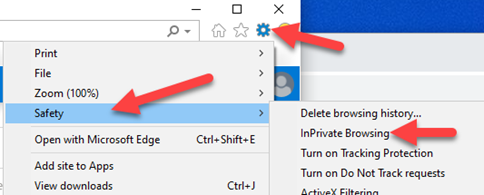
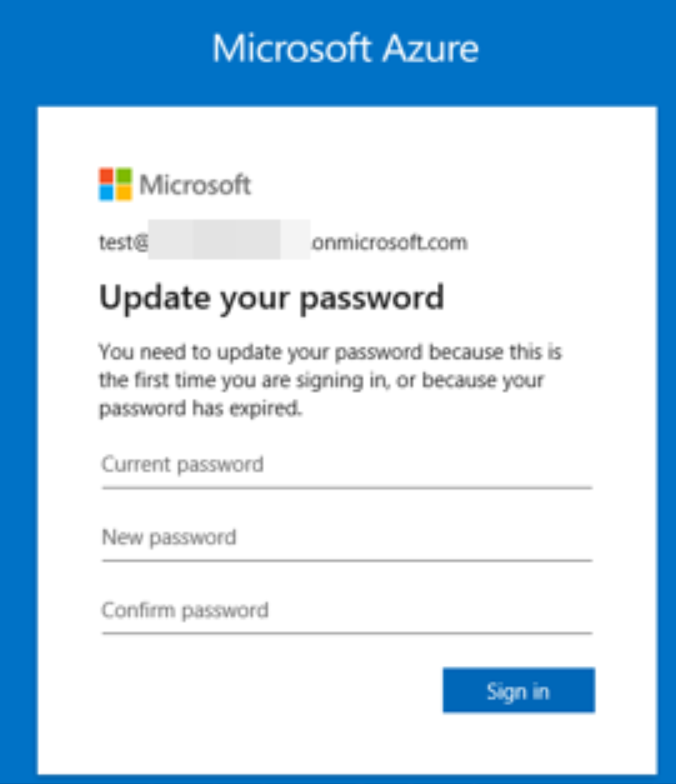
Now open a new private browser window. In IE click the settings icon, then Safety, then InPrivate Browsing. Navigate to https://portal.azure.com and login with your new test account you just created. It will ask you to change the password. Set this password and note the credentials for later.
AWS Account Setup
Part A
We will need valid AWS access keys during one of the labs. To do this you will need an Amazon AWS account. If you already have an AWS account skip to “Part B”. Like Microsoft, Amazon offers a “Free account” as well as a number of free resources. For more information regarding the Amazon AWS free tier read the FAQ here: https://aws.amazon.com/free/free-tier-faqs/.
NOTE: It is highly recommended that you set up a new AWS account that is not associated with your corporate email address and that does not have any important personal or corporate resources in it. During the labs, you will be creating vulnerabilities in your cloud subscriptions for testing the techniques taught throughout the course. In order to avoid breaking anything important, it’s best to just use a new account.
You must have administrative access over your AWS account. You will not be able to modify resources within your subscription if you are not an administrator, which means no labs will work.
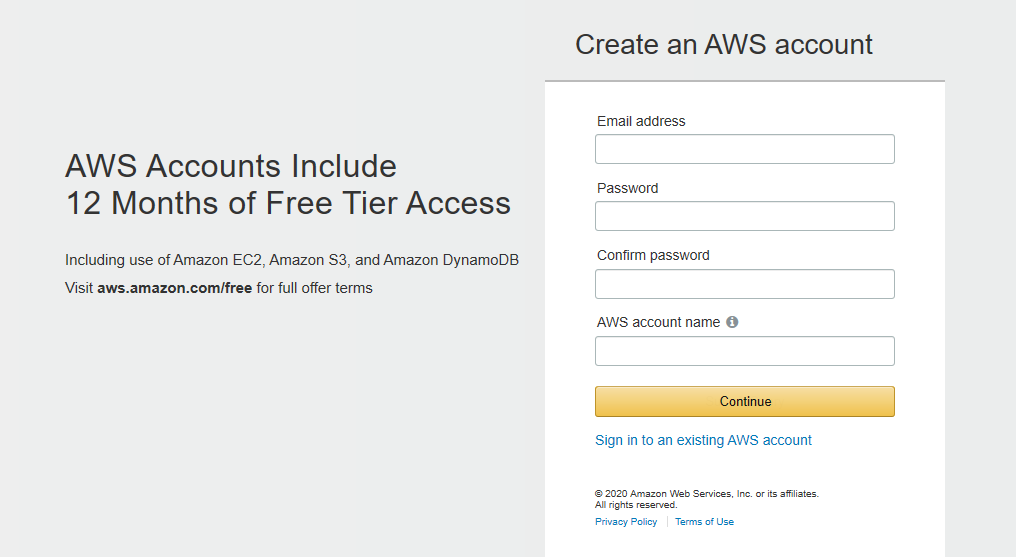
Navigate a web browser to https://aws.amazon.com/free/. Click “Create a Free Account”. Enter your email address and create a new password and “AWS account name”.
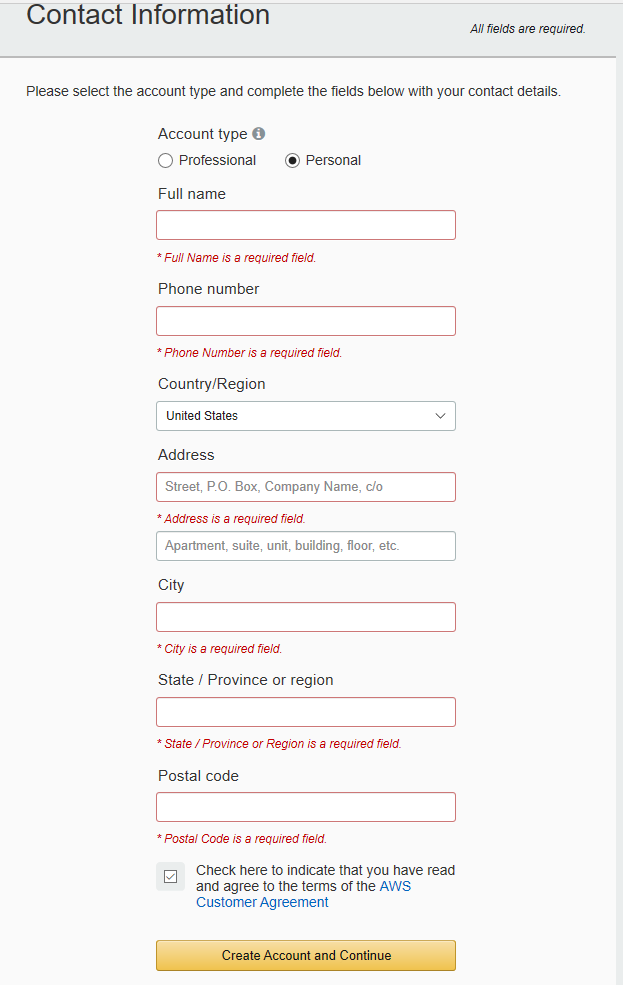
Complete the Contact Information form.
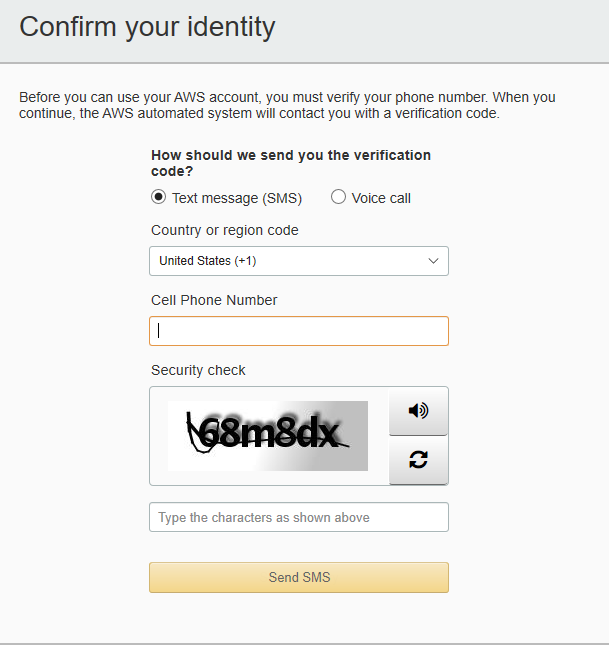
Just like with the Azure account Amazon requires a valid credit card to do identity verification. Enter your card number and click “Verify and Add”. Next, they will require a valid phone number to text or voice call for verification.
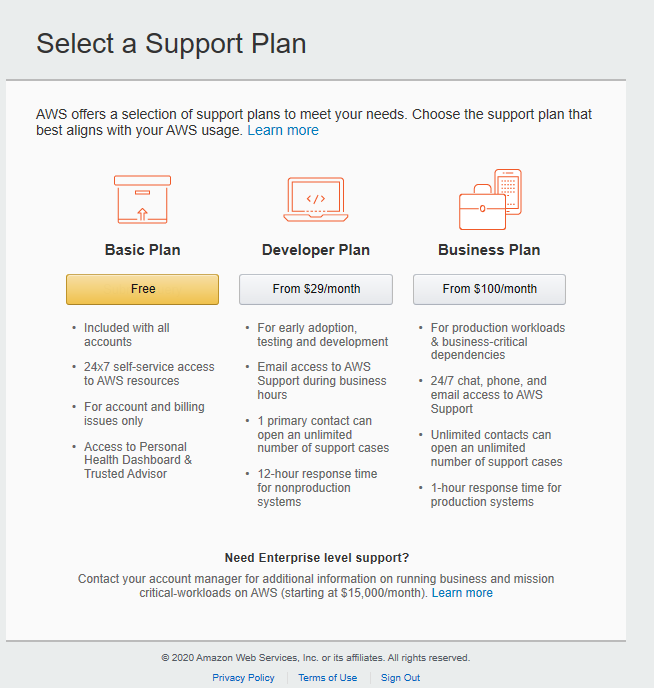
After you have confirmed your phone number select “Free” on the next screen regarding “Support plans”.
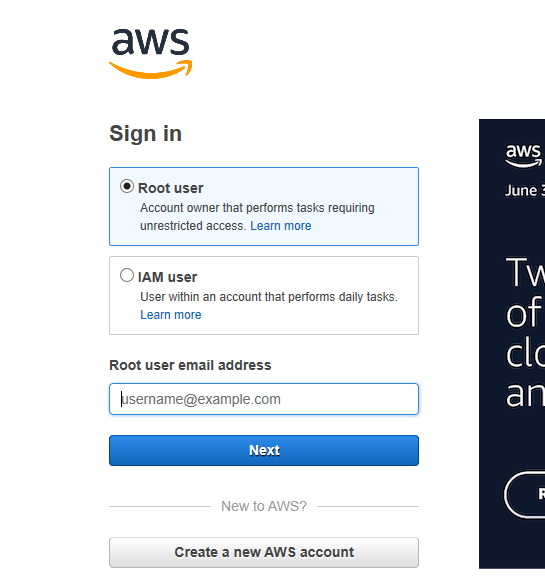
Next, you should be able to sign in to the AWS Console by clicking “Sign In to the console” in the top right of the AWS web page.

Enter your email address in the “Root user email address” field and then click Next. Enter your password on the next screen then click Next.
Part B
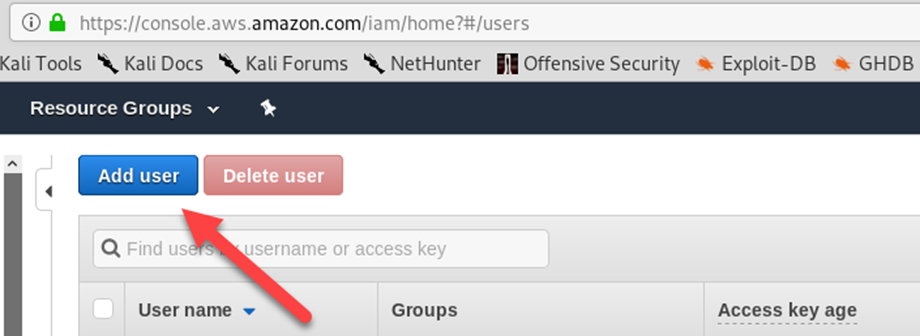
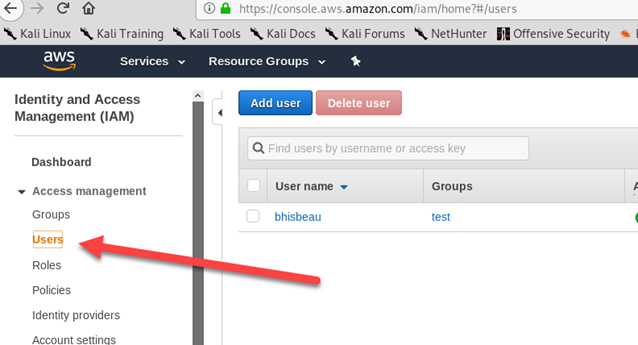
Next, we will need to create a set of AWS keys. Login to the AWS Console at: https://console.aws.amazon.com/iam/home. Click “Users” on the left.

Click “Add user”.
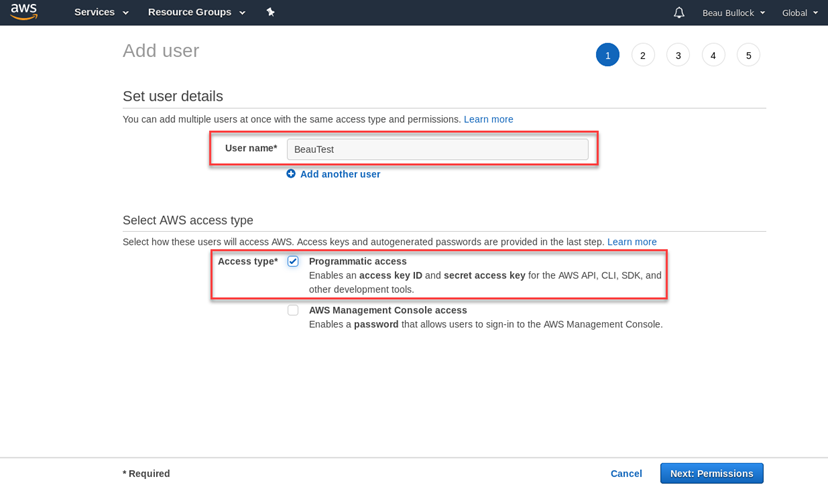
Create a “User name” and click the checkbox for “Programmatic access”, then click “Next: Permissions”.
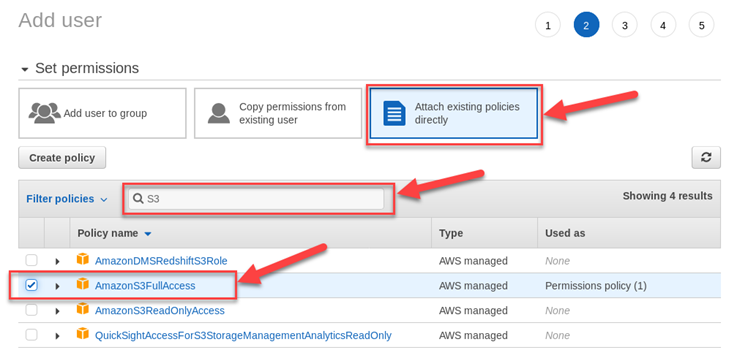
Click “Attach existing policies directly”. Search for “S3” then click the checkbox next to “AmazonS3FullAccess”. Click “Next: Tags”, then “Next: Review”, then “Create user”
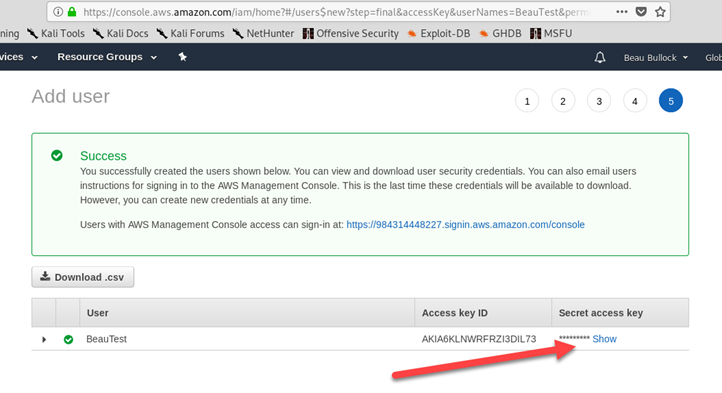
Click “Show” under “Secret access key”. Copy both the “Access key ID” and “Secret access key” to a text editor (or preferably a password vault) for use in the upcoming labs (KEEP THESE SAFE).
16-Hr Training Additional Pre-Reqs
Throughout the course of the paid training we will be leveraging Terraform to stand up various parts of the labs. This will require you to have two (2) things in addition to the previous pre-requisites: An Administrative AWS set of access keys, and an Azure Service Principal with Contributor access to your subscription. Below are the steps for setting these up.
AWS Admin Account Setup
Login to the AWS Console at: https://console.aws.amazon.com/iam/home. Click “Users” on the left.
Click “Add user”.

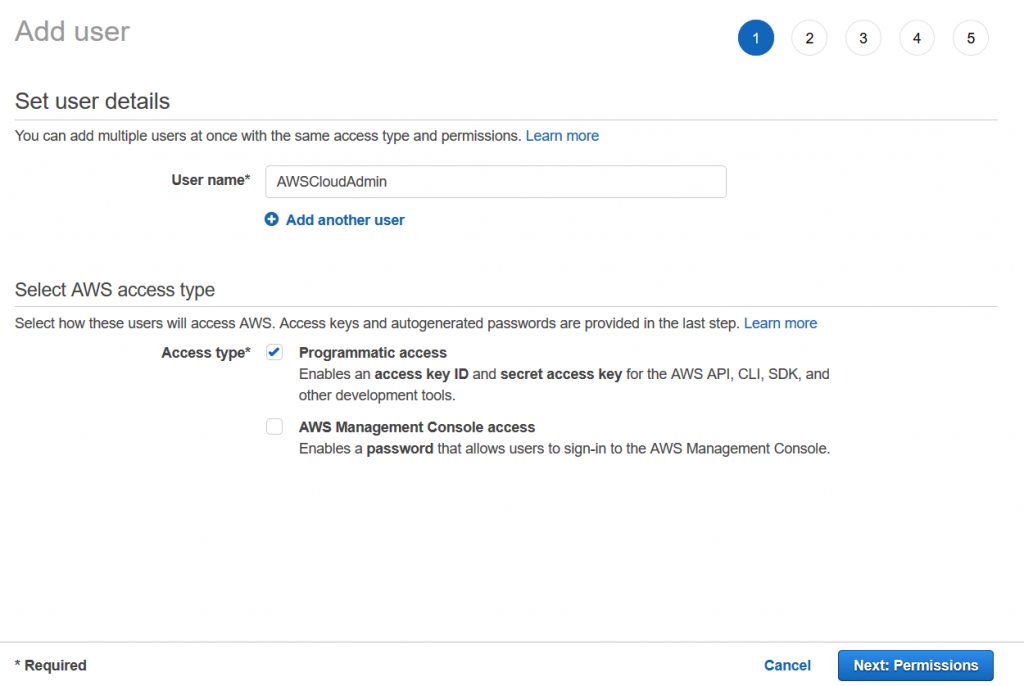
For “User name” enter “AWSCloudAdmin” and click the checkbox for “Programmatic access”, then click “Next: Permissions”.
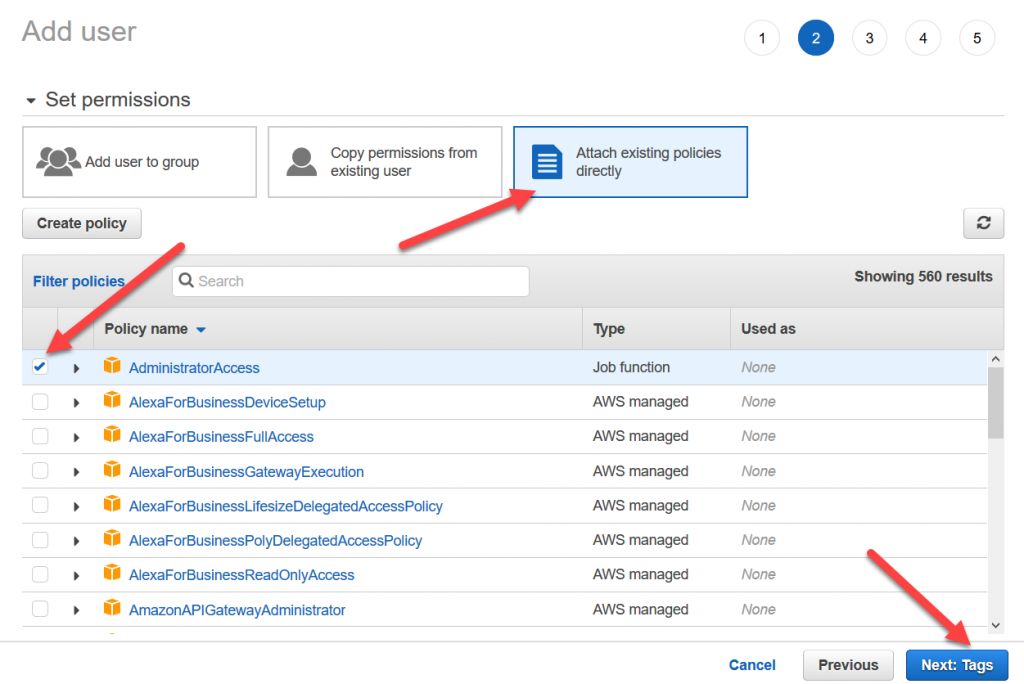
On the next page click “Attach existing policies directly”. Click the checkbox next to “AdministratorAccess”. Click “Next: Tags”, then “Next: Review”, then “Create user”
Click “Show” under “Secret access key”. Copy both the “Access key ID” and “Secret access key” to a text editor (or preferably a password vault) for use in the upcoming labs (KEEP THESE SAFE).

In your Kali VM setup the AWS profile for the “AWSCloudAdmin” with the following command:
sudo aws configure --profile=AWSCloudAdmin
Azure Admin Account Setup
Login to the Azure portal (portal.azure.com) with your primary account. In the search bar search for “Azure Active Directory” and click it. On the left click “App registrations”, then “New registration”.
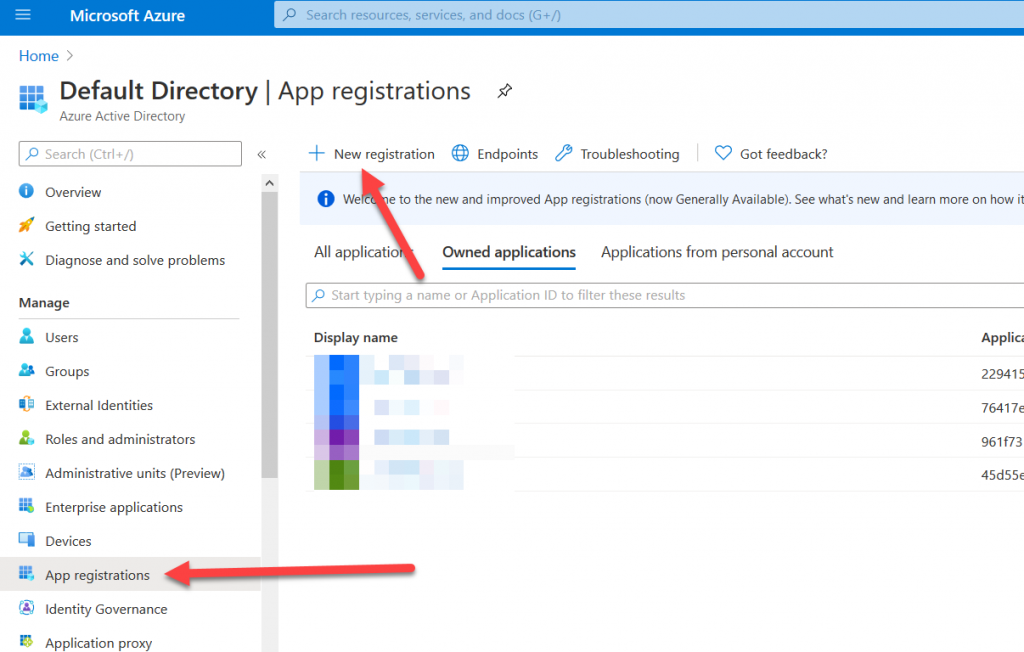
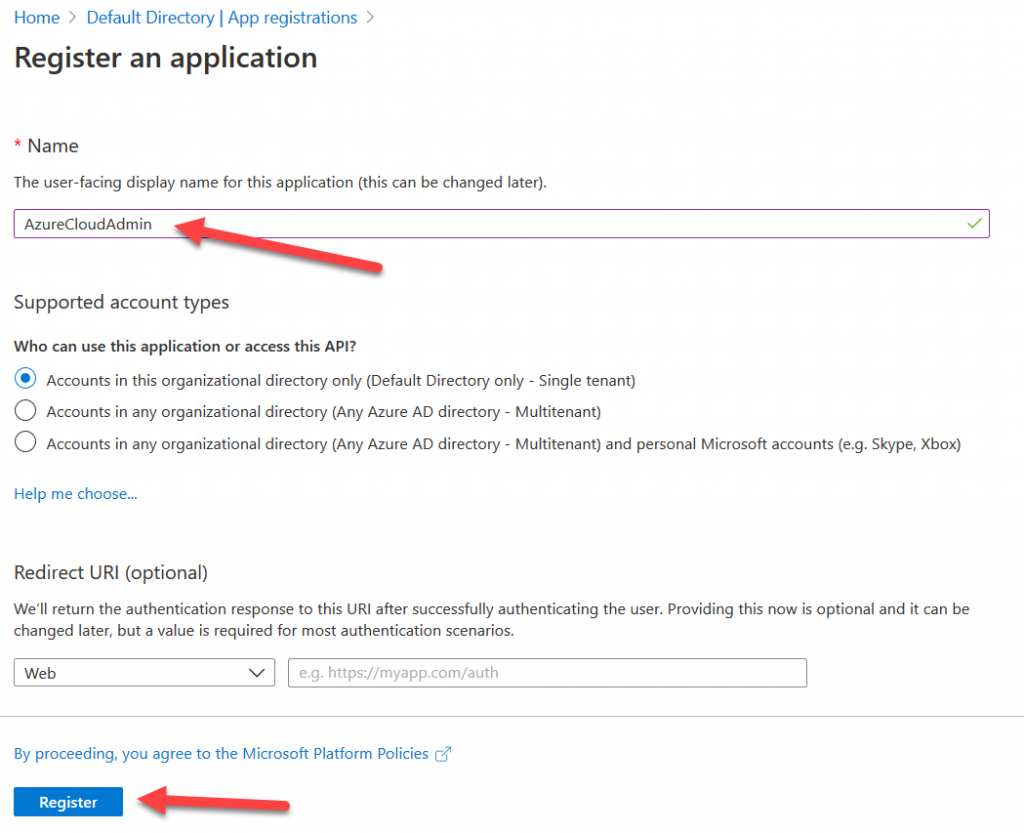
On the “App registration” page set the name to “AzureCloudAdmin” and click Register.
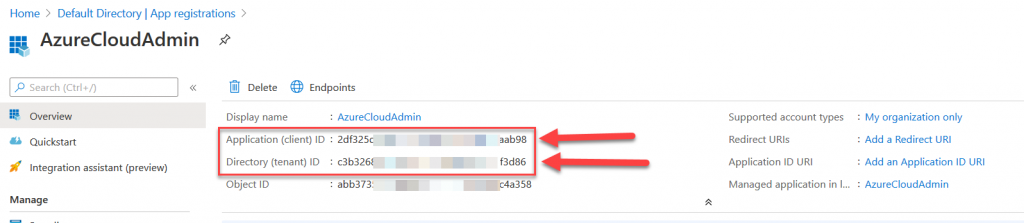
After registering you should see the Overview page of the application. Make note of the “Application (client) ID” and “Directory (tenant) ID”. You will need these to authenticate with Terraform.
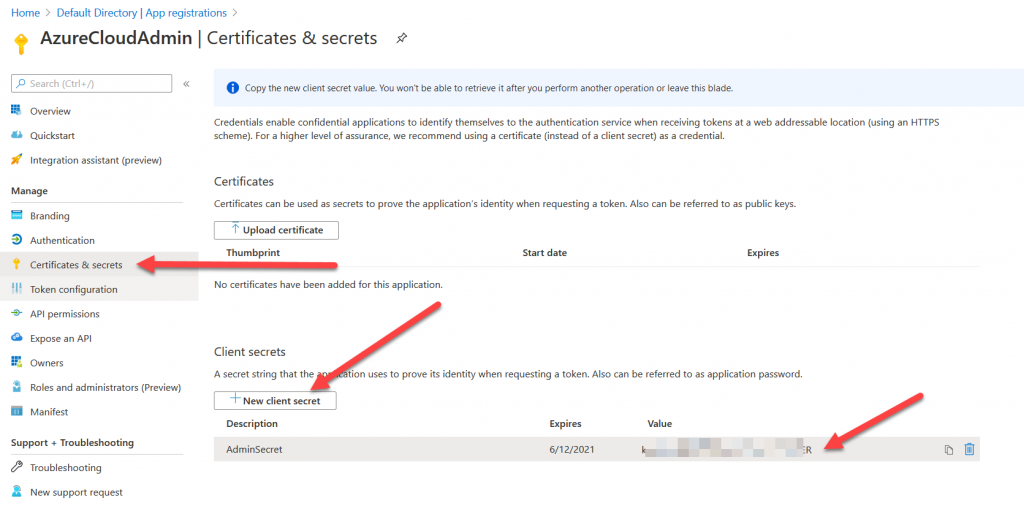
Next, you will need to create a secret for this service principal. Click “Certificates & secrets” on the left, then “New client secret”. Enter a description of “AdminSecret” and click Ok. Copy the “Value” of the secret to a safe location for use later. This is essentially the “password” for the service principal.
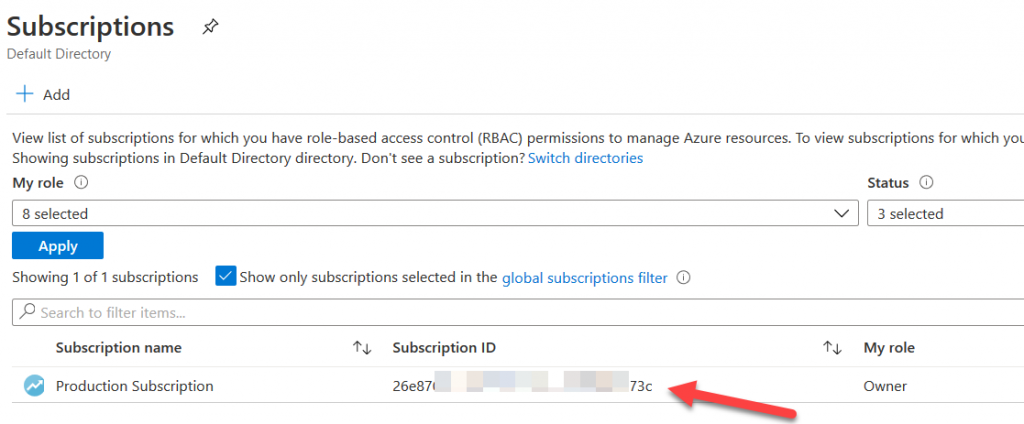
Next, you will grant the service principal permission to modify resources in your subscription. Search for “Subscriptions” in the search bar and click it. You will need the subscription ID to authenticate with Terraform. Click on your subscription and then copy the Subscription ID from the next page.
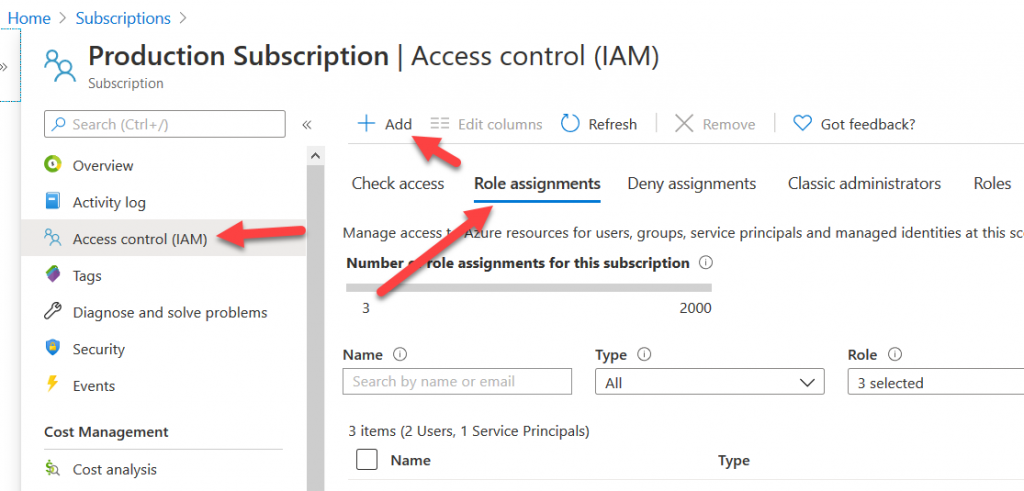
On the Subscription page click on “Access control (IAM)” on the left. Then click the “Role assignments” tab, then “Add”>”Add role assignment”.
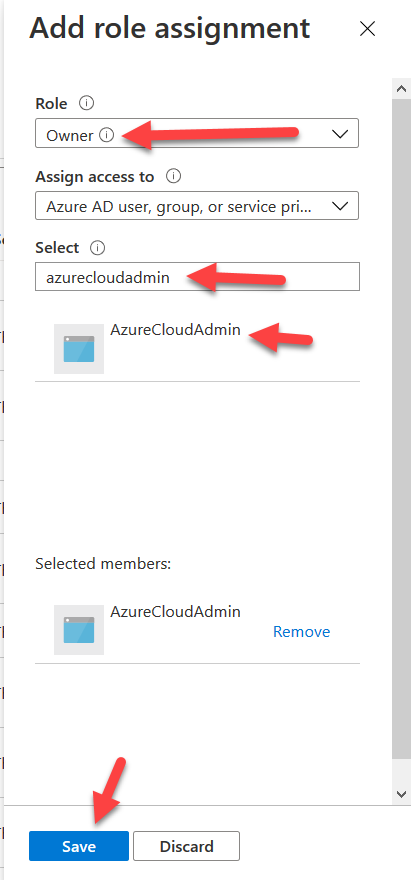
Click the drop-down menu next to “Role” and select “Owner”. Then in the “Select” box search for your service principal “AzureCloudAdmin” and select it. Click Save.
The Azure service principal should now have Owner level access to your subscription.
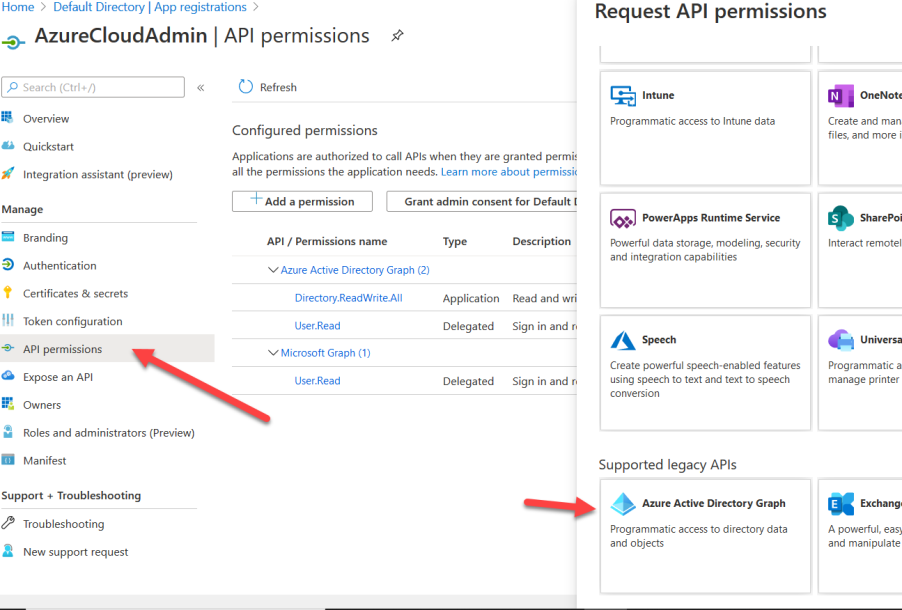
Next we’ll give the service principal permissions to access the legacy Azure Active Directory Graph API.
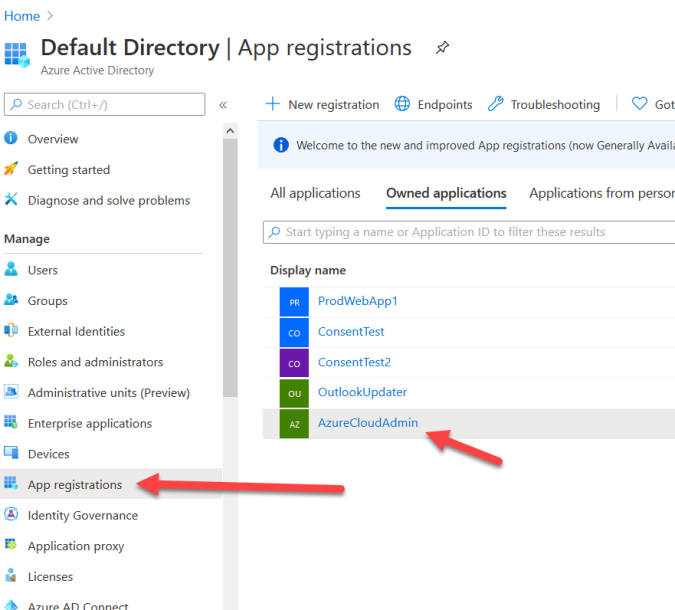
Navigate to Azure Active Directory, click “App Registrations”, click your AzureCloudAdmin.
Click “API permissions” on the left, then “Add a permission”.
Scroll down on the Request API permissions form to the bottom and click on “Azure Active Directory Graph”.
Click the box that says “Application permissions”.
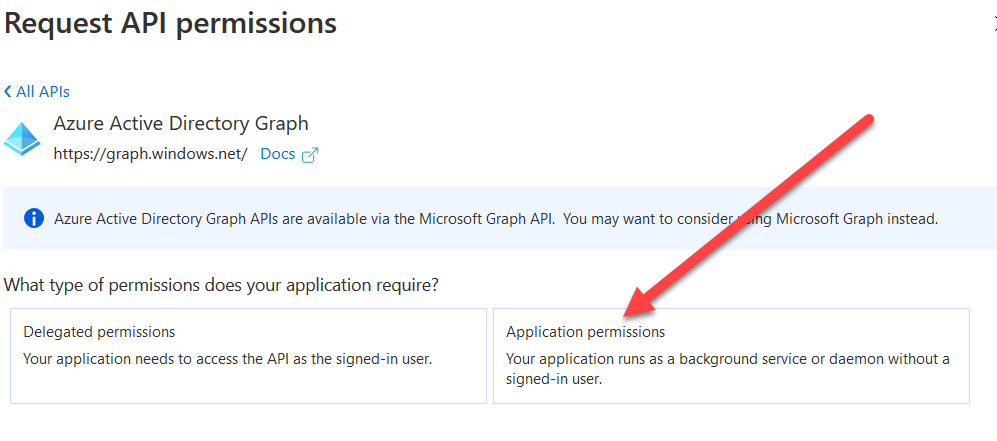
Search for “directory.readwrite.all” and click the checkbox next to it. Click Add permissions.

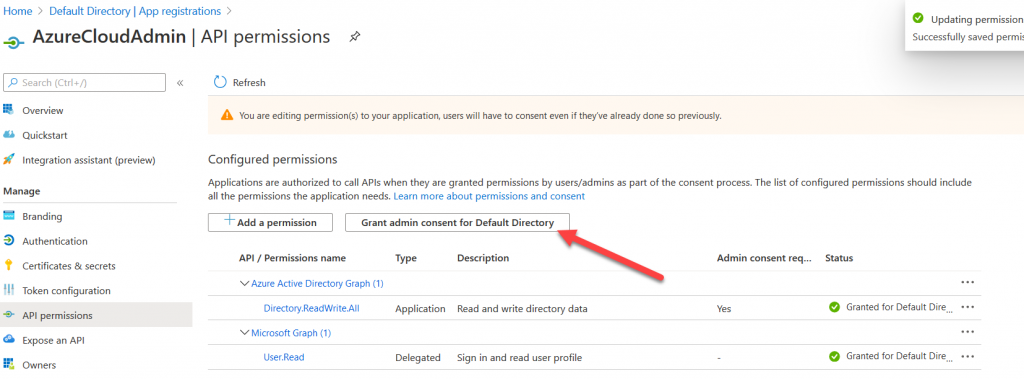
Finally, click the box titled “Grant admin consent for Default Directory”.
Now open a terminal on your Kali VM and run the following commands substituting your actual client ID, client secret, tenant ID, and subscription ID. These commands will set your keys as environment variables so that Terraform can authenticate to your account and setup parts of the labs.
export ARM_CLIENT_ID="00000000-0000-0000-0000-000000000000"
export ARM_CLIENT_SECRET="00000000-0000-0000-0000-000000000000"
export ARM_SUBSCRIPTION_ID="00000000-0000-0000-0000-000000000000"
export ARM_TENANT_ID="00000000-0000-0000-0000-000000000000"
(NOTE: These environment variables are only valid within the terminal you ran the export commands in. If you open a new terminal to run Terraform you will need to paste these in again)
You do have the option of saving these to your ~/.profile which can be loaded to avoid having to paste these in each time we run Terraform. Just know that these keys would be stored in cleartext on disk if you do this, which is not typically recommended.
Edit your ~/.profile file with your favorite text editor of choice and paste the export commands to the very end of it then save the file.
Next time you open a terminal run the below command to have your keys available in your current terminal.
source ~/.profileTerraform Install
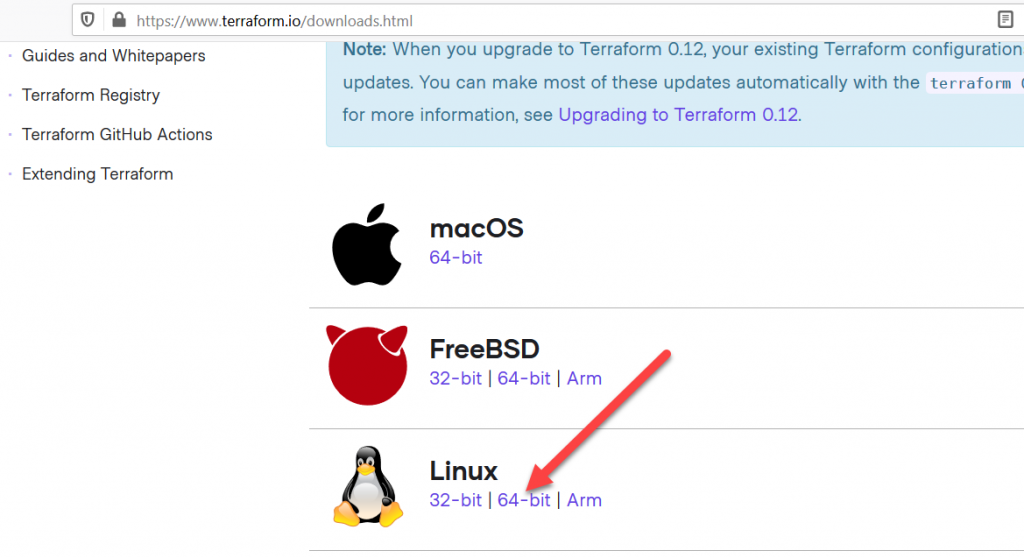
From the Kali VM open the web browser and download the Terraform binary from: https://www.terraform.io/downloads.html. Select the “Linux 64-bit” version.
Open a new terminal and navigate to the ~/Downloads folder.
cd ~/DownloadsUnzip the downloaded terraform file by running the following command:
unzip terraform*.zip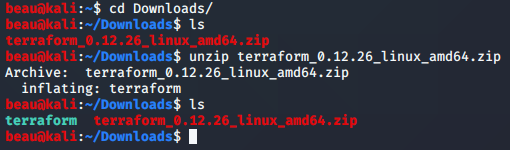
Now move the terraform binary to your /usr/local/bin/ directory.
sudo mv ~/Downloads/terraform /usr/local/bin/terraformYou should now be able to run the “terraform” command if installation was successful.
Conclusion
We should have everything we will need for the training setup at this point. To review here are the following items you should now have ready for the class:
- Windows 10 VM with MSOL and Az PowerShell modules installed
- Password is “Passw0rd!”
- Kali VM with Docker installed
- Password set during installation
- A Microsoft Azure Account
- A Microsoft Azure Active Directory Account (Created by the Azure Account)
- An Amazon AWS Account
- An Amazon Access key ID and Secret access key