
Turning a Raspberry Pi 3 Into a Cloaking Device With goSecure VPN
ADVISORY: The techniques and tools referenced within this blog post may be outdated and do not apply to current situations. However, there is still potential for this blog entry to be used as an opportunity to learn and to possibly update or integrate into modern tools and techniques.
This article, like the IADGov link here has three major steps. First, acquire a Raspberry Pi and a VPS running CentOS 6.8. Second, configure the server and Raspberry Pi. Last, we discuss and learn how to cloak all communications that use the Pi as your new router. I will demonstrate with a small peripheral monitor how to get the Pi connected to a Wi-Fi network that has a Terms of Use and Agreement page. Through this connection, all of my network traffic behind the Pi routes through the VPN tunnel for basically non-attributable communication to the Internet. See this article for purchasing servers with gift cards turned in to bitcoins.
Basics first: Link for how to “image” your Raspberry Pi with whatever operating system you choose: https://www.raspberrypi.org/documentation/installation/installing-images/. For brevity’s sake, I am using Raspbian in this article.
Quick and easy installation minimum for goSecure VPN server side:
Pick a platform, any of the following have CentOS 6.8 available. For full non-attribution, see the blog linked in paragraph one. The goSecure VPN server configuration is fully supported on CentOS 6.8, so please choose this operating system when selecting your virtual private server.
Digital Ocean: https://www.digitalocean.com/
Linode: https://www.linode.com/
Amazon EC2: https://aws.amazon.com/ec2/
When purchasing a VPS, you will not need to complete the majority of steps listed here:
https://iadgov.github.io/goSecure/documentation.html. Under Step 1 – Build Server Side network configuration – you can skip the “Internal network configuration”, since, well Amazon isn’t likely interested in you configuring VPN access to their trust networks.
Without further ado, the server installation commands:
[email protected]:~ $ cd ~
[email protected]:~ $ wget https://iadgov.github.io/goSecure/files/install_scripts/gosecure_server_install.py
### this command uses wget to go grab your server install python file – this is the server install, be sure you pull the server_install.py ###
[email protected]:~ $ sudo python gosecure_server_install.py client_id [email protected] client_psk “longpasswordforuse”
### please use whatever credentials and domain you want, the domain is irrelevant and your system will reboot after this command completes ###
That is all it takes. However, to change, edit or modify users, you will need to modify the following two files:
[email protected]:~ $ sudo yum install nano -y   ### adding nano text editor ###
[email protected]:~ $ sudo nano /etc/ipsec.conf  ### add users in here
[email protected]:~ $ sudo nano /etc/ipsec.secrets ### add secrets in here
Quick and easy installation minimum for goSecure VPN client side:
The following steps are all taken from the IADGov site and there are lots of beautiful screenshots out there.
1. Configure the Raspberry Pi from the terminal with the sudo raspi-config command
Change User Password - Option 2
Internalisation Options - Option 5
Change Timezone
Change Keyboard Layout   ### UK Keyboard by Default, see screenshots for this section, there are lots of options ###
Change Wi-Fi Country
2. To apply changes, click tab twice and reboot.
3. Configure Networking and make it match the following example network/interfaces file:
pi:$ sudo nano /etc/network/interfaces
# interfaces(5) file used by ifup(8) and ifdown(8)
# Please note that this file is written to be used with dhcpcd
# For static IP, consult /etc/dhcpcd.conf and ‘man dhcpcd.conf’
# Include files from /etc/network/interfaces.d:
source-directory /etc/network/interfaces.d
auto lo
iface lo inet loopback
### The eth0 interface will become your cloaking router’s interface IP. You can set it to
### whatever you want, but this must be configured prior to running the client_install.py
auto eth0
allow-hotplug eth0
iface eth0 inet static
address 192.168.50.1
netmask 255.255.255.0
auto wlan0
allow-hotplug wlan0
iface wlan0 inet manual
wpa-conf /etc/wpa_supplicant/wpa_supplicant.conf
- Restart networking using sudo service networking restart
- Update OS and Raspberry Pi
sudo apt-get update -y
sudo apt-get upgrade -y
sudo apt-get dist-upgrade -y
sudo apt-get install rpi-update
sudo rpi-update
sudo reboot
### After reboot, on login prompt, login.
5. wget and run the goSecure Client Install Script
pi:~$ cd ~
pi:~$ wget https://iadgov.github.io/goSecure/files/install_scripts/gosecure_client_install.py
pi:~$ sudo python gosecure_client_install.py
6. Clean up ### remove all of your configuration tracks
pi:~$ sudo rm /home/pi/gosecure_client_install.py
pi:~$ sudo rm -rf /usr/share/doc/* /opt/vc/src/hello_pi/
pi:~$ sudo find /usr/share/locale/* -maxdepth 0 -type d |grep -v en |xargs sudo rm -rf
pi:~$ sudo find /usr/share/man/* -maxdepth 0 -type d |grep -Pv 'man\d' |xargs sudo rm -rf
pi:~$ sudo find / -type f -name "*-old" |xargs sudo rm -rf
pi:~$ sudo rm -rf /var/backups/* /var/lib/apt/lists/* ~/.bash_history
pi:~$ sudo find /var/log/ -type f |xargs sudo rm -rf
pi:~$ sudo cp /dev/null /etc/resolv.conf
pi:~$ sudo reboot
Quick and easy client use case (screenshots and such further):
- Connect network cable from laptop, PC or switch to the Raspberry Pi.
- Plug in the USB cable to the goSecure Client to the device to provide power.
- Wait 60 seconds.
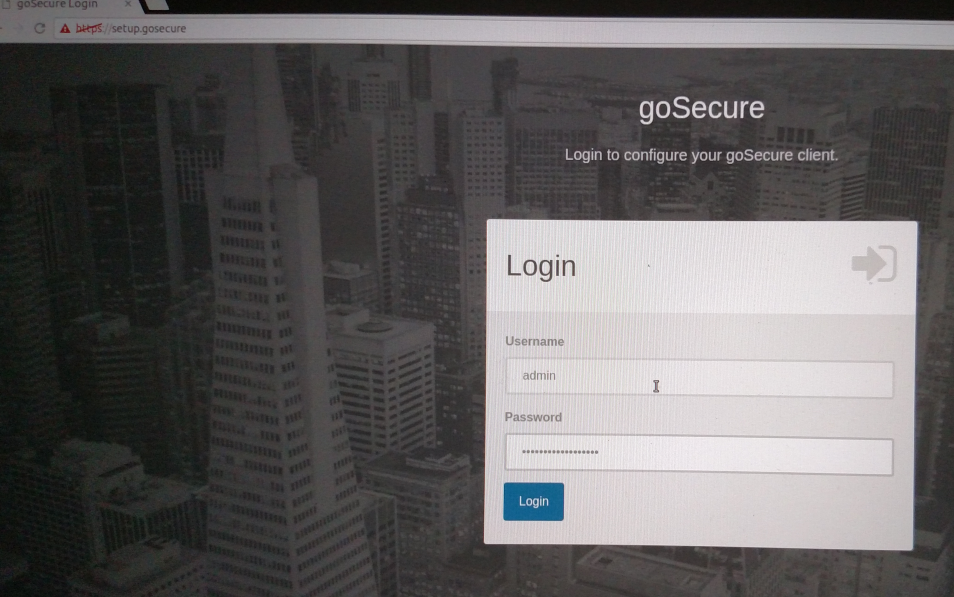
- Open a web browser and navigate to “https://setup.gosecure“
- Follow the instructions on the web page that appears. The default login username is “admin” and the password is “gosecure”. You will be prompted to change them once you login.
- The next page will prompt you for the local wireless network. I carry a small monitor if I need to accept a terms of service page for Wi-Fi access.
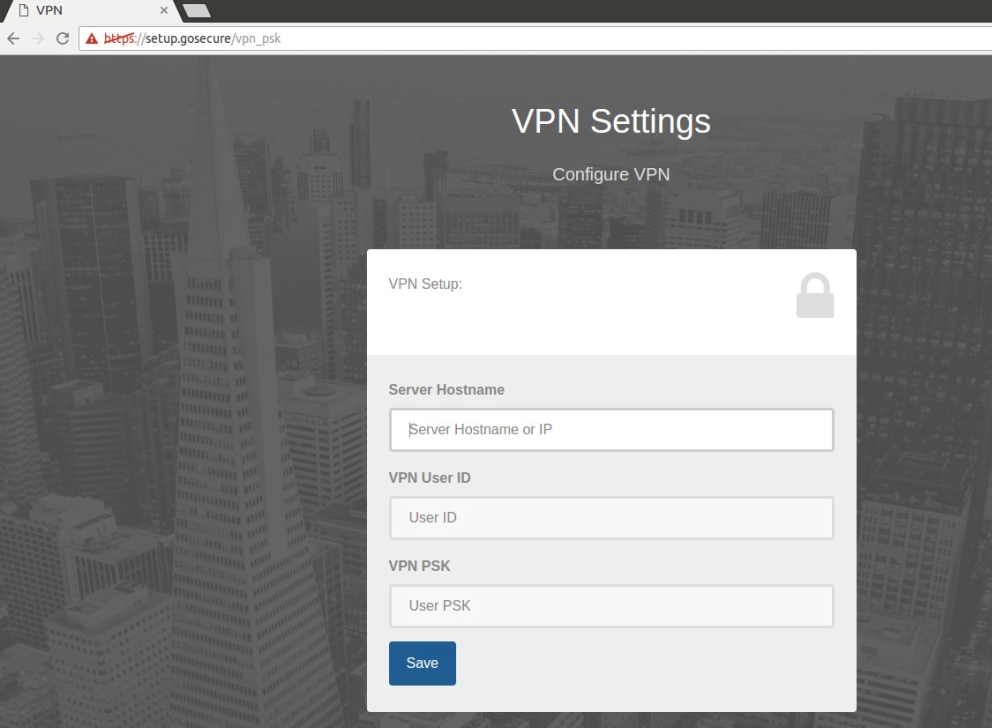
- The next page will prompt you for the destination VPN server; your previously acquired VPS IP address and the credentials used in the server_install.py command. Like those from earlier: [email protected] longpasswordforuse
- Everything should turn green and you should confirm you are cloaked behind your VPS IP.
Troubleshooting Page Unavailable:
- If you cannot access the site, can you ping 192.168.50.1?
- Did you receive an IP address on the 192.168.50.x network?
- Does a route -n command at a terminal on the Pi produce a valid default gateway or all zeroes route? 0.0.0.0 192.168.1.1 – if not, run a sudo route add default gw <gatewayIP> command in the same terminal
Finally, a normal use case:
- Plug in the Ethernet cable from the goSecure Client to your laptop
- Plug in the USB cable to the goSecure Client to the device
- Wait 60 seconds. I use the portable monitor here to accept the Wi-Fi network’s terms of service on the Pi. My laptop is wired to the Pi and it becomes my router/gateway/cloaker

4. Login to the goSecure client gui at https://setup.gosecure from laptop
5. Configure your VPS IP in the VPN field, and your pre-configured username and password
6. Magical time, great success!

You are cloaked and should be buried behind your VPS’ IP address when browsing the internet. Take another step, create a new local port hiding an SSH tunnel outbound and add another layer of obscurity with this:
hyperion@tau-ceti:~$ ssh -D 3333 -f -C -q -N -p 8415 [email protected] ### consider this server another layer of obfuscation
hyperion@tau-ceti:~$ google-chrome --proxy-server="socks://localhost:3333" ### socks proxy for the win!
Thanks for reading. Have fun. Be safe.
Want to learn more mad skills from the person who wrote this blog?
Check out these classes from Jordan and Kent:
Assumed Compromise – A Methodology with Detections and Microsoft Sentinel
Available live/virtual and on-demand!

josh roza
July 10, 2017 @ 11:05 am
I have followed your steps and those listed by IAD and for some reason, I can’t get the server and client to connect. I have a hosted server at Vultr (Centos 7 64) and my Pi connected to my computer. I can validate connection to the Rpi. I can SSH from the Pi to my server, but my computer can surf unsecured and the VPN won’t connect. is there a step Im missing?