
What’s Changed in Recon-ng 5.x
Brian King //
Recon-ng had a major update in June 2019, from 4.9.6 to 5.0.0. This post is meant to help with the adjustment by providing a cheat sheet for common commands and mapping of some old syntax to the new syntax.
If you’re at all like me, you’ll assume that what you know from the 4.x version will help you get up to speed on 5.x. And you’ll be wrong. If you instead treat Recon-ng 5.x as if it’s a completely new tool, you’ll be fine. Forget what you know about the 4.x version.
Visit the Recon-ng wiki on GitHub. Read the whole “Getting Started” section and maybe join the Slack workspace it mentions at the end. Read the whole “Features” section. The “Troubleshooting” section is also helpful and very short. The “Intro to Recon-ng v5” screencast on the “Videos” section is also worth the time. Go slowly at first and take notes for yourself.
The major differences in Recon-ng 5.x involve:
- Moving from BitBucket to GitHub
- Updating to Python 3 (Python 3.6 is now the minimum requirement)
- Moving the modules into a separately-managed “marketplace”
- Modifying the syntax of some commands
- Manually adding seed data to the database is now done by “db insert [your_item_type]” instead of “add [your_item_type]”
- Context must be explicitly stated: “modules search …” instead of just “search …” and “options set …” instead of just “set …”
- Everything is case-sensitive and lower-case except for the names of options (both global and per-module) which must be in ALL CAPS.
The actual use of the tool hasn’t changed much, but the initial tasks are different enough that I, for one, felt completely lost. If you have scripts or rc files, those will need to be updated to use the new syntax, too.
The first of those “major differences” above is easy enough: the project is on GitHub now and not BitBucket. If you visit the old BitBucket site, you get the new URL: https://github.com/lanmaster53/recon-ng
The update to Python 3 is even less of an adjustment because it has no effect on how you use the tool. Unless you’re developing Recon-ng modules, you can ignore this architectural change.
Moving all of the modules into a “marketplace” allows modules to be created and maintained separately from the Recon-ng framework itself. This gives two huge and immediate benefits. First, it draws a clear line between what’s the framework’s responsibility and what is handled by any given module. Second, it allows modules to be updated independently from the framework, which means module updates don’t need to be as disruptive as they sometimes used to be. You can learn more about how the marketplace works from the Recon-ng wiki.
As a Recon-ng user, the only thing you need to know about the marketplace is that it exists and that you must “install” modules from there before you can use them. If you do this as part of your initial setup, you can (almost) forget about the separation.
The main point of this article, however, is about adjusting to the new command syntax. The sections below provide a suggested sequence to follow for a new installation and then a cheat sheet to refer to as you use Recon-ng for actual work.
Setup:
Clone the repo, install framework dependencies, install three additional dependencies for the marketplace modules, launch the framework, install the marketplace modules, then add your own API keys. After these steps, you’ll have a functioning Recon-ng installation, ready to use.
- sudo apt update
- sudo apt upgrade
- sudo apt install -y git python3-pip
- git clone https://github.com/lanmaster53/recon-ng.git
- cd recon-ng
- pip3 install -r REQUIREMENTS
- pip3 install PyPDF3 pyaes bs4
First Launch:
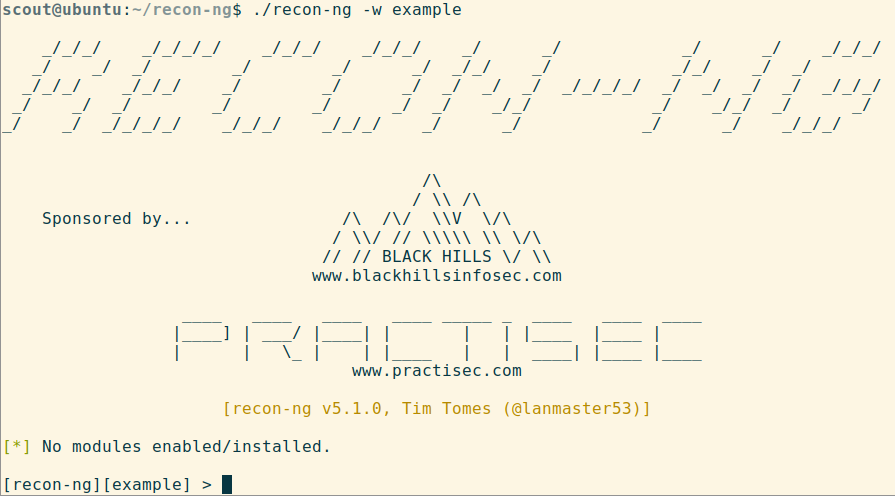
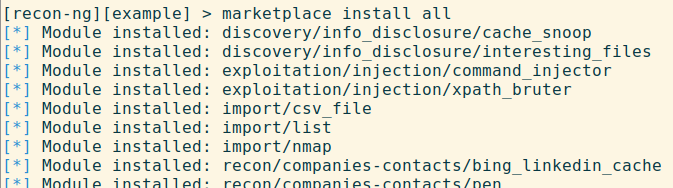
Once that setup is done, start Recon-ng into a new Workspace we’ll call “example,” install the modules, then add your API keys. Installing every marketplace module is simpler than selecting individual modules and installing them each one at a time, but you can do it either way.
The screenshots below show starting up Recon-ng for the first time into a new workspace (after completing the installation tasks listed above) and completing all of the framework setup tasks so it’s ready to use.

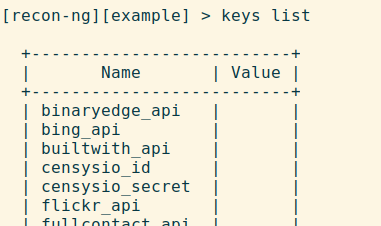
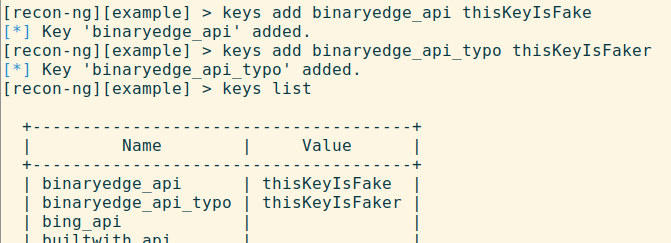
Notice that the list of expected key names doesn’t populate until you install the modules. If you run “keys list” before installing anything, you’ll get no output. You can still add keys, you just have to know the proper name for each one when you do.
Also notice that if you misspell the name of the key when you add it, the framework will accept it as you typed it. This is one way in which the framework can better handle new API keys, but the side-effect is that if you make a typo when you add a key, you’ll get no error, but the modules that use your new key will fail when you run them. You’ll get a clear error message then, so it’s easy to recover from, but it’s worth knowing that there’s no validation of the key names here.
Basic Usage:
Next, we’ll look at the global options, add some seed data, and get started on our reconnaissance project.
First, look at the global options to see what they are. Then we’ll change the default timeout to 15 seconds, just to see how to set these.

The names for all of the options (global and per-module) are in all caps. If you try to set them by lower-case, it will fail. But! Tab-completion works and doesn’t care about case. If you type `options set time<tab>` the framework auto-completes it to `options set TIMEOUT` for you.
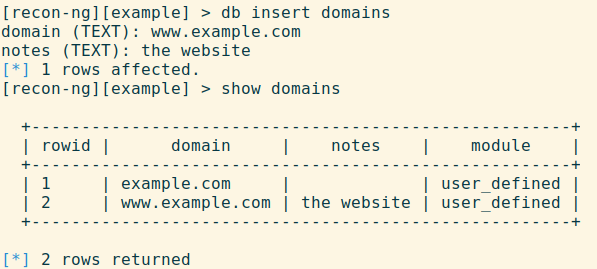
Add Seed Data:


Make Recon-ng tell you the alternate syntax, then use that:
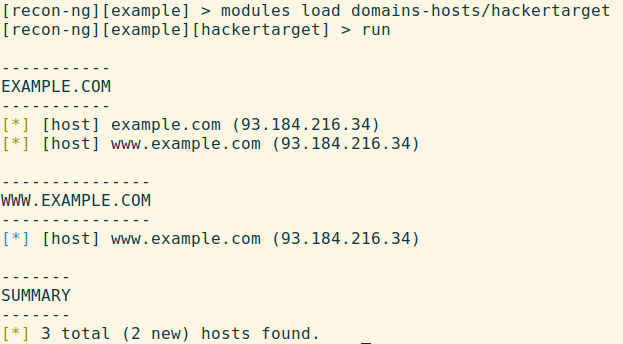
Load and run a module:
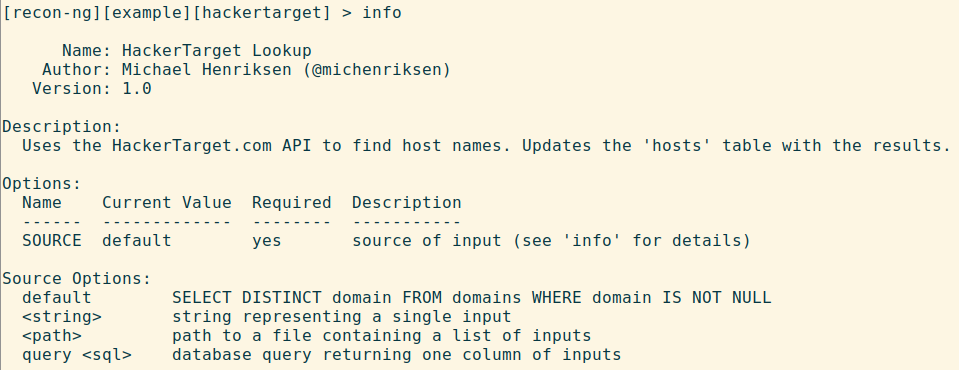
Setting Module Options
The ‘info’ command, while in a module’s context, tells you where the module gets its seed (or ‘source’) data and tells you how you can modify that. Most modules default to reading from the table that’s the first word in the module’s full name. For example, the module ‘domains-hosts/hackertarget’ will start with something that’s already in the ‘domains’ table.
Recon-ng 5.x Cheat Sheet
Once you’ve read the Recon-ng wiki, and are comfortable with how it’s organized, this cheat sheet may be a useful reminder of syntax and workflow.
https://www.blackhillsinfosec.com/wp-content/uploads/2019/11/recon-ng-5.x-cheat-sheet-Sheet1-1.pdf
Where to Go from Here
Now that you have seen how to install Recon-ng 5.x, how to see what modules are available, how to customize their behavior, and how to run them, you should be ready to start a recon project. Keep the cheat sheet close by at first so you don’t get stuck on a syntax issue. Better yet – make a cheat sheet for yourself as you go that only has what you need on it.
Once you have a workflow that suits your needs (creating a workspace, adding seed data, running modules in some sequence that works for you), the next logical step is using resource files to automate it all for you.
A resource file is a text file with Recon-ng commands in it, one per line. The framework will run them as if you’d typed them manually. The ‘script record’ command allows you to record your actions into one of these resource files, and then ‘script execute’ (or the ‘-r’ argument on the command line when you start the framework) will run it for you. You can also make the file manually by just typing it directly.
If you need to keep exact records of your actions while you use Recon-ng, the ‘spool’ command will do just that.
If you need to take a snapshot of the workspace at intervals while you work, look into the ‘snapshots’ command.
After a couple of practice runs, this will all become second-nature. Once you spend some time making resource files that fit your process, Recon-ng will become a wonderful assistant, collecting open-source information for you while you work on other things.
We think BB is pretty cool …but we might be biased.
Why not find out for yourself and take a class with him?
Available live/virtual and on-demand
