
How To Replay RF Signals Using SDR
Ray Felch //
SOFTWARE DEFINED RADIO: RF Signal Replay Techniques
Disclaimer: Be sure to use a faraday bag or cage before transmitting any data so you don’t accidentally break any laws by illegally transmitting on regulated frequencies. Additionally, intercepting and decrypting someone else’s data is illegal, so be careful when researching your traffic.
Preface: Recently, I was invited to collaborate with a few of my colleagues (many thanks to BB King for bringing me into his project) regarding the troubleshooting of an RF signal replay lab.
Although I owned an inexpensive ($20) RTL dongle and the higher-priced ($350) HackRF One device, I did not possess the Yardstick One ($100) dongle being used in BB King’s lab. Furthermore, I was not familiar with a few of the tools (RfCat) and scripts unique to the Yardstick One dongle.
As you might guess, I immediately ordered the Yardstick One and also purchased an inexpensive ($12) wireless doorbell at a local retail store. While waiting for the delivery of the Yardstick, I decided to power up my HackRF One and attempt to capture the doorbell remote’s RF signal and replay it using the HackRF.
Realizing that there are a few different ways to perform RF Signal replay attacks, I decided to document my findings so that others might benefit from what I discovered along the way. Hopefully, armed with this information, the methods can be chosen based upon your needs and the cost, complexity, and versatility of the devices and tools available.
SDR USB Devices:
- RTL-SDR – Inexpensive ($20), Receive only (Frequency range: 500KHz to 1.75GHz)
- Yardstick One – Moderately priced ($100), Receive and Transmit (Frequency range: 300-348MHz, 391-464MHz, and 782-928MHz), Half-Duplex
- HackRF One – Higher priced ($350), Receive and Transmit (Frequency range: 1 MHz and 6 GHz), Half-Duplex
- BladeRF – Higher priced ($420), Receive and Transmit (Frequency range: 47MHz to 6GHz, 61.44MHz sampling rate, and 2×2 MIMO streaming), Full Duplex
RF Signal Replay examples using a wireless doorbell:
FCC search (https://fccid.io/) of the device FCC Identifier results:


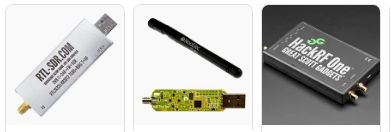
The RTL-SDR – RF Signal receive and capture using Gqrx: (Note: RTL-SDR can not transmit!)

After adjusting the center frequency for optimum gain and clarity (433.89MHz), we can click the “REC” radio button and then press the peripheral remote button and ultimately capture the RF signal burst to a file.
Obviously, we can not transmit this signal due to the limitations of the RTL-SDR dongle, but the captured file could be transmitted by the Yardstick One or the HackRF, providing we convert the .wav file to a raw file that these devices can recognize. For example, the HackRF requires an 8 bit signed IQ raw file with no header information.
In addition to GQRX, there many other SDR GUI applications available such as SDRSharp, SIGINTOS, etc. (for more information see my BHIS blog “Introduction to Software Defined Radio and GSM/LTE”)
The HackRF One – RF Signal replays using simple command lines:
Undoubtedly, one of the quickest ways to replay an RF signal when the signal center frequency is known is using the HackRF tool “hackrf_transfer“.
By providing the required parameters, the HackRF can capture the desired transmission (while pressing the peripherals remote button), and then save the raw data to a file. Additionally, the HackRF can replay (transmit) the raw RF signal in the saved file and thereby invoke the desired peripheral activity without the use of the physical remote.
Unfortunately, although this method is quick and efficient, it is done ‘blindly’ in that little information is known about the signal. It does what it is intended to do, but falls short with regard to exposing possible attack vectors or vulnerabilities.

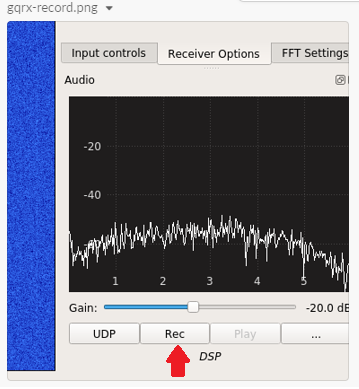
The HackRF One – RF Signal replays using GNURADIO flowgraphs:
Although, not the quickest method of RF signal replays, the HackRF can also be used in conjunction with GNURADIO flow-graphs to capture, save, and replay RF signals. The learning curve to understanding GNURADIO can be quite extensive, however with this complexity comes great power and versatility.
The following screenshots show a previous signal replay project (vehicle FOB replay) that I conducted using GNURADIO flow-graphs (for more detailed information see my BHIS blog “GNU RADIO PRIMER”). As can be seen, the center frequency in this project was 315MHz but the process is the same.

The following shows a File Sink block which saves the captured signal.
The following shows the replay flow-graph (greyed out blocks are disabled).

The Yardstick One – RF Signal replays using RfCat:
Install RFCat and Dependencies (libusb, pyusb)
git clone https://github.com/atlas0fd00m/rfcat.git
cd rfcat/
sudo python setup.py install
cd ../
git clone https://github.com/walac/pyusb.git
cd pyusb/
sudo python setup.py install
easy install pip
pip install libusb
Plug in your device and run the following to verify:
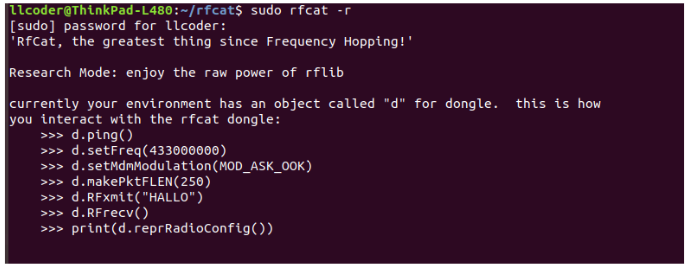
rfcat -r
Verify the installation and dongle detection:
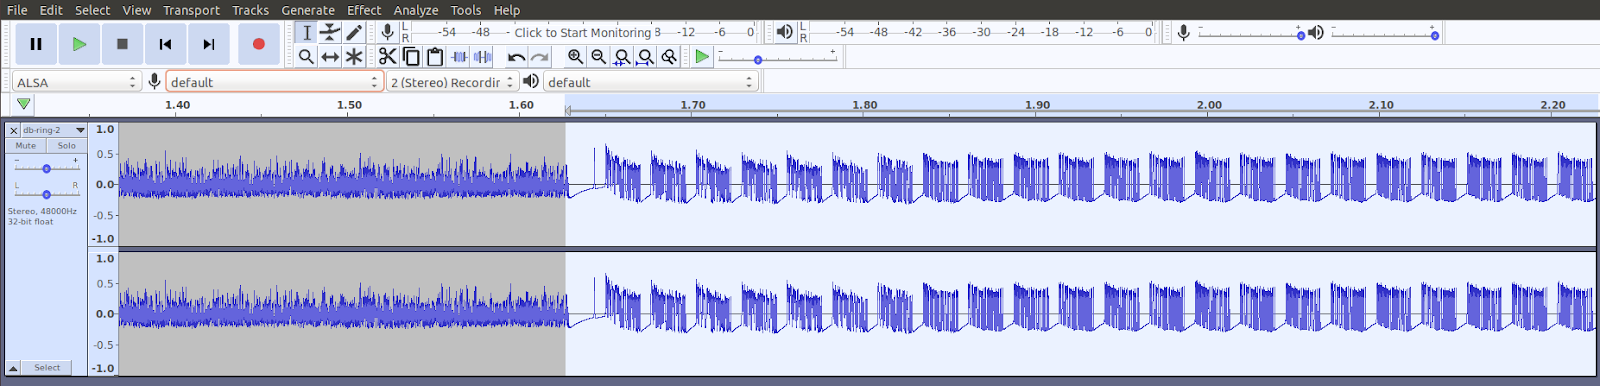
Loading the saved .wav file (which we captured using GQRX) into Audacity, we can quickly identify the transmitted on-off keyed data burst.

Highlighting the transmitted data burst and zooming in, we can see a repeating pattern of smaller bursts.
Zooming in on any of the repeating smaller bursts allows us to identify the actual OOK (on-off keying) PWM (pulse width modulated) data. Short pulses are considered (Mark = 1) and wider pulses are considered (Space = 0).

Decoding the waveform pulses, we get the following digital footprint:

Binary bit-stream:
In order to reproduce the waveform for replay on the Yardstick, each value of the digital footprint pulses need to be encoded using the following bit table:
Footprint value = 0 Encoded bits = 1110
Footprint value = 1 Encoded bits = 1000
Encoded bit-stream:
11101000 11101000 11101110 10001110 11101110 10001000 10001110 10001110 10001110 11101000 11101000 10001000 10000000
In order to replay this bit-stream using the Yardstick One, we need to convert this binary data into hex.
This results in the following hex values: E8 E8 EE 8E EE 88 8E 8E 8E E8 E8 88 80
We then need to precede each hex value with ‘\x’.
Yardstick Replay String = \xE8\xE8\xEE\x8E\xEE\x88\x8E\x8E\x8E\xE8\xE8\x88\x80
(padded with zeros) = \xE8\xE8\xEE\x8E\xEE\x88\x8E\x8E\x8E\xE8\xE8\x88\x80\x00\x00\x00\x00\x00\x00
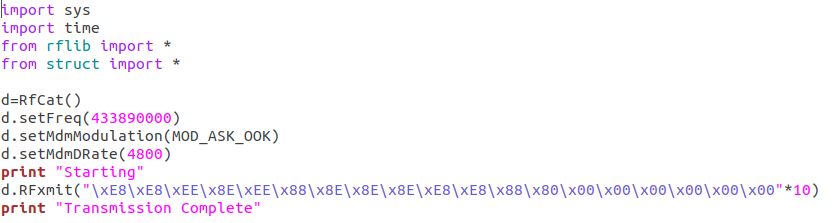
With the Yardstick One installed we can now run a RfCat instance: $ sudo python doorbell.py
(my script doorbell.py)
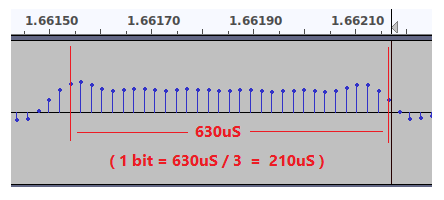
Note: Baud rate is approximated using the equation: baud rate = reciprocal (1/t) where time is the period of 1 bit
Based on the following screenshot, we can see a 3-bit pulse is approximately 630 microseconds in length, dividing by 3 yields a time of 210 microseconds per bit. Using the time of the shortest pulse (210uS) and taking it’s reciprocal gives us the approximate baud rate of 4800.
Executing the doorbell.py script, successfully resulted in ringing the doorbell!
Additional Information:
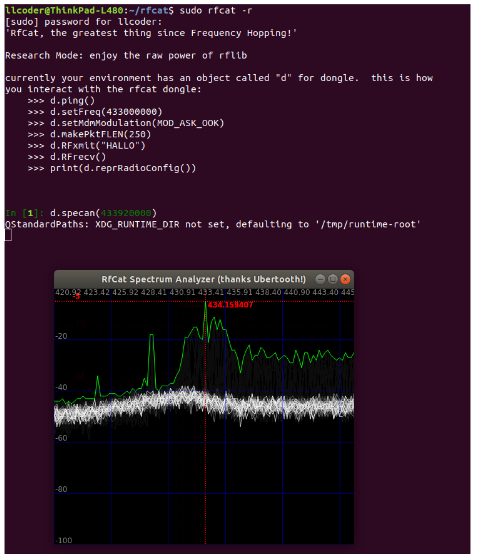
RFCat as a Spectrum Analyzer:
Install Spectrum Analyzer prerequisites:
sudo pip install PySide2
sudo apt-get install ipython
Executing >d.specan(433920000) and pressing remote button
Final Notes:
In an effort to automate the entire replay process (rather than manually entering the hex string in interactive mode), I wrote a short python script to reproduce the digital footprint that was captured by GQRX and which was later analyzed in Audacity.
As was mentioned earlier, encoding of the digital footprint was based solely on the following bit table:
Footprint value = 0 Encoded bits = 1110
Footprint value = 1 Encoded bits = 1000
However, it needs to be mentioned that although I was able to successfully ring the bell, my colleague was unsuccessful running the same script on his hardware. The difference between my captured digital footprint and his is displayed below:

Notice that my footprint begins with a “Space” (encoded 1110). However BB King’s footprint begins with a “Mark”, and by looking at the pulse, it should have been encoded as 0001. Unfortunately, I did not account for that scenario, and my script, therefore, encoded it as 1000 resulting in a fail for BB King’s testing.
To correct for this scenario, I made a modification to the script that checks the first pulse of the digital footprint and encodes the entire footprint according to the following bit-table:
First pulse of footprint = Space (‘0’)
Footprint value = 0 Encoded bits = 1110
Footprint value = 1 Encoded bits = 1000
First pulse of footprint = Mark (‘1’)
Footprint value = 0 Encoded bits = 0111
Footprint value = 1 Encoded bits = 0001
Python code:
Understand that I make no claims on the elegance of my python coding and admittedly threw this together rather quickly at the expense of efficiency and technique. Also, as there is presently no support for the rflib module in python3, so I opted to code it in python 2.7
Inasmuch, you are welcome to use and edit the code to your liking, however, keep in mind that you are also responsible for not breaking any laws by illegally transmitting on regulated frequencies.
import sys
import time
from rflib import *
from struct import *

# User defined parameters
_digital_footprint = "0101001000111010100101111" # My footprint: (short transition from 'space to mark')
#_digital_footprint = "11000111010000" # BB King's footprint: (long transition from 'space to mark')
_frequency = 433890000
_baudrate = 4800
_modulation = "MOD_ASK_OOK"  # Modulation Type (not alterable in this version)
_mult = 3  # Number of times to transmit RF signal
_pad_bytes = 3 # Number of zero bytes for trailing padding
_method = "1" # Time period of 'valley' gap when transitioning from space to mark in footprint:
 # Short period (1 bit time period) : _method = "0"
 # Long period (3 bit time period)  : _method = "1"

# Configure rf_cat
d = RfCat()

d.setFreq(_frequency)
d.setMdmModulation(MOD_ASK_OOK)
d.setMdmDRate(_baudrate)

print "SIGNAL INFORMATION"
print "------------------"
print "Frequency:                 ", _frequency
print "Baud rate:                 ", _baudrate
print "ModulationType:            ", _modulation
print "Repeat transmission count: ", _mult
print "Digital footprint:         ", _digital_footprint

mark_space = str(_digital_footprint)
xmt_stream = ""

# Scan each digital footprint bit (pulse) and convert it to the appropriate 4-bit value
# Mark = 1 (short pulse) and Space = 0 (long pulse)
mark_space = str(_digital_footprint)
xmt_stream = ""

if (_method == "0"): # transitions from space to mark (in footprint) are short (1 bit time period)
 for i in mark_space:

 if (i == "0"): # Space
 _pulse = "1110"

 if (i == "1"): # Mark
 _pulse = "1000"

 xmt_stream = xmt_stream + _pulse

if (_method == "1"): # transitions from space to mark (in footprint) are long (3 bit time period)
 for i in mark_space:

 if (i == "0"): # Space
 _pulse = "0111"

 if (i == "1"): # Mark
 _pulse = "0001"

 xmt_stream = xmt_stream + _pulse

# If length of digital footprint is odd, then pad it with "0000" to make it 8 bits
if (len(_digital_footprint) % 2 != 0):
 xmt_stream = xmt_stream + "0000"

# Pad zeroes for gap length between transmissions
_padding = ""
for i in range(0, _pad_bytes):
 xmt_stream = xmt_stream + "00000000"
 _padding = _padding + "00000000"
print "Trailing padding:          ", _padding

print "RF transmit binary stream: ", xmt_stream

# Convert binary transmit stream to hex equivalent'
hex_xmt_stream = str(('%08X' % int(xmt_stream, 2)))
print "RF transmit hex stream:    ", hex_xmt_stream


mod_xmt_stream = ""
for i in xrange(0, len(hex_xmt_stream), 2):
 ch = "\\x"
 mod_xmt_stream = mod_xmt_stream + (ch + (hex_xmt_stream[i:i+2]))
print "Modified RF hex stream:    ", mod_xmt_stream

# -------------------Send Transmission ----------------------------------------#
print "Starting transmission ..."

hex_data = bytearray.fromhex(hex_xmt_stream)
d.RFxmit(hex_data, repeat = _mult)

d.setModeIDLE()
print " "
print "Transmission Complete"
Follow-up testing:
In my attempt to try and understand why I needed to have two separate bit tables when encoding for two different pieces of hardware (just because one footprint started with a space and one started with mark), I decided to look into it further. I ran a test using my known working digital footprint, but with BB King’s encoding on the assumption that maybe it would work and I could eliminate the need for two bit-tables. It did not work, so I did a deep dive into why not. After careful attention to detail, it became clear where the problem was. The issue was not that my footprint started with a space and his with a mark, the difference was in the period of time transitioning from a space to mark!
Compare the two digital footprints (which I posted earlier):

Analyzing my footprint, the period of time when transitioning from space to mark is 1 bit in length, where BB King’s space to mark transitioning period of time is 3 bits in length.
Based on this knowledge, I again modified my python code to account for this difference when choosing which bit table to use. No longer concerned with whether a footprint begins with a space or mark, I instead looked at the transitioning period and used this information to choose the appropriate bit table. Success!!!
Closing thoughts:
Working with the Yardstick for the first time proved to be a very rewarding experience for me, and having the opportunity to collaborate with BB King, while we simultaneously worked on our own unique hardware, was hugely beneficial to me. It kept me focused and on track, and highly motivated, as well as exposed me to variations that could occur in similar (yet different) test labs.
Also, in my humble opinion, I feel that Michael Ossmann’s Yardstick One (Great Scott Gadgets) is an awesome tool, that’s relatively inexpensive, easy to interact with, yet versatile enough to automate if the need arises. It’s frequency limitations (under 1GHz) is of little concern when capturing and replaying rolling or fixed code devices like vehicle fobs, garage door openers, wireless doorbells, security devices, or just about any wireless RF signal in that frequency range.
Ready to learn more?
Level up your skills with affordable classes from Antisyphon!
Available live/virtual and on-demand
