
Information From Thin Air: Using SDR to Extract DTMF from Radio Waves
Ray Felch //
Disclaimer
When using an FM transmitter, do not modify the intended operation of the module by amplifying the transmitted signal. Also, be sure that attaching an FM high gain antenna will NOT be transmitting outside the legal range for RF emissions. When transmitting any data, be sure you do not accidentally break any laws by illegally transmitting on regulated frequencies. Additionally, intercepting and decrypting someone else’s data is illegal, so be careful when researching your traffic. https://en.wikipedia.org/wiki/ISM_radio_band
Introduction
Recently, I and a few colleagues were asked to put together a hardware lab for an upcoming Infosec conference. After some consideration, it was decided that the lab should be centered around introducing Software Defined Radio (SDR) and some of the tools available for forensic analysis of radio frequency (RF) signals.
It was also suggested that it would be beneficial to provide attendees with the hardware that we used in our lab. This would allow them to revisit the lab in the comfort of their homes, as well as use the hardware for future SDR labs and events.
The intent here is to expose the reader to the exciting world of RF (radio frequency) wireless technologies and to provide the various tools and information to get started exploring some of the great many invisible wireless signals surrounding us everywhere we go.
Preparation for the SDR lab
Hardware requirements:
- Software Defined Radio dongle
- FM transmitter module: https://www.amazon.com/gp/product/B08PVBZB8F
- Audio MP3 Player module: https://www.cytron.io/c-breakout-board/p-standalone-usb-mp3-player-decoder-module
- Micro-SD: (any size)
A good starter SDR (software defined radio) device is the RTL2832U v3
https://www.amazon.com/RTL-SDR-Blog-RTL2832U-Software-Defined/dp/B0129EBDS2/
This inexpensive ($25 – $30) SDR device can be tuned from 500 kHz to 1.7 GHz and has up to 3.2 MHz of instantaneous bandwidth (2.4 MHz stable). This is a receive-only USB dongle (cannot transmit).
Another inexpensive option is the NooElec-NESDR-Nano 2+.
https://www.amazon.com/NooElec-NESDR-Nano-Ultra-Low-Compatible/dp/B01B4L48QU/
The more expensive (yet still affordable) SDR device of choice is unquestionably the HackRF One from Great Scott Gadgets.
https://www.amazon.com/HackRF-Software-Defined-ANT500-Antenna/dp/B01H3T2U7G/
This device can be tuned from 1 MHz to 6 GHz, is a half-duplex transceiver, achieves up to 20 million samples per second, using 8-bit quadrature samples (8-bit I and 8-bit Q), and is compatible with open-source GNU Radio, SDR#, and more.
Also, the HackRF is software-configurable RX and TX gain and baseband filter.
Hardware setup
Software requirements:
Gqrx is an open-source software defined radio (SDR) receiver, with hardware support for RTL-SDR, Airspy, HackRF, BladeRF, USRP, etc., and can operate as an AM/FM/SSB receiver with audio output or as an FFT-only instrument. Gqrx is distributed as a source code package and binaries for Linux and Mac, however, many Linux distributions provide gqrx in their package repositories. (Extracted from csete/gqrx github)

- Gqrx Install gqrx (Linux/Mac) – https://github.com/csete/gqrx
- (optionally) Install SDR# (Sharp) (Windows only) – https://airspy.com/download/
- Audacity – https://www.audacityteam.org/download/ Audacity is a free (open-source) application you can use for recording, editing, and mixing audio.
- FFmpeg – https://ffmpeg.org/download.html FFmpeg is a program designed for command-line-based processing of video and audio files (available on all platforms).
Scope of the lab
For this lab, we will be transmitting DTMF (dual-tone multi-frequency) tones over the air and capturing these signals using an SDR dongle and gqrx application. These distinctive tones represent the buttons pressed on the older landline telephones and should be very recognizable. To continue with our analysis of DTMF, we need a better understanding of what we are looking for (or listening to).
Analyzing the DTMF sequence
The E.161 standard is an ITU-T (International Telecommunications Union) recommendation that defines the arrangement of digits, letters, and symbols on telephone keypads and rotary dials. Button presses result in a combination of two specific frequencies, generated for gaining access to a telephone network. For example, pressing “5” on the dial pad results in the combination of a 1.336KHz (column) and 770Hz (row) multi-frequency tone burst.
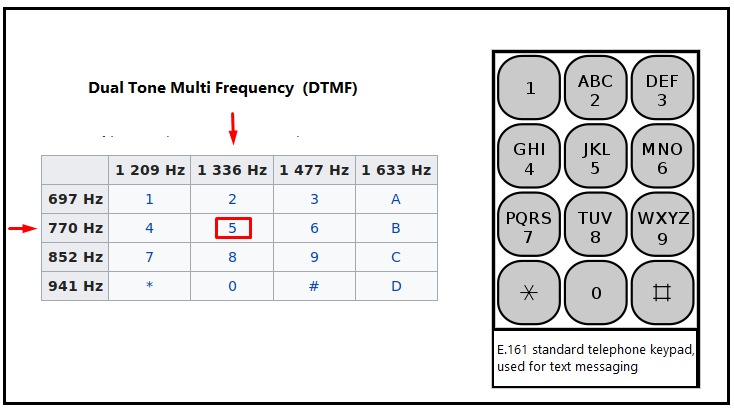
Prior to smartphones, texting was accomplished by tapping the (number) keys on the dial pad of the phone. Tapping the “2” key one time produced the letter “A”, tapping the “2” key twice in succession produced the letter “B”, and so on.
Generate an audio file for transmission
For purpose of this demonstration, we will encode the plain text “sample” to a sequence of DTMF tones.
Following the older convention of SMS texting, we would tap 7777 2 6 7 555 33 on the keypad.
We can use an online site to generate a (WAV format) audio file of the sequence of DTMF tones based upon the plain text “sample”. https://www.audiocheck.net/audiocheck_dtmf.php

For the sake of clarity, we will rename this file “SAMPLE-dtmf.wav”
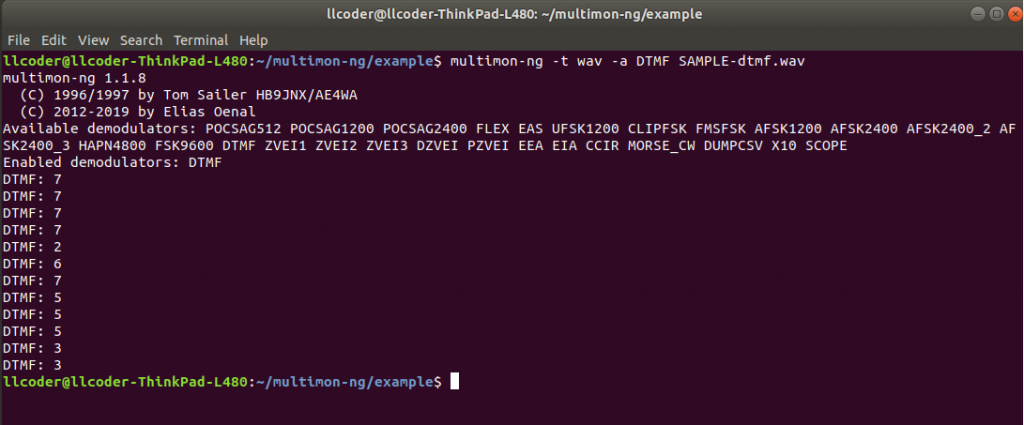
We can verify the contents of this WAV file using a multi-platform tool ‘multimon-ng” (successor of multimon). This is an awesome tool that supports many different demodulators.
git clone https://github.com/EliasOenal/multimon-ng.git
- cd multimon-ng
- mkdir build
- cd build
- cmake ..
- make
- sudo make install
Execute: multimon-ng -t wav -a DTMF SAMPLE-dtmf.wav
Alternatively, we can also use this open-source Linux tool to do the same.
- git clone https://github.com/ribt/dtmf-decoder.git
- cd dtmf-decoder/
- sudo python3 -m pip install -r requirements.txt –upgrade
- chmod +x dtmf.py
- sudo cp dtmf.py /usr/local/bin/dtmf
Execute: dtmf SAMPLE-dtmf.wav

Now that we have created the audio file that we intend to transmit over the air, we need to store it on a micro-SD card. This card will be inserted in our audio player and played in an endless loop for transmission.
Prepare the micro-SD for the audio player
General information
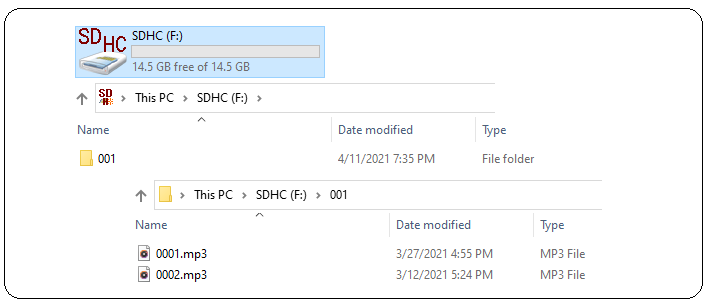
Following the lead of a few Arduino project authors, it appears the standard for placing files on the micro-SD, is to use the following naming convention for folders and files:
- Folders: 001 – 099
- Files: 0001.mp3 – 0255.mp3
Rename the SAMPLE-dtmf.mp3 created earlier to 0001.mp3 and copy it the micro-SD in a folder named 001.
Note: I also created a short 2-second audio file of silence (0002.mp3), to provide a short delay between sequences while looping on the main audio file during testing. You can record a short empty audio file using your favorite audio recorder and rename the file 0002.mp3.
Copy the 0002.mp3 to the same folder as the 0001.mp3 file.
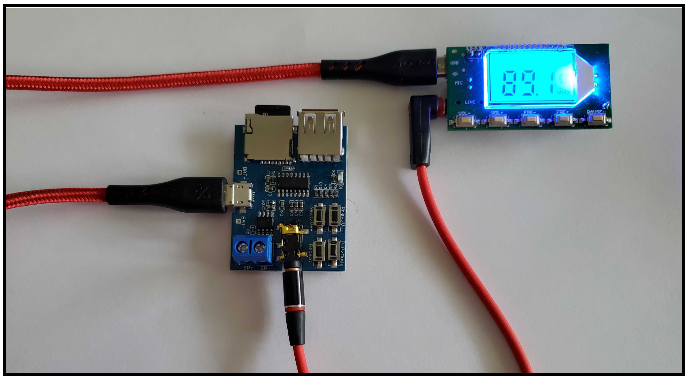
Hardware Lab Setup
- Insert the micro-SD card into the Cytron Audio player module.
- Connect the Audio player line-out to the FM Transmitter module line-in with a 3.5mm stereo audio cable.
- Connect both modules to a USB power source and power up both modules.
- Select the desired frequency to transmit on (preferably a quiet section of the FM spectrum to avoid interference from nearby radio stations).
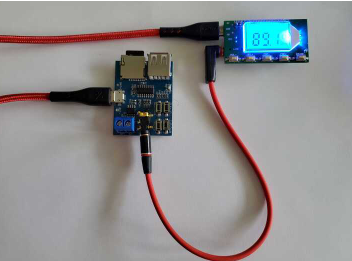
At this point, we are now transmitting our DTMF audio signal over the air, at the specified frequency indicated on the FM transmitter’s display. Note: You could verify the audio file is being transmitted on the selected frequency using any FM radio tuned to that frequency.
Gqrx
We will be using a software defined radio application (gqrx), to capture these DTMF tones and save the resultant demodulated signal to a WAV file for later analysis.
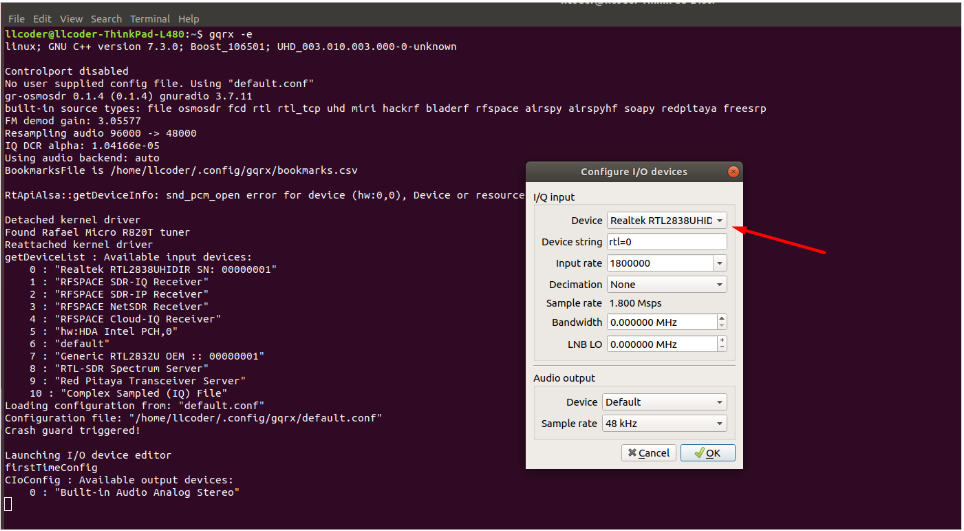
- Insert SDR dongle into an available USB slot on the PC (for this demo it is assumed we are using an RTL-SDR dongle).
- Run gqrx -e (using the -e flag allows you to select rtl-sdr device).
Adjust a few gqrx settings
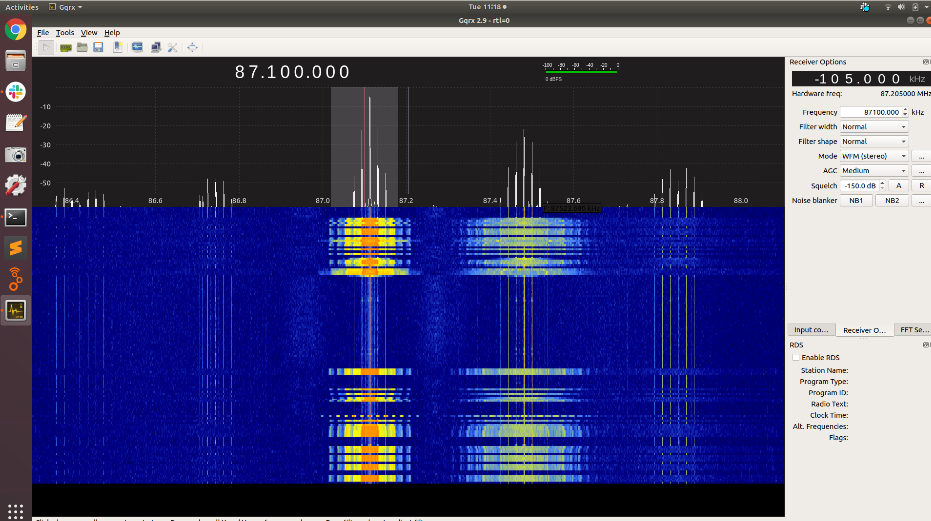
Select the ‘Receiver Options’ tab and set the desired receive frequency (this is the frequency that your FM transmitter module is transmitting on). Also, set the Mode to “WFM stereo” (wide FM stereo).
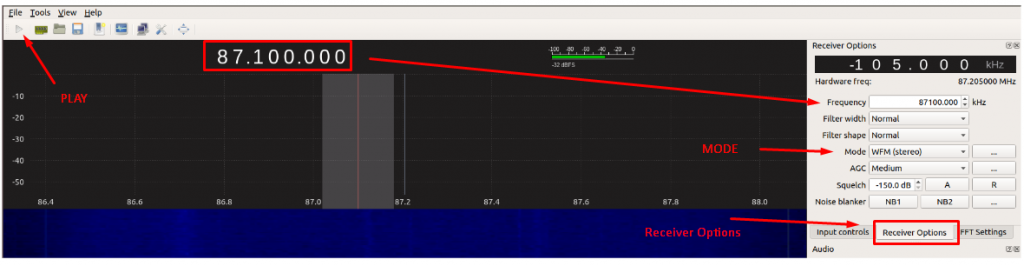
Additional information: In radio engineering, a frequency offset (Receiver Options – top right corner of display) is an intentional slight shift of broadcast radio frequency (RF), to reduce interference with other transmitters. This setting can vary depending upon local RF traffic interference and can be adjusted accordingly.
Ensure the FM transmitter and audio modules are running and click the “play” button in gqrx to begin receiving radio frequency signals. You may see many nearby signals, depending upon your location and the number of radio stations broadcasting in your area. For fun, you can play around with the receive frequency value and try tuning in to your favorite music station. Just be sure to return to the FM transmitter module frequency to continue with the lab.
Upon clicking Play, you will immediately observe the ‘waterfall’ real-time visualization of the demodulated signal containing the audio information. In the case of an FM music station’s broadcast, the audio will, of course, be music, DJ’s narration, commercial advertising, etc. Regarding our hardware lab, the audio will be DTMF tones.
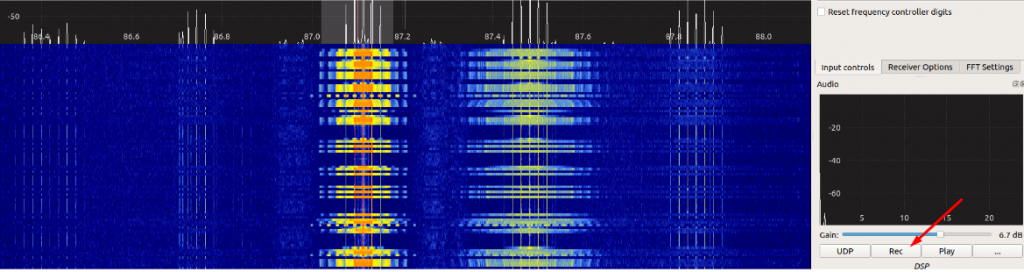
Gqrx also provides the capability to record the (demodulated) audio signal and save it to a file for later playback and analysis. This is accomplished by first selecting the “Input Controls” tab. With the waterfall running (Play mode), click on the REC button to begin recording. When you reach the end of your desired capture, simply click REC again to stop recording.
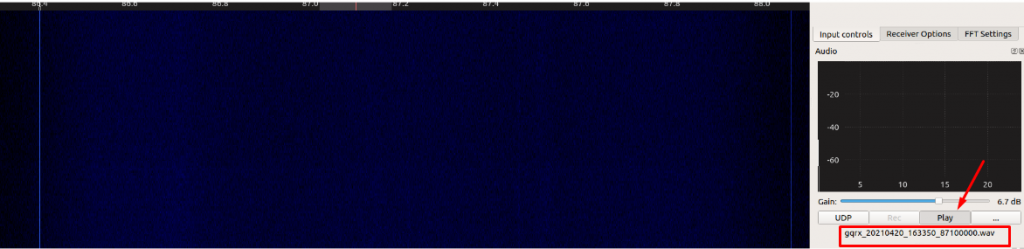
Shut off the FM transmitter / Audio module hardware. The waterfall should stop displaying the audio transmission. In the Input Controls tab, click Play. The recorded audio WAV file will play and can be heard through the PC’s sound port. Notice the WAV file is saved logging the date, time, and received frequency as part of the filename.
If we open the saved gqrx WAV file in Audacity and zoom in, we can see the distinctive multi-frequency components of the DTMF bursts,

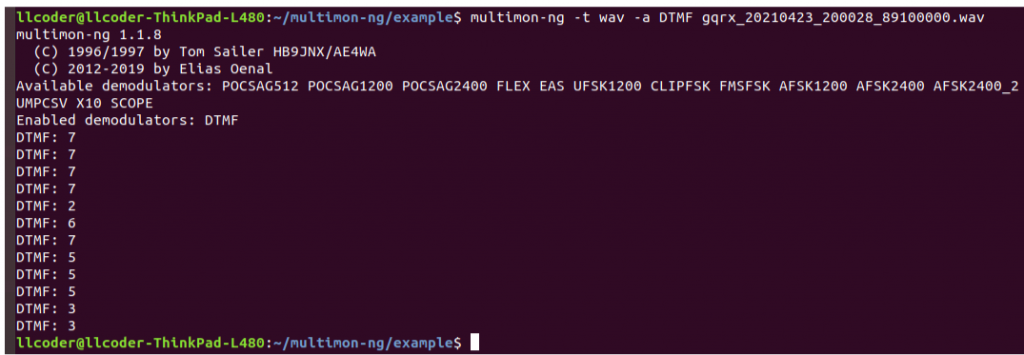
Finally, we can verify our over-the-air capture of the DTMF sequence matches the transmitted audio file we generated earlier, using ‘multimon-ng’
Execute: multimon-ng -t wav -a DTMF gqrx_20210423_200028_89100000.wav
Synopsis
Using the FM transmitter and audio sound module presented in this post, allowed us to simulate signals that would normally have existed outside the FM spectrum. Transmitting the signal using FM radio waves allows us to experiment with software defined radio tools in a controlled environment.
Using the free and open-source tools mentioned in this write-up and the appropriate SDR hardware, analyzing demodulated signals, such as FM (frequency modulated) radio, AM (amplitude modulated) signals, DTMF signals, SSB (single sideband), LSB (lower sideband), USB (upper sideband), Bluetooth communication, garage door opener and doorbell RF frequencies, amateur (ham) radio frequencies, satellite radio and video, etc., are entirely possible.
In the future, we intend on creating more virtual hardware labs that use the hardware presented in this write-up, to capture and analyze other wireless RF protocols. Ideally, we hope to be able to provide links that allow the reader to download pre-configured WAV/MP3 files which can then be saved to the reader’s micro-SD, for localized transmission over the air.
I am looking forward to being involved with this innovative and promising project!
Ready to learn more?
Level up your skills with affordable classes from Antisyphon!
Available live/virtual and on-demand
