
OSINT for Incident Response (Part 1)

Being a digital forensics and incident response consultant is largely about unanswered questions. When we engage with a client, they know something bad happened or is happening, but they are uncertain of the “how, when, where, and why.” A significant component of our job is to tease out the “known knowns,” the “known unknowns,” and effectively and efficiently help the client answer the following:
- Have we been compromised?
- If “yes,” then:
- How long have we been compromised? (“dwell time”)
- What accounts and systems have been impacted?What was the method of compromise? (“patient zero”)
- What data was accessed and/or exfiltrated?
In several recent cases, open-source intelligence (OSINT) has been instrumental in helping to answer these questions.
A compromise usually occurs because something changed, from misconfigurations to zero-day exploits to end-user behaviors, and the avenue of attack is most frequently the internet. OSINT can quickly and easily give us visibility into what the internet knows about the client organization. If the internet knows, the threat actors know, and as incident responders, we need to know!
As a DFIR consultant, an engagement begins with client contact. Based solely on that initial contact, we have some critical data points: the name of the organization, their email domain, and a timeline from which to start. Given a few minutes warning, I’ll engage in OSINT before even joining that initial client call. The following stories are less about the technical “how-to” or the specific tools/portals than about making the point that, whether you are a consultant or an internal resource, OSINT for IR is valuable and should be part of your investigative process.
Case #1: “3 Days from Misconfiguration to Ransomware”
As usual, the call came late Friday afternoon. Ransomware notes spewing from all network-attached printers was a fair indicator that my weekend plans were ruined, but I’m getting ahead of myself! Based on the first touchpoint with the client, I knew their primary TLD (top-level domain) and jumped right into my “5-minute OSINT” routine. First (drum roll please!), my email enumeration secret weapon: “Name Server Lookup” (ba-dum-bum-ching!). Yep, good ‘ol “nslookup.” I just want to enumerate their mail server. Super quick and easy, from Linux or Windows, specify “MX” (Mail Exchanger) record type and a reliable public DNS source (Google DNS in the example below), and mash “Enter!” (about 15 seconds start to finish):
nslookup -type=mx companydomainname.com 8.8.8.8
About 98% of the time (I made that statistic up), I’ll see something like companydomainname-com.protection.outlook.com, indicating they are using M365 for their email. Generally, I want to quickly rule out that they have self-hosted email or be prepared to talk to the client about potential impact to their M365/Azure environments, if indicated. In this specific engagement, the client appeared to have on-prem Microsoft Exchange. From an “attack surface” perspective, this is definitely worth noting! Super valuable? For the <15 seconds invested, worth a quick check, and I’ve gained one potentially valuable clue!
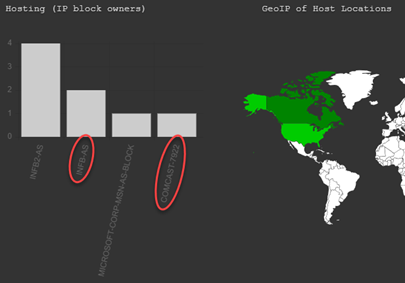
If I know the client engagement is a business email compromise (BEC) case, I might stop there. If not, I’ll cast a bit wider of a net by using their top-level-domain (TLD) to lookup IP address/ranges in use, pivoting to internet “attack surface” search engines. I like DNS Dumpster for this next step because it’s quick, easy to use, and easy to interpret. I’m most interested in “ISP-allocated” IP blocks, e.g. “COMCAST-1234” or “LOCALISP-AS-01,” as opposed to CLOUDFLARENET, MICROSOFT-CORP, etc. Not that I’ll ignore the latter, but self-hosted/on-prem infrastructure seems to be the likelier devil’s playground. And, of course, I’ll take copious notes, screenshots, etc., of everything I learn for future reference (spoiler alert… this is important to this case!): https://dnsdumpster.com
If DNS Dumpster returns a long list of IP blocks, take a hint from the IP listed in the SPF portion of their TXT records for a place to start. If you’re playing along, you may also note that the MX record is listed here in case you want to skip using “nslookup” in the future and jump right to DNS Dumpster!
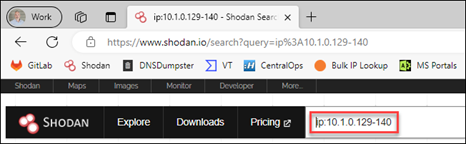
Next, I perused the Host (A) Records within the context of a local ISP, looking for standouts, e.g. “exchange.companydomainname.com” or “remote.companydomainname.com.” In lieu of a standout entry or two, I took a stab at the range of addresses in use by the client, e.g. “10.1.0.128/25” or “10.1.0.129-140” (that’s a private address range, I’m just using it as an example here) and headed to Shodan.io.
If you don’t have a Shodan.io account, then you can’t use search filters, which presents a bit of a challenge. But you can still search for an IP or TLD. Worst-case scenario, you can filter via an alternative, then re-visit Shodan.io with an IP of interest (see options below): https://shodan.io
I used a range, as above, or you can use a “net:10.1.0.128/25” filter. From there, I reviewed ‘TOP PORTS’ for standouts. Common ports like 80 and 443 aren’t very exciting and just go in my notes. I’m more interested in unusual ports or remote-access ports, like 445, 3389, or 22. In this case, I saw two that were noteworthy: 3389 (Remote Desktop Protocol) and what looked like a non-standard web-services port. Next, I clicked on port “3389” to see associated IP addresses, then clicked on an IP for details. It’s important that you check and document the “last seen” dates. Copious notes and screenshots are your friend!
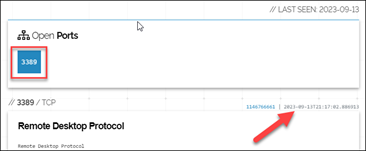
Screenshot of “Open Port” 3389 including Date Last Seen
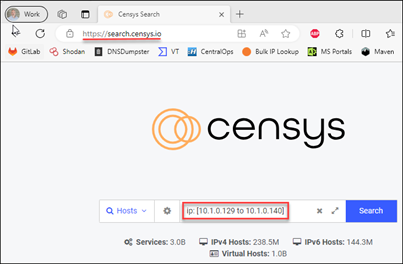
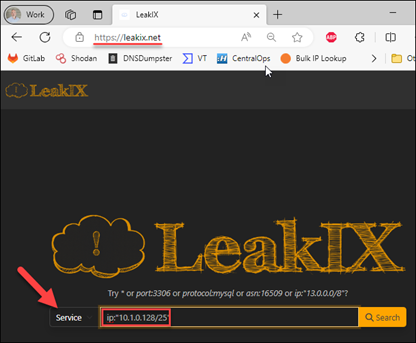
Side note… Shodan.io is certainly not the only “attack surface” search engine option. Even if it is your go-to, I highly recommend having more than one solution (see Case Study #2). Censys and LeakIX are a couple options, both providing search capabilities without registering and a bit more functionality upon free registration:
Censys.io example: https://search.censys.io – ‘ip: [10.1.0.129 to 10.1.0.140]’ or ‘ip: 10.1.0.128/25’
LeakIX.net example: https://leakix.net “Service” – ip:”10.1.0.128/25”
Remember, this is not deep-dive analysis. It should take longer to read this post than to perform the actual queries! I’m just doing a quick “attack surface” gut check. Anything glaring? Anything that might inform further investigation? Document everything for future reference!
Armed with some OSINT perspective, we kicked off the client engagement and were initially consumed with containment and eradication. A couple days into the incident, while doing some event-log analysis, I noted a significant number of “4625” events (indicating failed logon) from public IP sources. According to the client, this should not have been possible, as they had no publicly accessible authentication portals. Additionally, the date/times didn’t line up with what we knew about the current incident. Puzzling, until I revisited my OSINT notes, which indicated “Remote Desktop” was open to the internet on at least one public IP address associated with the client organization. After a quick check with the client network engineers regarding public IP to private IP firewall mapping, we had a specific host to investigate. We pulled a triage collection, noted remote-access software installation at 3:00 AM from an unauthorized account, unwound the timeline from there and found “patient zero” (the initial point of compromise).
As it turns out, a few days prior, the client swapped out their primary firewalls (remember the “something changed” axiom), migrating and modifying previous configurations. The old configuration allowed a single, non-standard port inbound from the internet to a web-application (remember our earlier Shodan.io observations). Somehow in the translation to the new firewalls, that single inbound port “allow” turned into a 1:1 NAT (network address translation) mapping, allowing all ports inbound, including “Remote Desktop” (as we noted via Shodan.io) and “SMB” to the web-application server. Unfortunately, these changes were made by a third party, and the client was not happy about the unintended exposure. They were keenly interested in how we discovered “patient zero,” and specifically about the dates and times that “the internet” became aware of this misconfiguration. Thankfully, I’d grabbed screenshots of my Shodan.io forays, which helped from an external validation perspective, showing “first seen” and “last seen” exposure. As you might imagine, this was instrumental in client-vendor discussions about causality and culpability for this incident!
Finding “patient zero” can be extremely challenging, especially in a large, distributed enterprise, but it is critical to informing the remediation and recovery phases of IR. In this case, given enough time, we would have eventually discovered “patient zero,” but the “5-minute OSINT” routine dramatically reduced time to discovery and provided invaluable context for misconfiguration timelines to the client.
Case #2: “Metadata and a New-Fashioned Bank Robbery”
In the next installment of “OSINT for IR,” we’ll dig a little deeper and unravel a targeted attack against a financial institution. Thanks for reading!
Enjoy what you read?
Then check out Patterson’s webcast released the day as this blog!
Rapid Windows Endpoint Investigations with Velociraptor & KAPE w/ Patterson