Red Teaming: A Story From the Trenches


This article originally featured in the very first issue of our PROMPT# zine — Choose Wisely. You can find that issue (and all the others) here: https://www.blackhillsinfosec.com/prompt-zine/
I remember a day when a customer (now a friend) bragged that the deployed application allowlisting policies at his organization were highly secure, thorough, and well vetted. Naturally, I asked about the process he undertook to create such a thing. My friend replied, “We started by considering all of the Microsoft Windows operating systems and applications to be hostile. Everything was blocked and we built from the ground up.”
I have to say that I was intrigued. How many organizations would live through the pain of application allowlisting on steroids — an approach that blocked everything and then selectively allowed only what is needed, including the operating system itself? For a little context, we have had a relationship with our friend for a number of years. At the start of our customer relationship, this person asked the right questions. In response, we literally posed: “Do you want to take the red pill, or the blue pill?” He chose red and began a program to build some of the most robust defenses that he possibly could.
Zoom forward a few years into this relationship and we graduated to a full-blown red team exercise, as many in our industry would think appropriate. Coming into the red teaming exercise, I and my teammate Ethan had decided that we really wanted to gain physical access to the organization and implant a command channel on the first machine we encountered. We began our preparations in earnest and reached the point of considering what command channel we wanted to implant.
What could we do? There was no possibility of running any binary content, any visual basic scripts, macros, PowerShell, and/or commands on these systems. We knew just how much the program had developed and had been locked down hard. To give a little more context, we are speaking of running our operations in early 2017. A lot of the current application allowlisting bypasses that are fairly widely published now were not really public knowledge.
As I was researching around the internet for application allowlisting bypasses, I came across a few Twitter posts from @subTee and, having encountered some of his materials before, began to get interested in the techniques that were published mostly as GitHub gists. What caught my attention was an attack that leveraged the REGSVR32.EXE binary, which, in turn, would load the Windows scripting runtime DLL named “scrobj.dll” to execute a block of Jscript. This attack became well recognized by the moniker “SquiblyDoo” around that same time period.
From my perspective though, I found the need to fetch a script object from an external resource to be unnecessary, so I decided to modify the attack. I authored some code I later called “WEvade” (I am not good at names) which used the same technique as SquiblyDoo but implemented in a custom DLL that did not attempt to interpret any form of script. Instead, the attack read the required shellcode from a file or web server and directly executed base64-encoded shellcode contained within that file or URL.
After we tested and ensured that the custom malware would successfully evade the antivirus solutions and application allowlisting, we began preparing for our physical incursion! Between Ethan and I, we geared up with a Bash Bunny and a USB stick as backup, just in case the Bash Bunny failed for any reason.
The Bash Bunny is a fun hacker gadget that has a small Debian Linux installation on it, and can present itself as USB storage or a human keyboard interface device for the express delivery of malware payloads!
Finally, the day had arrived for our adventure. Ethan and I nervously pulled up to a parking meter of the street next to the target organization premises. We both had all of the gear in hand, and cellular modems for communications to the command channel infrastructure.
In these situations, there is always that nervous sort of moment when you have the discussion that goes along the lines of, “Ok, who is going to attempt to enter the premises and do the nerve-wracking part of the work?” I managed to convince Ethan to do that part of the exercise, so he grabbed his bag and set out for the lobby. As it turns out, this was a multi-tenant and multi-floor building, so Ethan literally picked someone who looked like and employee that might work at the organization and followed them into the elevator. Later, we discovered that Ethan had actually hitched a ride up the elevator with the company CEO, making small talk all the way up.
Ethan quickly found that getting off at the correct floor allowed him direct access to the organization, so he walked casually into the door and found the nearest computer workstation, immediately whipping out the Bash Bunny and plugging it in. Ethan then discovered that the organization’s policies did not allow human interface-style devices to be connected, so he reverted to a USB storage method. He also had trouble with this mechanism and began getting very nervous, as he was an unknown face messing around with a computer workstation in a pretty open office setting!
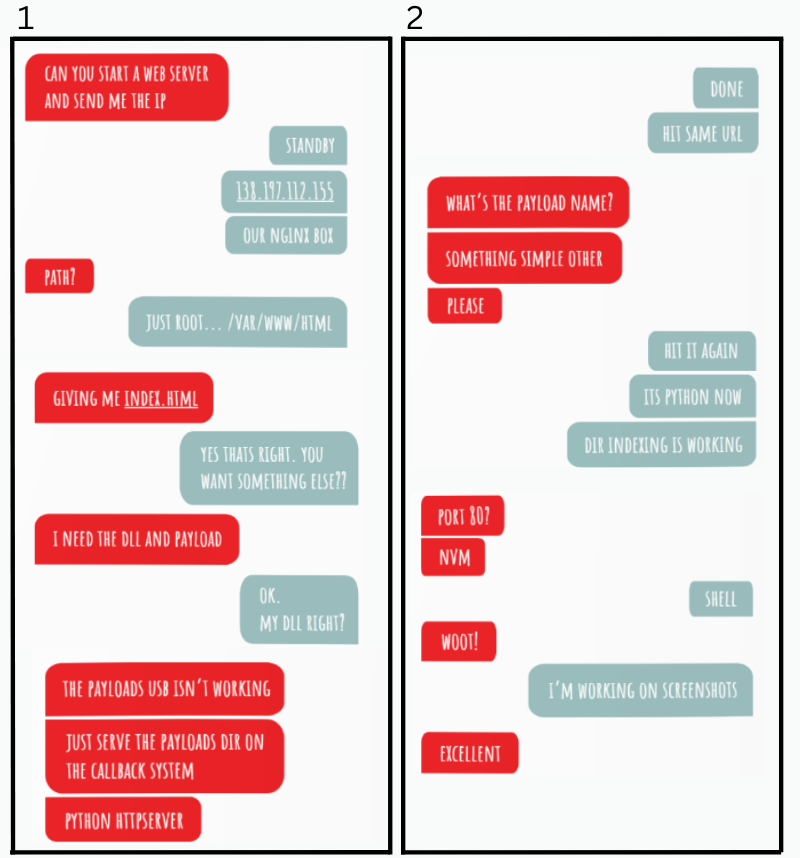
The following SMS transaction between us then transpired whereby Ethan asked me to quickly deploy a web server with the payload files on it. The funniest part of the entire SMS transaction is when I realized that Ethan did not just want a web server, but a web server with the payload files on it. I have been accused of being “too literal” in the past. This time, it was along the lines of anxiety-driven stupidity. See the SMS right here:
Ethan: [It’s] giving me index.html
Joff: Yes that’s right. You want something else??
Ethan definitely must have thought I had either lost my mind completely or was playing a really poorly-timed joke.
It worked! We got a command channel fully operational, and I did my customary “root dance” in the driver seat of my rental vehicle downstairs.
As we later in the day were regaling our success, celebrating mightily that we had bested the application allowlisting deployment, our point of contact and friend told us that he almost succeeded in stopping us.
Of course, we were feeling pretty cocky by that time and asked how that could be possible. I mean, we had won that first hurdle of gaining a foothold! As it so happens, our customer had an interesting solution deployed that detected whenever any USB storage device was connected to one of his workstations. The defense solution had indeed done its job and alerted the system administrator in his office that an unknown USB device had been connected to this workstation.
Being very security conscious, the alerted system administrator made his way upstairs to the workstation cubicle area to find out what was going on. As he was on his way, he needed a quick bathroom break, by which time Ethan had already succeeded and had hightailed his way out of the office pronto! Amusingly, Ethan even ran into the system administrator on his way out, giving quick eye contact and trying to continue looking casual while leaving the scene.
I suppose that the moral of the story is that, “When you gotta go, well, you just gotta go, right?” Who would have known that a penetration tester (aka threat actor) had just run in the door and dropped a malware payload, only to exit stage left and somehow completely avoid revealing his purpose by virtue of lucky timing?! As was also discovered later, it was fortuitous that Ethan even found an unoccupied workstation without the screen being locked. So ends this tale from the Red Teaming trenches where, by a combination of skill and sheer luck, we bested the people, process, and technology literally by seconds, and, of course, had a great deal of fun and laughs afterwards.
You can learn more straight from Joff himself with his classes:
Regular Expressions, Your New Lifestyle
Enterprise Attacker Emulation and C2 Implant Development
Available live/virtual and on-demand!
