
Wrangling the M365 UAL with SOF-ELK and CSV Data (Part 3 of 3)

In part one of “Wrangling the M365 UAL,” we talked about acquiring, parsing, and querying UAL data using PowerShell and SOF-ELK. In part two, we discussed leveraging AWS EC2 for greater flexibility and accessibility for SOF-ELK deployment. Along the way, we learned how to specifically format our exported UAL data for easy, automated ingestion into SOF-ELK, but what if the data you’ve acquired or were provided is not in the proper format? Fortunately, if we have the “AuditData” blob, as part of a CSV export from Purview or PowerShell, we can extract, reformat, and feed it to SOF-ELK for automatic parsing.
We are frequently called to investigate an incident that occurred days, weeks, even months prior and, in many cases, the customer or a third party pulled the UAL data from the M365 Purview (aka Compliance) Portal and provides it for our analysis. Unfortunately, the only export option from Purview is CSV and wrangling the data elements in the CSV via Excel or command-line parsing tools can be extremely onerous. Armed with the information from Wrangling… Part One about the data format SOF-ELK expects, we can take the provided CSV, pull out the “AuditData” blob, change the encoding, and we’re back to efficient parsing and querying via SOF-ELK.
The first thing we need to do is extract the “AuditData” column from our CSV. If you have Excel handy, you can just open the CSV, copy/paste the “AuditData” column (do not include the column title) into a text editor and save it as a text file. Sometimes CSVs can be large and unwieldy, or you may not have Excel, in which case we can turn to “csvtool” to extract the “AuditData” column via command line on Linux.
NOTE: Although our CSV is “comma separated,” the “AuditData” column contains commas, which makes “cutting” on comma delimiter challenging. “Csvtool” handles this nicely.
I’m using WSL (Debian), installing “csvtool” via “sudo apt-get install csvtool”:
$sudo apt-get install csvtoolLet’s test our csvtool command just to validate our CSV column is correct, as sometimes, depending on how the UAL data was exported, the “AuditData” column number may vary. We’re hoping to see the “AuditData” blob in its entirety:
$csvtool col 6 your-csv-ual-data.csv | head -n 2
Column 6 looks correct, so we’ll go ahead and extract all of column 6 to a text file, this time omitting the “AuditData” column heading. In the test above, you may have noticed the standard CSV double-quotes around values containing spaces. We’ll need to remove these to create our SOF-ELK ingestible JSON file, and remove the “AuditData” column heading:
$csvtool col 6 pc-purview-export.csv -o pc-purview-audit-data.csv
$csvtool readable pc-purview-audit-data.csv | sed ‘1d’ pc-purview-audit-data.json
Now we just need to copy the file to our SOF-ELK ingestion directory (changing the IP to match your SOF-ELK system):
$scp pc-purview-audit-data.json [email protected]:/logstash/microsoft365/pc-purview-audit-data.jsonIf everything goes according to plan, you should be able to check to see if your M365 indices show up in Elasticsearch within SOF-ELK. You can do this via SSH and command line or check the web UI:
$sof-elk_clear.py -i list
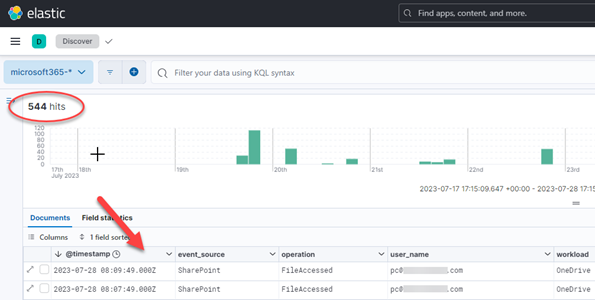
What now? You guessed it: UAL wrangling time! Go back to part one for some pointers or stick around for a couple additional SOF-ELK tidbits!
While I’ve got your attention, I just wanted to point out two quick items of note relative to SOF-ELK: geolocation and updates. Neither is complicated and both are useful.
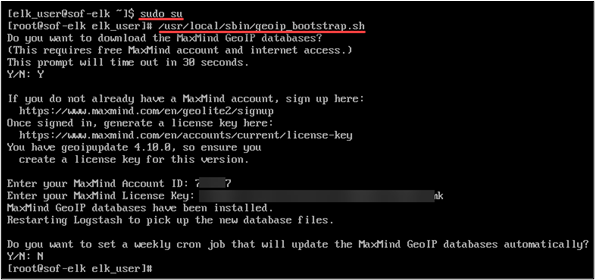
There is MaxMind geolocation data prepopulated in the current version of SOF-ELK, but it is necessarily stale, not useless but not up to date. To remedy this, visit MaxMind and sign-up for a GeoLite2 account (or one of their other commercial solutions): https://www.maxmind.com/en/geolite2/signup. Once you’ve done that, you’ll receive an account ID and can then generate a license key: https://www.maxmind.com/en/accounts/current/license-key. To easily apply this to your SOF-ELK deployment and update the geolocation data, just run the built-in “geoip_bootstrap.sh” script and enter your account info at the prompts. You’ll need to run this as root.
$sudo su
#/usr/local/sbin/geoip_bootstrap.sh
Lastly, to keep your SOF-ELK installation up to date, you can run the built-in “sof-elk_update.sh” script, which must also be run as “root.”
As previously mentioned, we’ve only scratched the surface on SOF-ELK’s utility! When you get a moment, do an “ls /logstash” from your SOF-ELK system and ponder the log-wrangling possibilities (aws, azure, gcp, etc.)!

Until next time, thank you very much for reading!
READ:
Ready to learn more?
Level up your skills with affordable classes from Antisyphon!
Available live/virtual and on-demand
